Showing posts with label projects. Show all posts

Monday, May 16, 2011

Cowgirl Chunky ATC

Suzannes Project PWA RoundUP sm

The Pennywise Arts annual retreats are always a “shoebox party” which means everyone that attends brings the components of a specific project to share and we all move around the room making each project over the course of the weekend.  It’s really a great way to get to try new products and techniques!

This year I decided to share my first chunky atc!  I really like the chunky aspect because it opens so many doors for embellishing.  I also like that it’s something that can stand alone on display rather than get tucked into a collection binder.

I apologize in advance because I’m going to be teasing you just a little by sharing this project.  A couple of the items are brand new and not even on our website yet. 

The focus on my chunky atc is the shaker box window filled with a mix of micro beads.  The window is a clear plastic bubble that comes with a strip of adhesive on the edges.  We just got in a case of many different shapes and sizes of windows and this was my first sample using one.  Several members of our design team are hard at work making samples with them so we’ll have more to share soon.

Inside the window is an image from a new collage sheet created by Michele Aiello-Zendejas of Swing Shift Designs.  I love these sheets and look forward to sharing the western collection with you soon!

Since it’s a perfect fit for the Cowboys and Cowgirls challenge on Gingersnap, I’m sharing this project with the gals over there! Gingersnap Creations Chestnut Theme Challenge - Cowboys and Cowgirls  Check it out for lots of fun wild west inspiration!  (I even recognize an artist or two there as PWA Beadie Buddies!  Ü)

Suzanne

Hugs,  Sheriff Suzanne

Saturday, February 26, 2011

Beaded Love Shadow Box

  Once in awhile I host little “Migraine Parties” at my home.  They were dubbed that about 7 years ago, and the name just stuck.  All it means is that yoBeady LOVEu call in sick to work (possibly with a migraine) and then come over and play for the day.  I love having friends over to craft with me because their energy fills my craft room and the laughter and creativity lingers in the space for days after they’ve gone home.  It’s fabulous!


Last time I had one of these parties, Julie Imsland was over working on her shadowbox – the one that NO ONE wants to win, even though they don’t have to DO anything other than take a picture and send an email …….for shame…but I digress….. 

So, another PWA designer happened to be there that day, I call her Miss Yvonne, but her real name is Yvonne Grimes.  Miss Yvonne was so inspired by Julie’s box that she actually drove HOME to look in her own craft stash and then came back with a box to work on!

Here’s what Miss Yvonne had to say:

“I was inspired by Michele A-Z’s shadowbox and Julie’s $1 spot find to look through my $1 store frame stash and came up with this shadowbox that was perfect for collage images.”

plain box

Beaded Love Shadow Box   By Yvonne Grimes

Materials:

Wood shadowbox frame

Acrylic paint in desired color

Lumiere paint in desired colors

Tim Holtz Grungeboard letters, heart, and flower

PWA Opaque Micro beads in desired colors (I used red and pink from my stash)

PWA Bubble Beads

Assorted seed beads in desired colors

PWA Collage Sheet “Be Mine”

Cardstock (to back collage image)

Handmade or textured paper, contrasting color to paint & beads

Thick foam tape or dots (or layer thin foam tape to desired thickness)

Gold ‘german scrap’ borders

Small dried or other flowers

SureTac Glue

Krylon gold pen


How To:

Paint the entire frame with a base color in acrylic paint. After it dries apply one or two colors of Lumiere paints over the base coat. Apply with an almost dry brush so that you don’t entirely cover the base color. Set aside to dry.

Paint the grungeboard letters, heart, and flower with the same colors.

Apply “bead soup” (Suzanne’s word for it!) to the grungeboard letters and heart after the paint is dry. Apply a thick layer of SureTac glue to each piece of grungeboard. Then drop seed beads, bubble beads, and lastly micro beads onto the glue to entirely cover each piece and then set them aside to dry. (I put mine on a non-stick craft sheet or piece of foil so I can pick the whole thing up and move it.) Once the glue is dry, gently tap off the unstuck beads.

Beaded heart closeup

Use your finger or a dauber to apply a very thin layer of Lumiere paint directly to the grungeboard flower. I used contrasting colors so it would stand out against the frame.

Attach german scrap borders using SureTac glue around the outside of the frame and around the two sections where the collage images will be mounted.

Attach small piece of german scrap border using SureTac glue to bottom of each section where the collage images will be mounted.

Choose your collage images and trim to fit in the desired section of your frame. Mount each collage image onto a piece of cardstock cut slightly smaller than the image to add stability, and use foam tape or dots to mount each collage image into its niche.

Cut pieces of homemade or textured paper to go behind each grungeboard letter and the heart. Outline with gold Krylon pen if desired.

Mount the beaded grungeboard onto the background paper, and use foam tape or dots to mount each letter and the heart into its niche.

Use SureTac glue to attach the grungeboard flower and other flower embellishment onto the frame where desired.

Attach ribbon to the frame hangars.

Beady LOVE

I love to watch how we all inspire one another!  I think I’ll be saving this one to award as blog candy for the blog hop that is coming soon! 

Wednesday, May 12, 2010

Beaded Napkin Cards

Georgias Class Sample Back in the early days of our Pennywise Arts Yahoo Group, we hosted weekly online classes where members shared all kinds of wonderfully beadie ideas with the other community members.  Class nights were something I always looked forward to.  They were special.  The energy around the project, the class, the group,…. it was so electrifying and inspiring!  

There was something about knowing that a group of other crafters were with you in spirit, in real time, at that very moment.  Run into a snafu?  Got a question?  Just ask it at the group site and instant feedback and encouragement could be received.  Additionally there were several funny stories related during classes too,… there was the poor gal who tripped over a power cord and spilled all her beads on the floor, and the lady who who accidentally spilled beads over her husband’s chicken dinner and he ate it anyway, and the ever popular woman who laughed so hard she fell off her chair and had to go to the hospital for an appendectomy,….  Ü  It was one of those “you had to be there” moments.

I have over 273 class files on my home computer.  Yes, that is two HUNDRED and seventy three.  Wowza!!   As I go through my files I plan to share those classes here on the blog and hopefully inspire a reawakening of some really great projects.  Our website archives contain 54 of these classes and I’ll be throwing some of those in as well.

Today I want to feature this easy card by Georgia Wood.  I miss Georgia.  That gal has a most wicked sense of humor!  Talk about witty and fun – time spent with Georgia was never dull!  From her “I hate basketball” hotel room shoebox party in Seattle, to a group “day trip” to Alaska, Georgia never ceased to keep me on my toes.  So fun loving and spontaneous, even “Flat Kat” found herself in unexpected places and pictures whenever Georgia was around!

If you ever happen to be in Roswell, New Mexico attending a wedding ceremony officiated by a very, very  tall alien,…. well, please give Georgia a hug from me!  Ü

Beaded Napkin Cards

Georgias Class Sample

by Georgia Wood

Supply List:
Decorative 2 or 3 ply paper napkins, luncheon or dinner size. Floral or a design/style you like.
Roll of clear plastic wrap, any brand.
Several sheets of white tissue paper.
Cardstock, white or a color to compliment your napkins, cut and folded to card size.
Pennywise Arts brand micro beads, clear unless you want to intensify a napkin color.
For this project you will also need your iron and ironing board. The iron will be used NO steam, so you might want to empty the water prior to class.

Directions:

Step 1
Open and press your decorative napkin. Your ironing board can be your 'work station' for this project.

MVC-001S

Step 2
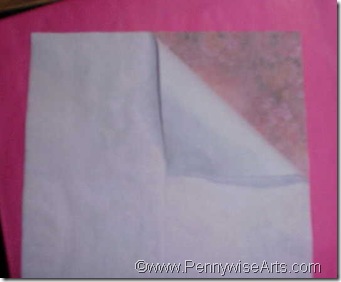
Peel away the extra layers of the napkin, you will only use the decorative layer on the card. You can use the excess layers to protect your ironing board.
MVC-002S

Step 3
Place your blank folded card on the piece of tissue paper. Lay the napkin over the card and move it around until you find a positioning that pleases you.

MVC-003S

Step 4
Trim the napkin but make sure there is enough 'margin' to allow for slippage.  As you can 'rough trim'  the napkin, it is not necessary to pick it up. You can do the trimming with it laying in position on your folded cardstock.

MVC-004S 

Step 5
Place a piece of plastic wrap between the napkin and the card.

MVC-005S 

Step 6
Lay a piece of tissue paper over the napkin. I used the excess layers of the napkin as tissue paper.

 MVC-007S
Step 7
Press firmly on the iron. You want the heat to go through the protective tissue paper, the decorative napkin layer,  and fuse the plastic wrap to both the decorative napkin and the card.

MVC-008S

 Step 8
Pressing over, let it set a minute before handling.

MVC-009S 
Step 9
Now that it's cool and bonded, you can pick the entire unit up for trimming.

MVC-010S 
Step 10
Turn the unit over so you will be looking at the back of the card while trimming.

MVC-011S 
Step 11
Trim all the excess layers at one time, following the edge of the back side of the folded card.   Use scissors that do not have any tape or other residue gummed to them! You will be removing 4 excess layers of material at one time.

MVC-012S 
Step 12
Your basic card is now finished. On to beading it!

 MVC-013S
Step 13
Stamp a sentiment if desired.

MVC-014S

This tutorial was a wonderful walk down memory lane for me.  I even recall that we hosted a huge napkin swap on the PWA Yahoo Group after this class so that we would all have tons of new napkins to create with!

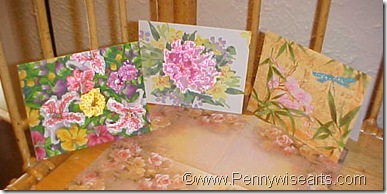
Here are some cards made by several of our members at the time!


Evelyn Spikes 


Diane Martin aka Fly Di


Darlene LeMar


Glenna Schuchman


Diane Martin aka Fly Di


Kim


Kim


Jean Marchand


Pam Fuda


Janeen DeGeorge


Diane Raschal aka Inky Di


Suzanne's Cherries sm

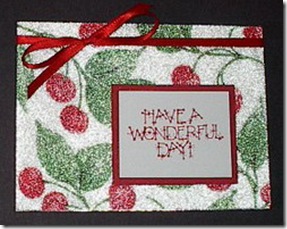
For the Beaded Cherry card that was created by Suzanne Glazier:   Cover the entire card front with O'So Sticky Tape from and peel off the top liner.  Add the stamped sentiment bordered in red paper and then press the entire card face down into clear micro bead.  Complete with a red ribbon and bow!

Stamp Credit:  Close To My Heart

Thursday, May 6, 2010

Wildest Of Dreams

In my wildest dreams I could not have imagined what awaited me at the 7th PWA annual retreat! 

BornToBeadWild Just when I think I’ve seen it all, a whole new breed of fun finds it’s way through the jungle of my life and once again I find myself laughing so hard my sides hurt.  Smiling out loud, I mean really loud.  Sleeping as little as possible (so as not to miss anything good!)  Eating way too much (Blame Yvonne and Leola!) and even singing at the top of my lungs to the Mama Mia soundtrack with 13 other ladies and one lip syncer (You know who you are D*b!)  Okay, okay, okay, I know that this wasn’t everyone’s favorite moment, but it was one of mine, most definitely! Ü

So many inside jokes, scary stories and silly moments bonded our group together in a unique and special way.  I like to think that everyone got exactly what they needed that weekend, and a little bit more than what they expected.  I know I did!

I am in the process of editing the photos to upload and share but for now here are a few teasers……..

Brian hooked up his trailer and loaded all of our goodies inside… everything fit no problem!

PWA Transport This is the welcome mat that we put at the front door.  Pretty much sums up the PWA retreat code quite nicely, I think!

Welcome Mat

Here is an aerial view of some of the tables.  Gosh they look so full of fun stuff!!

Arial View

Whenever beadie buds get together there is sure to be some kind of money business!

Monkey Business And if you weren’t addicted to Banangrams before the retreat, you’re sure to be now!

Bananagrams Mmmmmmm………  Leola baked fresh chocolate chip cookies for us!

Fresh Baked Cookies There were “healthy” snacks too…….  Ü

Good Snacks THere is always such interesting trash at these things……..  Ü

Interesting TrashHere is a bottle cap project by Mary Wallace!   (I’ll be posting more of the fun things that were made when more photos are ready to share.)

Marys Bottlecap Project Uh oh!  Who let Marion play with fire?????

Play With Fire Seriously??  I’m telling the truth that we did NOT plan this twins outfit and I wasn’t even aware of it until I got this photo from Susan!  LOL!!  But dang we are cute, don’tcha think?

Suzanne and Yvonne in Lime

Stop back by soon, and I’ll show ya more fun stuff from the PWA 7th Annual Retreat!

Hugs, Suzanne