Saturday, July 14, 2012

Floral Frenzy

Creative Classes In Paper

Presented by Suzanne Glazier of Pennywise Arts

clip_image002

Flower Frenzy

There is nothing imitation about these paper roses!

Incredibly durable and easy to make, it’s a given that students will be addicted to this inexpensive technique in a blink of an eye creating a frenzy of colorful and unique paper flowers!

Using a wide variety of inks we will explore learning several different techniques for dyeing the paper. This will be followed up with stamping ideas for turning these colorful blooms into gift bows or even greeting cards.  Of course there will be micro beads embellishments too!

Students can expect to take home at least 5 completed flowers with supplies to make several more at home.  Price $25   with 5 student minimum.  Allow 2 hours.

Let your favorite stamp stores know you would like to have me come teach, I’d love to see you! 

If you bring a friend to my North Bend, WA studio for a class the 5 student minimum is waived.  This class is not available by mail.

Hugs, Suzanne

Friday, July 13, 2012

Creative Classes In Paper

Presented by Suzanne Glazier of Pennywise Arts

clip_image002

Working from home has fabulous benefits that I don’t take for granted.  Working in my  jammies is definitely a top favorite.  There are also drawbacks though.  #1 drawback is that super social me is spending way too much time alone working at the computer.  It’s high time to get back out in the “field”!  home office

So, with that goal in mind I’ve been pulling together my class write ups and project samples in hopes of getting on a schedule or  two (or ten!) at some of my favorite local stamp stores.  Being in class with creative people feeds my heart and soul and I’ve missed it!

I’ll be posting all of the current classes available here on the blog.   If you see something you like and you’re local to the Pacific Northwest, please let your favorite stores know!  I’m also available for private classes at your place or mine.  If you aren’t local, you can still partake – I will be offering many of the class kits for sale so you won’t feel left out.   :)

Hope to see lots of you real soon!

Hugs, Suzanne

Thursday, July 12, 2012

Rainbow Beads

First mobile post attempt..... When I spend a little time getting beneath the surface of my craft room I am always amazed at what I find and it often compels me to go deeper yet for more possibilities and art inspiration.  Just getting my beads organized in baby food jars on a shelf was super satisfying project.  No more digging in bins and sifting for the right colors.  I can easily see everything I need now!  Right now I just need to keep looking at the beauty of the thing.  :)


Wednesday, July 11, 2012

Sweeet Friend

Clear micro beads are so doggone difficult to photograph!  If I use a flash they reflect back and all you see is a bright spot and if I don’t flash then sometimes the beads don’t show at all.  Good thing YOU have a great imagination!  For instance, imagine that this cupcake is sparkly and textured with ultra fine clear micro beads.  Actually, it is!

Sweet Friend PWA designer Jean Sunderman created this “sweet” card with lots of pretty paper layers.  To bead an image (like this cupcake) all you need to do is stamp the image onto the paper side of O’So Sticky Tape and cut out.  Then place the O’So sticker directly over the image and dip into clear micro beads.  It’s just that quick and just that easy.

When choosing what size clear beads to use it’s important to take into account how detailed the image being beaded is.  Something with very fine or light lines and features will probably look best with ultra fine beads.  If the image is big and bold you can get more sparkly and distortion with the regular size (.5mm) micro beads.  If you just aren’t sure then go with the mini micro beads, it’s a pretty safe middle of the road size.  :)

Hugs, Suzanne

Sunday, July 8, 2012

Gracias

It’s time to freshen up the artwork displayed in my craft room so I’ve been going through baskets, boxes and bins and finding so many treasures to share with you and to inspire me!  Here’s a sunny thank you card from my friend Miss Yvonne.

gracias

If Yvonne were to have “signature colors” these would definitely be the ones!  And if she were to have a “signature beadnique” this would be it!  First Yvonne covered a piece of Basic Grey “Color Me Silly” swirly paper with O’So Sticky Tape.  Then she printed the text onto acetate and cut it about a half inch smaller than the swirly paper.  The acetate was laid in the middle of the O’So Sticky Tape and clear mini micro beads were pressed into the exposed tape around the edges of the acetate forming a beaded frame.

With the micro beads, Cuttlebug background, scalloped edges, fiber and flowers this card has a lot of fun texture!  Dankeschoen for the Gracias card Miss Yvonne!

Hugs, Suzanne

Friday, June 22, 2012

Metal Embossed Backgrounds

My friend Cathy Varner showed me this easy metal embossing technique and overnight I became totally addicted to it!  Just ask Cathy, I think I texted her a photo of each and every one I made! There is something about  the depth of  texture and shiny surface that just makes me need to make more, and more, and more.

Raven

To start, Cathy cuts up cereal box cardboard and then brushes glue on each piece and wraps it with aluminum foil.   Any glue will do, even Elmer's.  Glue the front of the board and glue the foil flaps that wrap around the back to anchor the foil in place so it won’t slip when embossed. Glue Foil Embossing The cardboard can be cut to any desired size.  For a card front I cut my cardboard to 5.25” by 4” to layer onto the front of a standard 5.5” by 4.25"" card.  Cut first, then glue the foil on. Once the glue is dry the foiled piece can be put into an embossing folder and run through whatever your squishing machine happens to be.  Mine is a Vagabond.

vagabond For my machine I use the Sizzix-Big Shot Pro Accessory  - Solo Platform, Shim and Wafer Thin Die Adapter.  I flip the #2 tab over and through the machine.  Only Tab #1, my two clear cutting mats and the embossing folder go through at one timebase plates folderHere they are all sandwiched and motoring through.

IMG_1919 Each squishing is like magic and I never tire of the process.   I think I have borrowed every embossing folder from friends within a 50 mile radius to do this technique!

IMG_1922 In fact when I ran out of cereal boxes, I discovered that there are many other kinds of the same weight of cardboard that could be gathered from all over the house and used!IMG_1900 

Once they’ve been embossed, these metallic pieces have so much potential.


They can be left shiny or distressed.  I love alcohol inks so that is my go-to for adding color to the pieces. 


This is the card that Cathy gave  to me for inspiration.  Alcohol inks in browns were used with Graphic 45 paper for the focal image.

Cathys Cuttlebug Card

This is my “bubble fish” card using bottle, lettuce and stream alcohol inks for coloring the background.  It has added layers of teal and brown papers.  The image is from a sheet of Graphic 45 paper.  I placed PWA Bubble Beads on the swirls but they really don’t show well in the picture.

Bubblefish Card2 

The raven card above was a collaborative effort with my friend Sarah Payne.  She chose green tones of alcohol ink mixed with butterscotch for the background of the raven.  (An unmounted stamp that might be from Invoke Arts)

The raven piece was layered onto black paper to make it pop out a little bit.  The edges were textured using 1/4” O’So Sticky Tape and Lettuce colored micro beads.  This was then layered onto the embossed background also colored with the green inks.

Whenever in doubt, layer, layer, layer!  This card has a total of six layers.  In my opinion layers always take a card up a notch.

raven2 I hope you’ll give this technique a try – if it brings you half the joy and contentment it has me it’s so worth it!

Hugs, Suzanne

Wednesday, June 20, 2012

Easy Bead Masking

Blooming Friends

Bead masking is a fun “beadnique” using masks made of release paper.  I always save my tape liners so that I have some on hand for just this purpose. 
clip_image002

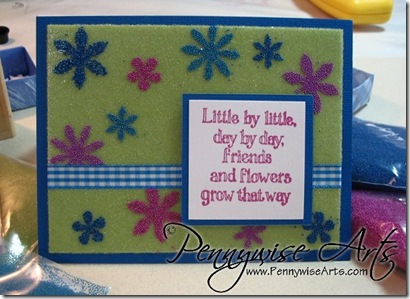
For the “Friendship Grows” card above I used floral shaped punches and the release paper from a sheet of O’So Sticky Tape.  When doing this there are two very simple and important things you need to know before you get started.

a.  Always use the PAPER piece of release paper with punches, not the red liner.  The red liner has rubber in it and does not punch well. 

b.  Another important note is that the release paper has a shiny side and a dull side.  The shiny side will release and the dull will not.  Always put the shiny side against the exposed O’So Sticky so that it will release and not become a permanent part of your design.

Directions:

1.  Create a card  base in desired color. (Example is blue).

2.  Cut a background piece of cardstock 5.25” x 4” to layer on card base. (This one is green).

3.  Cut a sheet of O’So Sticky tape the same size  - 5.25” x 4”

4.  Adhere the  O’So Sticky Tape to the background cardstock following the simple “Tape Trick” instructions:

The secret to applying O’So Sticky Tape  perfectly every time is to peel back just one small corner of the tape sheet and crease it as shown.clip_image002[6]

Next, with the creased side  facing down towards your cardstock base align the O’So Sticky Tape sheet to fit squarely. The creased  flap will keep the O’So from actually touching your paper.

clip_image002[8]

Once the tape is lined up with the base press firmly on the exposed corner to anchor the O’So Sticky in place (see photo at right). Next remove the rest of the liner from the back of the tape and gently smooth it into place as you go.

clip_image002[10]


5.  Remove the top liner from the O’So and lay a piece of ribbon on the card about 2/3 of the way down.

clip_image002[12]


6.  To save a spot for the verse to be added later, place a small piece of cardstock over the ribbon and tape as shown.


clip_image002[14]

7.  Place paper liner flower masks  (shiny side down!) randomly over the remaining areas of the exposed O’so.  Let some flowers hang off the sides and over the ribbon.

clip_image002[16]


Using tweezers to do this part will make it so easy.   A saved red liner works great to press the flower masks down flat onto the O’So.


clip_image002[18]

8. Lay the card in a tidy tray and pour beads over all of the still exposed areas.  Choose a color that somewhat matches the background cardstock or go with clear.   (These are Lettuce Translucent micro beads). 

Press the beads into the O’So to secure and then tap off excess. 

clip_image002[20]


9.   Gently remove mask liners at random and add colored beads as desired. Take care not to tear the masks, they can be used over and over.


clip_image002[22]

I lift several liners off at once and lay the card in a tidy tray, then pour the beads onto the areas that are exposed, press the beads in with my fingers, tap off excess and return them to the bag.

clip_image002[24]


Repeat until all flowers are done.

clip_image002[26]


10.  I stamped my verse on white cardstock and layered that onto blue cardstock.  To make the frame pop I put it on foam tape before placing onto the card.

clip_image002[28]


11.  Secure the ends of the ribbons behind the beaded piece and adhere to card base.


Below is an up close look at the masked bead flowers.  You can see that some stray colored beads are stuck in the background.  I didn’t mind them.  They can be flicked off with a pin if desired.

Blooming Friendscrop

I think it’s true that friendships and flowers have a lot in common.  With a social based company like Pennywise, I get to participate in lots of blooming friendships and I also get to witness friendship blooming in the lives of others when we all get together for events and retreats.  It’s so awesome.  Ü

Hugs, Suzanne