Showing posts with label holiday. Show all posts

Saturday, November 24, 2012

Shop Small For Free Shipping!

Sometimes the little guys have to work extra hard to get your attention.  We don’t have big advertising budgets and many small businesses like us are a one woman show.  So here it is plain and simple.  Shop on our website anytime on Saturday from midnight to midnight and you will automagically get free shipping anywhere in the US with orders of $30 or more! 

frame-blog-SmallBusinessSaturday-t8vstzvw8.jpgFree Shipping


And enjoy free shipping!


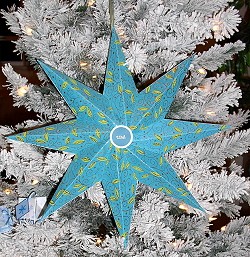
We have lots of wonderful ideas for homemade gifts on our online tutorials page.  My favorite is the 3D Star complete with free templates for three different sizes.  It has a big “wow” factor and can easily be completed in under two hours. Stop by and see what inspires you!

Make your Christmas sparkle with micro beads from Pennywise Arts and support a small shop!

Hugs and Happy Holidays!  Suzanne

Small print: International orders will receive a discount equal to the domestic shipping cost.

Friday, June 15, 2012

One Buck ATC

After creating all of the kits for the Father’s Day room cards I had a bunch of little parts and pieces left over.  I’ll be honest,  one buck2usually I just toss little bits and scraps right into the trash.  However, I had company over.  Someone that is known for rescuing my scraps so I decided instead to make something.

Keeping with the Father’s Day theme I made artist trading cards to swap in the monthly Pennywise Arts community 1-4-1 atc swap.

The deer trophy was created with part of  the “Deer Trio” die from Memory Box.  The head was “mounted” with foam tape on a oval brown background that was covered in O’So Sticky Tape.  The oval was then beaded with brown translucent micro beads and layered on what I thought was the perfect stamp – part of a one dollar bill.

When I showed it to one of my son’s friends he said, “If you made 99 more you’d have a hundred bucks.”  We all laughed out loud!  I thought that might make a cute saying to add to the back for a Father’s Day token.

And if you happen to be swapping on the Pennywise Arts community 1-4-1 atc swap this month you will be getting one of these bucks in the mail soon!

Hugs, Suzanne

Thursday, March 17, 2011

Erin Go Braugh

Erin Go Braugh

Michelle McCarthy used the same texturing technique with this great shamrock card as she did with the hearts one posted here.  So get out your Cuttlebug and texture folders and see what kind of magic YOU can create!

Happy Green Day!

Hugs, Suzanne

Sunday, October 31, 2010

Happy Halloween

Being sick for the whole month of October really didn’t leave much room for blogging but I just HAD to get Chriss Grabb’s spooky creations up for you before the holiday past by!

Halloween is Chriss’s favorite holiday and she loves to create all things bats year round!

This fun banner has been hanging in my kitchen:

Boo

Lot’s of great paper layers with a spider web background stamp and micro beaded letters make up this great decoration.  Oh, and lets not forget the due cut bat dangly!

Chriss also created this great Halloween card: Batty I think this photo showed the sparkly watermark background off very well, but the lavender micro beaded background not so much.  Some things you just gotta see in person!

Thursday, January 21, 2010

My Heart Is Yours

Oh boy, I better get busy!  Valentine’s Day is only 24 days away and I still have GOBS of “love”ly designs I want to share before then!  Here are a couple more cards by Julian Buttenshaw.  Be sure to click on the photos to enlarge the view so you can see the micro beads!  Ü

 DT - Wedding - JulianDT - Wedding - Julian2

Don’t forget to check out our newest Valentine collage sheets too!  Michele has added many new images to inspire you!!

Crazy Love Shaker

Here’s a crazy shaker card that I found in my stash tonight!  I have no idea who made it, but obviously they love to use their scissors!! 

This care is a great example of how unlimited the possibilities really are when making shakers using the free Pennywise Arts templates!  Think outside the box (or the square in this case) and cut the window to be any unique shape you desire.

IMG_4369

If you are the artist of this card, please be sure to contact me so I can give you due credit!!

Postscript:  Thanks so much to Beki Ward for solving our mystery!  She is the artist and the stamps in question are Club Scrap!

Saturday, December 26, 2009

Here Comes Santa Clause!

Oops!  I think I missed this hat in my posting of the fat hats from our swap!

This classic Santa hat was made by CJ Mueller.  Ol’ Saint Nick has been hand stamped and colored and adorned with holly. Ho Ho Ho!

CJ Mueller 1

Friday, December 25, 2009

Julie’s Christmases

Coming up in January, PWA will be spotlighting projects created by designer Julie Imsland.  Julie is a long time “beadie bud” and talented artist hailing from North Bend, WA.  Here are a few of the Christmas cards she has made in past years for our design team…

DT - Julie - Xmas4

Stamp Credits: Paper Inspirations


DT - Julie - Xmas1

Stamp Credits: Rubberstamp Ave.

DT - Julie - Xmas2

Stamp Credits: Rubbermoon

DT - Julie - Xmas3

Tuesday, December 22, 2009

Santa Hat Shaker

Kelli Green used colored plaster to create the amazing texture on this Santa hat.  She crafted a fun shaker card rim with red and clear micro beads over a red snowflake background.  Her hat was finished off with a cluster of holly leaves and berries.

Kelli Green 2

Ho! Ho! Ho!

This festive hat was made by Karen Slusher and comes packed with lots of added details!  A mixture of  micro beads  and 1/4” O’So Sticky Tape stripes add texture to the wallpaper effect in the background.  A three dimensional sticker has been layered and embellished with Stickles and fun red pom poms border the hat’s brim.  Karen also added red stickles to the snowmen bordering the bottom edge to create glittery hearts.  A large pom finishes off the hat and was created from crumpled paper, a silk flower and a fancy brad.

Karen Slusher 1

Holly Jolly Santa Hat

Tracy Mathia 1

Tracy Mathia’s Santa hat has by far the fattest cotton balls I have ever seen!  Her background has lots of texture happening with embossed patterned paper and a glitter embossed “Merry Christmas” over the top of it.  Tracy then added red micro bead holly berries and she used her signature micro bead fabric technique to create the holly from O’So Sticky Tape that has been cut and beaded on both sides. 

Lady Chat Got Plastered!

This self titled fat hat was made by Melissa Ragsdill, also known as Lady Chat in the PWA Yahoo Group.  She used plaster to create the texture of the background which doubled as adhesive to hold a whole lotta clear micro beads to the brim.  A wide sparkly ribbon creates the perfect trim and a really, really fat squishy “something” with a peppermint candy image in the middle is the final, fun touch. 

Melissa Ragsdill

Monday, December 21, 2009

Heartful Snowman

Karen Slusher 2

Karen Slusher added her unique and classic style to the creation of this snowman with hidden features.  Paint and stamps start it all off in the background while hand punched snowflakes and Stickles take the stage to create the face and icicles on the hat.  The arms are ornament hangers and the vest is cut from patterned paper.  Not shown in this photo is the surprise inside when one discovers that the vest actually opens up and underneath is a large crystal snowflake heart!

Snow Angel

Julie Imsland 1 One of two snowmen in the Pennywise Arts fat book swap came from PWA designer Julie Imsland.  Julie was super creative in making her snowman into an angel and here’s how she did it…  The snowman body is covered in three white felt circles which have been aptly adorned with the basic snowman outfit of eyes, nose, scarf and heart.  (Everyone knows that snowmen have hearts!)  To keep her man’s head warm Julie created a hat from an old tube sock (clean of course!)  The wings were made from scalloped chipboard that she found at Michael’s last summer.  She cut each board in half to get the shape shown.  Painted white and run through her Cuttlebug, Julie added embossed snowflake texture to the background of the wings before rubber stamping snowflakes over the top with gold ink and adding them to the back of the snowman to create her warm hearted snow angel.

Let The Angels Sing

Our only angel in the holiday fat book came from Jennifer Toussaint.  Her heavenly design consists of a neat crackly background with lots of white feathers, beaded trim, crystals and comes with it’s own set of musical instruments.

Jennifer Toussaint 2

Sunday, December 20, 2009

Another Marvelous Mitten

Lynn Lake created a fuzzy blue mitten with felt cuff adorned with chilly snowflakes and a warm cup of cocoa.  “Tis the Season” don’t cha know!

Lynn Lake 1

And More Marvelous Mittens

This marvelous mitten was created by Julie Imsland.  To truly appreciate this creation you’ll want to be sure and click on the photo for a larger version.  Julie has used an assortment of patterned paper as well as hand held punches to create this fun design.  Behind some of the punched out patterns she has used O’So Sticky Tape and micro beaded it.

Julie Imsland 2

Monday, November 30, 2009

Operation Organized!

Designer Dee Moran has created a fun and functional shopping planner that will help keep you organized and stylish while you’re out trying to conquer the task of acquiring all of those Christmas gifts and goodies.

pic 1With a notepad for making lists, and a filing system for coupons or receipts as well as a matching micro bead embellished pen you will be all set to hit the mall and get what you need for everyone on your shopping list.

Supplies needed to make one for yourself:

Elastic: 1/4” x 8” (1 piece)

Chipboard: 5.5” x 3.5”(2 pieces), 5.5” x 1” (1 piece)

Paper pad 5.5” x 3” (1 piece)

Patterned paper: 6” x 9.5” (1 piece)

Coordinating  paper 2” x 8” (1 piece)

Coordinating Papers 6.5” x 4” (1 piece) and 8” x 5.25”(1 piece)

Plain colored card stock 6”x 6” (6 pieces)

O’So Sticky Tape 1/8” size

Sharpie marker – color to match the paper

How to do it:

Step 1.  Create the cover:  Glue the chipboard pieces as shown below on to the back of the 6” x 9.5” patterned paper leaving a small gap between them.


layout1 jpg

Miter the corners and glue all edges down to the chipboard .

Step 2 Attach the elastic:  Punch 2 holes on backside of organizer 3/4” up and 3/4” in from each corner.  Color the elastic with colored Sharpie to match paper.  Thread elastic through the holes and adhere on the inside with O’So Sticky Tape.  Note:  You need  some slack in the elastic to have enough room to close the book - so don’t make it too tight.

Here is a photo of the back cover to show how the elastic comes through:

Elastic

Step 3 Finish the cover”  Glue the  8” x 5.25” coordinating paper inside the cover to give it a finished look.

Step 4.  Create the pocket:  Cover the 5.5” x 3” chipboard with 6.5” x 4” coordinating paper.  Apply 1/8” O’ So Sticky Tape to the back side of this piece, as close to the edges as possible to the bottom and outer edge of the pocket. Place this inside of the back cover of the organizer (the side with the elastic on it) to create a pocket for the paper pad to slip into.  When you insert the paper pad it looks like this:

pocket

Step 5.  Create the file pockets:  Take one of the 6” x 6” cardstock pieces and score 1/2” on 2 sides then fold the whole piece in half like this:

scorefold

Cut away two edges like this:

cutscore

Glue the remaining edge flaps to the inside to create a folder.  Repeat four more times for a total of five folders (shown below).

Step 6.  Create file tabs: With the remaining 6” x 6” cardstock, punch or cut five tabs.  Fold and adhere to each pocket.  Label as desired.

Step 7.  Create accordion with files:   Adhere double sided tape to the center of each of the four pockets and attach them together to create an accordion.  Cover the top pocket with patterned paper (2” x 8” strip of paper) and embellish as desired.  Glue the accordion to the inside of the front cover with pockets facing out.  Here is how Dee did hers:

accordian from top coupons

Step 8.  Embellish as desired.


Dee created a faux bound edge with cardstock and faux brads leaving a gap to store her pen:
binding

To create the coordinating pen, Dee took a plain round barrel pen and wrapped it with O’So Sticky Tape.  She then covered it with coordinating patterned paper and embellished the top edge with 1/4” O’So Sticky Tape and micro beads.

pen 

While the instructions may seem lenthy, it’s only because we have a way of over explaining everything to make it easy for you!  Got an hour or two of down time this week?  Whip one up and see for yourself, and then send a photo so we can see it too!  Ü
Sunday, November 15, 2009

And Softly Fell The Silent Snow

Annette Lanker is another talented artist that designs for Pennywise Arts. I’ve had the opportunity to create side by side with Annette on play days and it’s amazing to watch her process. Fearless, free-spirited and unconcerned about the outcome, Annette creates from a deep place of self acceptance and love of all things paper.

In the first card shown Annette used green paper to make the base and she covered the front of the card with two different decorative papers. The creative fold that really makes this card unique is actually a pleat made of two folds. The first diagonal fold takes the cover backwards and the second fold brings it forward again. To keep it in place Annette punched two holes through all of the cover layers and knotted red and kraft colored hemp fibers together on the front.

DT - Annette - Xmas2

Stamped with brown ink in the bottom right corner is a reindeer that has an oval of O’So Sticky Tape over the top of it. The card has been finished with clear micro beads on the tape. The image is hard to see in the photo due to the reflective nature of the clear beads when being photographed.

clip_image002

Last week I went shopping at a large department store and of course the glittery and festive holiday displays caught my eye. I couldn’t help but be drawn in to see what what fun and new things I might find down THOSE aisles. I’ll admit I was even wondering what ideas and inspiration I could “borrow” for my own holiday creations. This year blue and green seem to be the new Christmas colors and Annette’s second card fits right in with the trend.

DT - Annette - Xmas

This top fold card was cut 11” tall by 4.25” wide and folded down. Snowflakes were stamped randomly with VersaMark ink over the blue paper. Basic Grey patterned paper was added to one side with the verse stamped in green. The scallop oval was punched from coordinating patterned paper and Annette created the delicate lacy look by using her 1/8” hole punch inside of each scallop. Slits were then punched on each side of the scallop to feed the blue ribbon through. Annette wrapped the ribbon around to the inside of the card and hid the ends behind the scallop for a finished look.

A micro beaded snowflake was the final touch on this card. Annette punched a snowflake with her QuicKutz and O’So Sticky Paperback Tape. She peeled off one side of the tape liner to add the snowflake to the oval and then removed the top liner to cover the tape with blue translucent micro beads.

When I grow up, I want to be as fearless and free spirited in my artwork as my dear friend Annette is in hers.

Stamp Credits: DeNami, Serendipity Stamps

Wednesday, November 11, 2009

Wonder and Delight

DT - Beki - Xmas

PWA Designer Beki Ward loves to scrapbook all the special moments in her life – especially if the grandkids are involved!  Here she shares a fun holiday layout using Pennywise Arts  micro beads and O’So Sticky Tape™ as a simple striped accent.  (Click on photos to enlarge)

DT - Beki - Xmas2

There really is nothing quite like having little ones around for the holidays.   The anticipation of Santa, the excitement of baking, shopping, wrapping gifts, dreaming, hoping….

As a grown up I love the opportunity to relive it all through the eyes of my nieces and nephews.  In the process I always feel the magic and rediscover the child within myself.