Wednesday, July 20, 2011

Butterflight

carole butterfly

I received this multi layered luscious butterfly card last fall from artist Carole Miller.

“Blinged” to the hilt with swirls, shimmer, glitz and micro beads this is a wonderful example of using PWA beads to fill in the gaps of an intricately die cut shape.

Carole added O’So Sticky Tape to the back of the wings letting the sticky show through the outline.  When dipped into micro beads the area fills in nicely and adds another layer of dimension to the butterfly.

This creation is a jaw dropping wow in person, come on by and see it up close!  ;0)

Hugs, Suzanne

Monday, July 18, 2011

Springtime Tins Better Late Than Never, Right?

Spring Tins by Eunice

Is it July?  For reals?  It sure feels more like springtime here in the Pacific Northwest.  We’ve only had a few peeks at the sunshine in the last couple of months and our vitamin D levels are waning.

My deeeeeeeepest apologies to my dear friend and designer Eunice Creswell for the very, very belated posting of her simply gorgeous springtime tins.  Life happenings coupled with a computer virus sorta knocked me off my game for a bit.

I posted this in the largest size photo that I could because I want you to get a good look at the details!  If you click on the picture it should get even bigger!  Eunice’s punches were clearly happy to be out to play for these because they showed up in a big, big way.  The patience and coordination needed to work with such teeny pieces is admirable.  Of that patience, I am seriously lacking so I extra appreciate it when I see it done well.

The green tin has several layers.  Green grass and a white picket fence are the anchors.  Little white bunnies and colorful micro beaded butterflies frolic in the foreground.  Sweetness is what this tin is, pure sweetness.

The blue tin is a virtual tulip garden with tulips and butterflies making the rounds.  The entire rounds.  Ü  Eunice added texture to the striped ribbon with a strip of O’So Sticky tape and clear micro beads. 

The pink tin is sporting intricately punched white lace with ribbon threaded through.  The butterfly really takes the stage though with it’s delicate wings and rose micro beads.

Eunice’s artwork is always a treat to see.  Her hyper attention to details and finishing touches are what make her so unique.

Monday, June 27, 2011

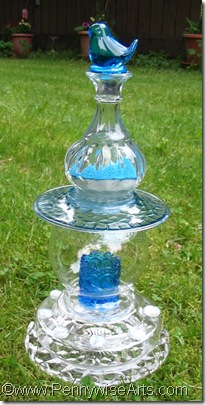
Glass Sculpture

Bird Glass Sculpture

This fun project has been two years in the making, really!  A couple of years ago I was craft show hopping with some friends when we spotted a beautiful cobalt blue glass sculpture displayed as a yard ornament. 

As we discovered that it was all created from various glass items such as a wine bottle, vase, plate, marbles, etc. we all ooh’ed and aaahhh’ed even more.  Surely we could do that!

The best part was that when I wasn’t looking those silly girls bought it for me for my birthday.  I love them so much!

From that day forward we all started collecting interesting pieces of glass to use in our own sculptures some day.  After several false starts, that “some day” came several weeks ago when we all met together with ALL of our collective glass pieces and the sculpting began!

The sculpture shown above was a collaborative effort but I think Julie Imsland and Yvonne Grimes were the key contributors to the design.

The glass is “glued” together with 100% silicone applied liberally.  For items left outside it’s important to seal everything tightly so that water won’t get inside.  (If it does, yucky things grow.)  Because I still have very little hand strength I purchased a Black and Decker power caulking tool for about $35.  It worked out wonderfully!

Inside the vase I put some teal and clear micro beads.  Above you can see them still layered.  At that point in the photo shoot I hadn’t decided for sure if I was going to mix them up or not but then I went for it!Beads In Bird Vase And I’m so glad I did!  This little sculpture stands about 14 inches high and is just too sweet and delicate to decorate the outside.  I’m keeping it inside where I see it every day and where it won’t have to weather the elements!

Included in my sculpture is a glass bird, a vase, a small plate, a bubble vase, a votive holder, white pebble marbles, a weird flat vase (like the kind my grandma floats rose blossoms in) and a heavy plate with scalloped edges and glass feet.  Someone thought it could be Fostoria – don’t tell grandma that I glued that!  ;0)

I really wanted to show you the inspirational cobalt blue piece but the virus on my computer won’t let me have the picture.  :0(

Hugs, Suzanne

Sunday, June 19, 2011

Red, White and Blue SALE!!


While my computer has been offline (ugh virus!) I've been busy cleaning! Cleaning out closets, cupboards and my craft room! Things are starting to feel lighter and less overwhelming and that is a good thing!

In fact, I even carried it over to the Pennywise web "home" and cleaned up quite a bit there too... http://www.pennywisearts.com/index.shtml

Brian helped me combine some of the web pages and we deleted several of the ones that just cluttered up the menu bar so now the home page feels lighter and updated too. What a great feeling!

To celebrate we decided to bring in some fun new products to jazz things up a bit! NEW colors and NEW sizes of beads! And NEW Shake It window pouches for making another fun variety of shaker cards! You gotta see them! http://www.pennywisearts.com/beadables.shtml Be sure to scroll down and see the fun SAMPLES that some of our designers created with them!

Be sure to let me know what you think of the new look and the new stuff!

Since my most favorite holiday of the year is approaching I'm going to have a Red, White and Blue sale!

Shop on the website between now and July 4th and add at least one red, one white and one blue bag of beads to your cart and you will automagically get a FREE bag of Mini Micro Beads in your order! That's a value of $5.25 and FREE! Cool beads!

It doesn't matter if you choose them in opaque or transluscent, there just needs to be one of each color in your cart. If you order two of each color, you'll get two bags of free beads. You might want to go in on an order with a nearby friend and share the shipping cost.

Hugs, Suzanne
http://www.pennywisearts.com/index.shtml

Tuesday, June 7, 2011

Berries Fresh From The Garden

This special project was hand picked by designer Michelle McCarthy.  It might look like a simple crate but just you wait!

Strawberry Box By Michelle Mc

Inside is a fun berry surprise!

Strawberrybox By Michelle Mc

The sides of the box fold down and are embellished with stamped scenes and quotes as well as tags, micro beads, ribbon, fiber and brads.  In the middle of the box is another little box that holds the handmade strawberry boxes. 

IMG_1154 

The micro bead exteriors make the berries look morning fresh picked with a bit of dew still on them.  Yum!

Friday, May 27, 2011

A Trio Of Paper Jewels To Wear

Stephanie Loomis’s embellishment of her paper flowers really makes her jewelry unique.  She uses glass beads, chain, micro beads, wire and charms to complete each piece.  Her three piece set of burgundy and orange is quite amazing.  IMAG0097

My photography however is not quite so amazing.  It really made me sad today when I couldn’t get a picture that truly captured the beauty of this trio.  I’ll keep working at it.  Even though photography isn’t my forte it is a necessary skill for blogging and sharing!

Here is a closer look at the necklace: 

IMAG0088

  And a close up of the coordinating lapel pin:

IMAG0095

Thanks for sharing with us Stephanie! 

And now we want to share the love with our readers!  If you would like a chance to win one of Stephanie’s necklaces  just send me an email that says “Stephanie’s Jewelry Rocks!”  My email address is suzanne@pennywisearts.com

The random drawing will take place next week!

Hugs,  Suzanne

P.S.  If you’re just joining us be sure to look at the last several posts to see how Stephanie made these!

Thursday, May 26, 2011

Foam Flower Wearables

Stephanie also created a pretty necklace with fun foam.  This one was inspired by the paper flower idea she got in a magazine.

IMAG0083


How To Make The Foam Flowers

Supplies: fun foam, die cut machine (Sizzix), black ink (Staz-On by Tsukineko), rubber stamp (sentiment or small pattern. Mine is The Angel Company), white glue, microbeads, mulberry paper

Directions:

1.  Cut flowers from foam.

DSC_5571 

2.  Stamp on flowers.

3.  Discard flower centers

4.  Cut a base for the back side of the flower. (I used a rounded rectangle) 

DSC_5576

5.  Tear mulberry paper into leaf shapes.

6.  Glue leaves onto base. DSC_5578

7.  Glue flower on top of leaves.

8.  Fill flower center with white glue.

9.  Add micro beads.

DSC_5608 

10.  Let dry.


From there the directions are the same as the paper necklace (see previous post)

Necklace:

  1. Decide how the flowers will be clustered.
  2. Glue them to a base of felt or foam.
  3. When dry, trim the base so it doesn't show.
  4. Use a paper piercer to create holes in the base to add jump-rings, wire, and/or ribbon.
  5. Embellish as desired....

Stephanie also created a matching hair clip to complete this fun fashionable artwear.

IMAG0084 

Just wait until you see the NEXT set Stephanie created,….. oh my WOW!

Hugs, Suzanne