Just a quick update for everyone 
Thanks to all who helped make this possible! Your support and patience are so appreciated!
Hugs, Suzanne

Just a quick update for everyone
Thanks to all who helped make this possible! Your support and patience are so appreciated!
Hugs, Suzanne
Here’s another beauty by PWA designer Julie Imsland. As the Pennywise Arts Yahoo Group 1-4-1 ATC swap coordinator Julie is very prolific in her swap creations!

The vintage looking background reminds me of wallpaper that my grandma had in her kitchen. Ü
Hugs, Suzanne
I love this stamp for several reasons. 1. It fits for just about any occasion 2. It’s fun and 3. Every time I use it I think of my sweet friend Debbie W. because she is the one who gave it to me. :)

I put a strip of O’So Sticky Tape across the paper and put ribbon that was slightly smaller on top of it. Then I added micro beads to the edges for a fun textury border and finished it off with a premade cupcake sticker from Jolees.
My original idea was to use the Jolees for inspiration and make my own. Maybe I will. Someday. :)
Hugs, Suzanne

Paperback tape sheets are wonderful for die cutting sticky shapes you'd never want to cut by hand.
O’So Paperback is the exact same tape as our regular sheets and Mega Rolls but it has a white paper liner on both sides which makes cutting with scissors easier and digital die cutting possible. Hand punches also work but expect it to get gummy and have some Goo Gone nearby. Thumb lever punches seem to work the best for me.
Between my Vagabond, Cricut and O’So Sticky Paperback Tape sheets I can get myself into some really amazing artwork that otherwise would never happen! Ü But alas, even my own personal stash is nearly depleted.
If you've been wishing we would bring it back, now is your chance to help make that happen! Place your preorder on our website here:
http://www.pennywisearts.com/adhesives.php
Currently we have a handful of the Mega Rolls in stock - you might want to grab one while you are there!
Hugs,
Suzanne
Creative Classes In Paper Presented by Suzanne Glazier of Pennywise Arts
When this altered cigar box arrived in my mail it took my breath away! PWA designer, Dee Moran’s attention to the details made me want to keep looking and looking to make sure I didn’t miss a thing! My next instinct was to make one! 
And since I think you’ll want to make one too, Dee has given me permission to offer this in a workshop with the possibility of also offering kits by mail. Please let me know if this interests you!
I’ve been able to track down almost all of the components that Dee used with some substitutions that work just as well as the original. Graphic 45 has discontinued the papers that Dee used so the boxes we make in class will be slightly different than the example but not enough to change the overall look and feel of the box.
This is some of the substitute paper we will be using in class:

Here is one side view of Dee’s Box:

Inside the lid Dee put corkboard and decorated push pins (not shown). The box has separate sections for hand stamped note paper, a matching pen, a Post It note pad with an elegant coordinating cover, a pocket for postage stamps, another pocket for labels and some very fun clips! 

This time of year I look at everything with the eye of “does this project have gift potential?” An altered cigar box made into a sweet box for mail supplies is a resounding, “YES”!
Hugs, Suzanne
O’So Sticky Tape Pre-Orders
Due to popular demand we will be ordering TWO of the O'So Sticky Tape products. Mega Rolls and Paperback Sheets.
Please place a pre-order here on our website! The Mega Rolls will be here around September 13th and as soon as we raise enough funds we will be ordering the Paperback Sheets!
Prices may increase once it gets here so pre-order now to save money and insure that there is a roll or two for your holiday crafting needs.

6" Wide by 6 Yard long O'So Sticky Tape Sheet Roll
O'So Sticky Mega Roll Tape is the equivalent of 22 6”X8” sheets.
6"X8" O'So Sticky Paperback Tape - 10 sheets for $25.00
Place pre-orders on the website or contact me for payments other than Paypal.
Hugs, Suzanne
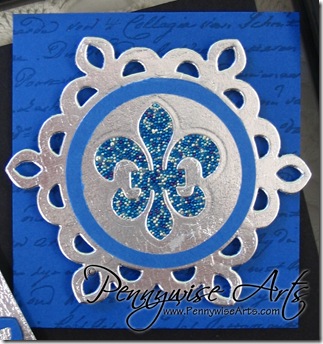
I had such a fun day at Art ‘n Soul in Olympia, Washington yesterday! Meeting so many “beadie buddies” and hearing your feedback about the blog and class lineup really made my day! The Pennywise make ‘n take was this pretty French fleur die cut artist trading card.
I scheduled 4 classes there for September! Hooray! The dates to save are September 9th and 23rd! More details coming soon!
Here’s how we did the above atc:
The short explanation:
Silver base, dark blue layer stamped with Versamark and French script from Stamper’s Anonymous, silver fleur frame and a medallion made with a blue cardstock circle covered in O’So with the silver fleur on top and the micro bead mixture filling in around it.
The longer more detailed and visually pleasing explanation:
The silver cardboard foil is recycled material - would you believe a lid from a takeout container?! I cut it using the Spellbinders Fleur de lis accents die set (S5-042)

To conserve the pretty silver paper I put the fleur die in the middle of the frame and cut it at the same time. Since this gets covered up by the medallion it didn’t matter if it was centered or straight.
The circles were all cut with my Cricut - including the O'So Sticky Tape circles! I love letting my machines do all the fussy stuff! The Cricut will cut clean through paperbacked sticky tape. I set the blade on depth 6 with high pressure. Your machine may vary.
Note: Any red liner tape sheets can be converted to paper by saving the white liner from a used sheet and trading it out for the red.
To make the medallions I put a 1.5” circle of O’So Sticky Tape over a 1.5” blue cardstock circle. I removed the top liner from the tape and placed the silver fleur die cut in the middle.
Then the medallion was pressed into a mixture of colored opaque micro beads. (Royal blue, silver, teal and purple).
The pictures are dark. I was too lazy to put my shoes on and go outside like I usually do for the best lighting.
Here is another one of my other experiments using all of the same materials:
For the above medallion I cut the fleur first. Then I used a circle punch to cut it from the sheet. A circle of O’So Sticky was placed behind the cutout and the micro beads fill it in. If you work with Spellbinders at all you know that layers, layers, layers make the design. Foam tape lifts the frame piece off of the background for more dimension.
If you’ve read this far you are a true blue Pennywise fan and to reward your loyalty I will send the above atc to the first 8 people to leave a comment on the blog! Leave a sweet note in the comments section and then click the “contact me” button at the top of the blog page and email your mailing address to me PRIVATELY! You’ll know if you are in the first 8 just by counting the comments.
Hugs, Suzanne
Our Pennywise Arts 3rd quarter fat book swap is complete! With so many different interpretations of “vintage” our book of eight pages from eight players is truly a unique piece of collaborative art. This is what it looks like all bound together:

The top page of each book is the page that player created. This helps me keep it all straight when I’m ready to package and mail the books back.
Each base is a pre cut chipboard shape from Maya Road. I was inspired by papers from Prima Marketing’s “Almanac Collection”. This is my page:
I painted my bases white and then rubbed them lightly with Distress Ink. (Maybe Frayed Burlap?) The background was stamped with a fabulous handwriting sampler from an old Dream Impressions set.
A piece of patterned paper was embossed with a Cuttlebug die and the raised parts were rubbed with the same Distress Ink.
The butterflies and nest have multiple layers to make my page “fat”. Foam tape keeps the wings in flight and the small butterfly has been covered with O’So Sticky Tape and clear ultra fine micro beads from Pennywise Arts.
I’ll show a close up tomorrow. This post ended getting too long because I went into the whole process of mixing beads from my edges and decided that would be better as a separate post.
Every day for the next week I will feature the other pages in this fabulous book so keep coming back!
Hugs, Suzanne
After creating all of the kits for the Father’s Day room cards I had a bunch of little parts and pieces left over. I’ll be honest, 
Keeping with the Father’s Day theme I made artist trading cards to swap in the monthly Pennywise Arts community 1-4-1 atc swap.
The deer trophy was created with part of the “Deer Trio” die from Memory Box. The head was “mounted” with foam tape on a oval brown background that was covered in O’So Sticky Tape. The oval was then beaded with brown translucent micro beads and layered on what I thought was the perfect stamp – part of a one dollar bill.
When I showed it to one of my son’s friends he said, “If you made 99 more you’d have a hundred bucks.” We all laughed out loud! I thought that might make a cute saying to add to the back for a Father’s Day token.
And if you happen to be swapping on the Pennywise Arts community 1-4-1 atc swap this month you will be getting one of these bucks in the mail soon!
Hugs, Suzanne
Michele Aiello-Zendejas’s art has a very unique style. She uses lots of layered die cuts and embellishments to create cards that look complex and elegant.

Swing Shift Designs To My Valentine 1 Collage Sheet, Pennywise Arts Clear Ultra Fine Micro Beads, Pennywise Arts Mega Roll O'So Sticky Tape, Spellbinders Dies, Quickutz Dies, K & Co Paper, Card Stock, Vintage Buttons, Double Stick Tape, Tacky Glue, Martha Stewart Paper Punch.
May your Valentine’s Day be filled with thoughts of those you love and a few unexpected surprises too!
Hugs, Suzanne
PWA designer Michele Aiello-Zendejas has been super inspired and getting her craft on! Here is a Victorian themed Valentine gift bag she created.

The products Michele used to create this gift bag are:
Swing Shift Designs To My Valentine 1 Collage Sheet, Pennywise Arts Clear Ultra Fine Micro Beads, Pennywise Arts Mega Roll O'So Sticky Tape, Spellbinders Dies, Quickutz Dies, K & Co Paper, Card Stock, Vintage Buttons, Flat Back Rhinestones, Paper Bag, Double Stick Tape, Tacky Glue, and a Martha Stewart Paper Punch.
It all adds up to a very lovely gift before you even put a gift inside!
Here is a slightly different view that shows the dry embossing on the top edge of the bag.

Have a “love”ly day!
Hugs, Suzanne

And then I got to thinking,……..
Wouldn’t it be cool if I could get my Cricut to cut a bunch of these out for me?? Wouldn’t they make fun party favors? And so it happened!
I added some bubble beads (with Sure Tac Glue) to border the top and bottom and mimic the bubbles in the paper design. Then I cut some hearts in varying sizes with my Cricut and stamped sentiments from an ancient Close To My Heart stamp set that I have.
I found that with a heavier cardstock they really needed to be put together with O’So Sticky Tape – nothing else held them together for longer than a minute.
I have a little craft party coming up in a few days, I think it’s time to go into production! Ü
Oh, and if you would like to have the svg file I’m happy to share it! (You would need to have one of the compatible computer programs to use it). It will cut 3 boxes from a sheet of 12 by 12 paper. Just “contact me”!
At Christmastime I shared this holiday box of beaded candles:
![Holiday Lights Box INside _thumb[1]](https://blogger.googleusercontent.com/img/b/R29vZ2xl/AVvXsEipjUPPQtafjEhqc_9txZ5Yh2jQ07sU-2w9J_ZLUaWSFvWkYAQDFrF2WMue2S8Iq5qdoirCiGqkXyszWH1XhpbO4dXu9pHtGSeGZ3-8ev04dB0Sp9-tHIIqRrAHiqI-V46agfRDVNcbgBs/s1600-h/Holiday%252520Lights%252520Box%252520INside%252520_thumb%25255B1%25255D%25255B6%25255D.jpg "Holiday Lights Box INside _thumb[1]")

There are endless possibilities for this idea! With Valentine’s just around the corner I’m thinking a romantic gift or dinner by beaded candle light!
Hugs, Suzanne
On one of our play days together my friend Julie Imsland was inspired by a gift bag sample she saw on the web. Right before my eyes in a very, very short amount of time Julie transformed a white paper sack into this darling Valentine gift/treat bag!
Below are her directions. Note, the tab of the package opens at the back.
Supplies:
Small lunch sack with base of approx. 3” x 5”, I used a recycled white sack
Solid cardstock to match focal image
Focal image by SwingShift Designs: Valentine Hearts 3
Patterned Papers, two to match focal image
Paper adhesive of choice (I used ATG tape)
Foam tape
Self adhesive Velcro circles
Directions:
Wouldn’t these make fun party favors?
Hugs, Suzanne
Microscope slides always made wonderful jewelry! This one uses two glass slides, a collage sheet from our Swing Shift Designs Valentine Collection, a piece of sheet music, some wire, seed beads, a self adhesive pin back, 1/4” O’So Sticky Tape and gold and red opaque micro beads.
It probably only took about 15 minutes to do from design, assemble and finish. A great project for office or teacher Valentine gifts!
For more details on “how to” as well as other photos see our tutorial on the website!
Hugs, Suzanne
Sometimes when I need a little creative jump start I just Google things. This time I Googled “Valentine Craft Projects” and selected to see only images. That was how I found the inspiration for my Valentine cone. The photo I saw is copyright and I want to credit the original artist so click here to see it.
Hers is a much simpler version than what I made. I was cooped up without power for three days so as soon as the lights came on I went crazy in my craft room!
I started with a book of sheet music. It’s old. I’ve had it since I was about 12 or so which makes it really old. I decided it had more value to me in my craft stash than it did crammed in my piano bench. Ü I rolled the sheet into a cone shape and taped it together. For stability, I rolled a sheet of cardstock the same way and tucked it inside. Then the fun stuff started!
My friend Julie helped me set up my sewing machine so I could do a running stitch down the middle of some white crepe paper. It gathers itself a little bit and when I wanted more I just tugged on the back thread. The crepe paper is put around the top edge of my cone with O’So Sticky Tape. Then I punched holes in each side with my Crop-o-dile tool. Big holes, long reach, perfect.

I cut a heart from a piece of chipboard, inked it red and covered it with O’So Sticky Tape. I peeled off the liner and placed the “Valentine” banner across the heart and then dipped the heart into red opaque micro beads. It really helps to have friend over that does calligraphy, thanks Julie! Ü


The left side of the cone has some linked crystals dangling that I found at a really cool antique store, a lock and a key charm and an eye glass charm. The image inside the glass is from one of our Valentine collage sheets by Michele Aiello-Zendejas.
I strung some red, pink and gold seed beads together to dangle from the bottom of the heart. And I added a string of pearls and chain, something from my junk jewelry stash that I thought was a perfect finish. Ü
I could tell from the photos that the original artist shared that she created more than one and now I know why, they are utterly addicting! Consider yourself warned. Ü
Hugs, Suzanne
Here are a couple of sweet New Year atc’s created by Julie Imsland. She used a freebie collage sheet from our designer Michele Aiello-Zendejas. See how to get it below!
~~~~~~~~~~~~~~~~~~~~~~~~~~~~~~~~~~~
Hi Beadie Buddies,
I wanted to do something to thank you for purchasing and using my collage sheets and Suzanne's micro beads in your artwork. So, I created a holiday thank you freebie collage sheet set just for you! You can download it here: www.atozdesigns.com/holidaythankyou.html
I hope you like it! :-)
Hugs,
Michele A-Z
WebsiteDesign, Blog Design, & Graphic Design: www.AtoZDesigns.com
Collage Sheets, Digital Stamps, & Printables: www.SwingShiftDesigns.com
Pre-Printed SSD Collage Sheets & Micro Beads: www.PennywiseArts.com
At Christmastime and always, I am so thankful for the amazing support of friends, family and my O’so faithful customers and fans. Pennywise Arts is what it is thanks to all of you!
Pennywise Arts designer Julie Imsland created this sparkly Christmas greeting atc with lots of layers. From the bottom up it goes like this:
2.5” by 3.5” dark blue cardstock base
2.25” by 3.25” light blue cardstock with a white core. It is embossed with a Cuttlebug snowflake die and then lightly sanded so the white shows through.
Wrap the light blue piece with iridescent fiber and adhere to the dark blue base.
Silver balls were punched for the ornaments with small birds punched and layered onto them with foam tape.
Merry Christmas was stamped onto silver paper which was then covered in O’So Sticky Tape and clear micro beads.
I’m wishing you the Merriest of Christmases!
Hugs, Suzanne
Playing around in my craft room this week I created some new glass slide ornaments from our Christmas collage sheets. I played with different hangers based on ideas from the domino swap as well as the wire wrapping I did on the “Over the river” atc posted on Tuesday of this week.
Left: I cut the ornament hangers into two pieces and wedged the ends between the images that are sandwhiched between the slides. Plastic slides worked best for putting lumping things inside because they will bend just a little.
Center: The hanger is created from a piece of 1/4” O’So wrapped over the top from front to back. Each end touches the glass for a stronger bond. Bead the inside of the loop before removing the liner to bead the outside.
Right: Still not a perfected technique but I do like the wire wrapping with the beads that move back and forth. Getting the loop to land in the middle at the top was harder than I thought it would be, but I don’t have a lot of wire work under my belt yet.
It’s definitely not to late to whip up a few of these yourself! They take only minutes to do. Purchase digital collage sheets from our website, print and cut out. Place between two slides (glass or plastic) then wrap with 1/4” O’So around the edges and fold the excess tape to the front and back to make a frame. Press into micro beads and you’re done.
Hugs and Happy Beading! Suzanne
It’s always fun to see the ideas that others come up with for hanging dominos. Here are some from the PWA domino swap (and a couple creative ones from past years).
A fancy bead glued to the top.
A bead made from rolling clay and poking a straw through it to create the hole.

Pre drilled dominoes from Pennywise Arts.
An ornament hook glued to the back.

An eye hook screwed into the top.

Ribbon wrapped tightly around the edges and then cinched up through the center of a flat bead. The ribbon is then knotted to hold fast.

A bead glued to the top.

Several pony beads glued to the top (side) edge.

Ribbon wrapped and tied tightly at the top with a knot.

A band of beaded O’So Sticky on the sides (glue was added so the cord wouldn’t slip out.)

A heart shaped clip bent so the bottom sticks up for a hook to attach to.

Wire poked through the holes and twisted back on itself.

When adding things to the top to use for hangers, be sure to use a super strong glue like epoxy, E6000 or Jewel Tac. It needs to be able to hold the heavy weight of a domino and not all glues are strong enough.
Hugs! Suzanne