Wednesday, October 19, 2011

Brads into Pendants Take One

When I posted to the Pennywise Yahoo group that I was too cheap to pay $4 for a single bezel I got lots of great input, ideas and links!  Debbie Warren shared this photo of how she turned big brads into bezels by breaking off one leg and curling the other: brads into bezels This was something I definitely had to try myself!  Finding the big 32mm brads turned out to be a bit tricky, they seemed to be sold out everywhere I turned, even JoAnn’s and Michaels craft stores.  I was finally able to locate some online $3 for a box of 12 – a price I can really sink my budget into!

The brads I liked are from Karen Foster Design and are called Big Time Brads, Antique Metal.


karen_foster
bigtime brads

I was able to find the brads in smaller sizes but I really liked that the big time brads matched a circle punch I have!  Ü

Making the bezel was super easy.  The metal is soft and easy to manipulate into a curl with a pair of round jewelry pliers.  The important thing is not to bend it all the way at the base but rather curl it into place.  Stressing the metal at the base caused my first attempt to break off.   The extra leg broke off easily and I sanded the rough edge it left with a sanding block. 

The rest of this article is really a diary of trial and error and trying again and again.  I’ll admit up front that I still haven’t found the “perfect” process for me, but I think I am getting close!

This was my first attempt followed by all the things I learned and was puzzled by:Pendant 1

I punched a circle with the “keys” from some old K & Company papers that I have.  I tacked the image into the bottom of my brad/bezel and put Diamond Glaze over the whole thing.  I set a smaller decorative brad into the goo (on the left side) and sprinkled a colorful mixture of micro beads on top.  I struggled with air bubbles and their determination to not be popped.  The decorative brad sunk, the color on the fuchsia micro beads bled and the Diamond Glaze dried with a muddy yellow hue and a sunken dip in the middle.  I filled the dip two times, evidenced by the light lines you can see on the right side of the pendant. 

The paper in the background shows the original coloring that the paper had before being coated.  I wonder if my Diamond Glaze is just old.

Trial #2

Pendant 2Basically I did the same process as before.  The fuchsia micro beads bled again and as the pendant dried the beads that were all nicely scattered about pulled together into groups.  Weird.  The Diamond Glaze is still yellowish so I moved to using Glossy Accents.

Trial #3

Pendant 3

This time I put some gems on the paper before I put the goo in.  Don’t do that.  While I was sleeping the glue just lifted the gems up and they floated wherever they wanted until drying NOT where I put them.   The Glossy Accents definitely finished more clear and didn’t discolor my background image as much (compare in photo above).  It’s quite possible that my Diamond Glaze is over 5 years old, so I’m not going to rule it out as a future possibility in case age has something to do with the discoloration. 

Note to self: The fuchsia beads bled again.  Apparently there is something different about that coating because none of the other colors bled.  So stop putting them into these pendants!

More things to make you go “hmmmmmmmmmm” on this subject tomorrow!

Hugs, Suzanne

Tuesday, October 18, 2011

Even Disney Micro Beads!

Look at this fabulous shirt that my friend Anna was wearing the other day!  Imagine my excitement when I looked at it closely and realized that the design was drawn on the shirt in black micro beads!

IMAG0141

It appears that the adhesive is possibly an iron on (I can’t imagine anyone hand drawing them in glue for all of the Disney gift shops!)  But it sure has a hand drawn look to it. 

The silver reflections are where some beads have come off over the years of wearing and washing the shirt.

IMAG0142

This really got me thinking of things I could draw on shirts with fabric glue and micro beads for Christmas gifts this year!

Hugs,  Suzanne

Sunday, October 16, 2011

Beaded Lace For Fall

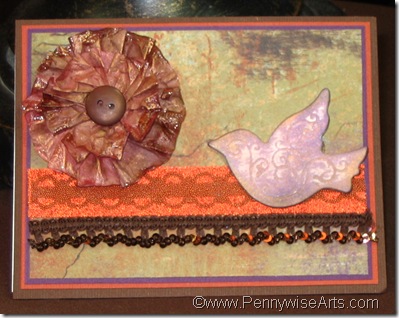
Beaded Lace Card

Autumn colors are definitely my favorite color palette and Jean Sunderman’s beaded lace card is full of rich color, depth and texture.  I love her handmade flowers made from coffee filters!  Anytime I can dual purpose materials from my kitchen to my craft room I’m happy!  So creative!

Materials:

Orange and Copper micro beads

Brown, Orange, Purple and White Cardstock

Patterned Paper

O'So Sticky Tape and Extra Liners

Any Border Punch

punch

Chipboard Bird sprayed with Glitter Mist

Flower (Jean’s are made with coffee filters and Glitter Mist)

Sequined Cord

 bird materials

Directions:

Cut Brown cardstock to 4 1/4 x 5 1/2. Cut Orange and purple cardstocks slightly smaller. Layer together with patterned paper to create the base of the card front as shown.

Cut a one inch strip of orange cardstock. Layer with O'So Sticky tape. Peel off top liner of tape. Use a punch with an extra O'So Sticky tape liner to create a design strip. Make sure shiny, waxy side is down and layer punched strip onto the O'So Sticky tape.  First use orange beads to cover background of design strip. Next, peel off the punched liner and add copper beads. Attach beaded strip to the card front along with flower , sequined cord and bird.

Beaded Lace Card

Wednesday, October 12, 2011

Take Note

Notepad Pens and Pencils

Marianne Colschen is the queen of dress it up!  When it comes to finding inexpensive items and transforming them into darling “handmade-ish” gifts Marianne certainly has a talent fine tuned to the art.

Here she has covered a small notebook with decorative paper and a micro beaded front plate.  The pens and pencils have all had small bit of matching paper and micro beads added to them to pull it all together into a very nice ensemble. 

Are you thinking “teacher gifts”?  How cute would that be??

Hugs, Suzanne

Monday, October 10, 2011

Hanging Collage ATC Holder

IMG_1174

Jennifer Toussaint created a pretty way to hold and display her favorite collectible ATC cards using lots of fun items she found in her craft room!

Supplies:  Assorted ribbons, Mono Adhesive, Crystal effects, White acrylic paint, fancy brad, Modge Podge, Assorted scrapping paper, Pennywise Arts Collage sheet, Lettuce, gold and clear micro beads and a cute wooden box from a dollar store.

Directions: Cut around each collage picture so there is no extra white space, set aside. Paint wooden box 3 coats of white acrylic paint let dry thoroughly. Using Modge Podge, apply the collage images randomly over the outside and back of the box. Let dry. Cut scrapping paper to fit the inside dimensions of the box and apply with adhesive. Attach flowers with brad to the center. Using Crystal Effects make a line of glue all around the top edge of the box, apply mixture of gold, lettuce and clear micro beads. Allow to dry. Using Mono Adhesive apply blue ribbon to the middle of each picket on the box. String through each hanging hole with pink ribbon and tie securely.

IMG_1176

  So very pretty Jennifer!

IMG_1175

To find Jennifer on the web go to her blog!http://craftychickfrommaine.blogspot.com/

Hugs, Suzanne

Friday, September 30, 2011

Halloween Skulls

Next up from Christine Grabb is a Halloween skulls card.

Christine explains, “I clear embossed the Boo on crumpled patterned paper and dp'd some red ink over it.  I love the effect! 
The skulls are grungeboard that I covered with white acrylic paint.  After they dried (okay, okay - after they were dryish), I covered them in Versamark and did two layers of clear embossing powder - UTEE would be perfect here, I just can't remember where I put mine - and while the ep was still hot and sticky, dipped them in Ultra Fine Clear Beads.  I added an additional three layers of ep and beads, heating between each layer and ending with a final layer of ep.   Ta-dah!”

She continues, “After they cooled, I cracked them a bit - I tried to rub them with a dye ink pad but it wouldn't stick - duh!  Black Stazon would have been a better choice, but it's apparently run off with my UTEE  and they're living in sin.  :)    I think I'm going to try this little trick with some colored micro beads and maybe some other shapes - I want to see this technique on a heart or flower shape.   I would be tickled pink if anyone decided to try it and left a link for me!”

If you like Christine’s style be sure to follow her blog!

http://gotasunsetinmyveins.blogspot.com/

How many more days til Halloween?

Hugs, Suzanne

Saturday, September 17, 2011

Trick Or Treat

It’s PWA tradition that our design team member Christine Grabb gets first dibs on Halloween, her most favorite holiday of the year.  Christine’s creative ideas and “beadniques” are something that I always love to see!  If you like her style be sure to follow Christine on her personal blog:  http://gotasunsetinmyveins.blogspot.com/

Chriss tells us how she made this card below:

“I took some double-sided paper and made the base card, then I flipped the paper over and made a paper 'ribbon' from the print on the back side (yay! bats!); I couldn't get the tail right, so I ended up using the corner of a medallion shaped die.
Papertrey Ink stamps and die helped make the tickets out of more patterned paper and I added a some hand-dyed seam binding.  To finish it all off, I took a small square of O'So Sticky tape, removed the rubber liner and adhered it to some black paper, which I then punched with a bat.”

“I removed the paper liner and dipped it into Clear Mini Beads.  You could use the Black Opaque beads too, if you wanted a little less sparkle but I like a little bit of bling.  Stick it on with some foam tape and you're done!  Thanks for looking and stay tuned for more Halloween goodies!!”

Hugs!  Suzanne