Showing posts with label jennifer toussaint. Show all posts

Monday, October 10, 2011

Hanging Collage ATC Holder

IMG_1174

Jennifer Toussaint created a pretty way to hold and display her favorite collectible ATC cards using lots of fun items she found in her craft room!

Supplies:  Assorted ribbons, Mono Adhesive, Crystal effects, White acrylic paint, fancy brad, Modge Podge, Assorted scrapping paper, Pennywise Arts Collage sheet, Lettuce, gold and clear micro beads and a cute wooden box from a dollar store.

Directions: Cut around each collage picture so there is no extra white space, set aside. Paint wooden box 3 coats of white acrylic paint let dry thoroughly. Using Modge Podge, apply the collage images randomly over the outside and back of the box. Let dry. Cut scrapping paper to fit the inside dimensions of the box and apply with adhesive. Attach flowers with brad to the center. Using Crystal Effects make a line of glue all around the top edge of the box, apply mixture of gold, lettuce and clear micro beads. Allow to dry. Using Mono Adhesive apply blue ribbon to the middle of each picket on the box. String through each hanging hole with pink ribbon and tie securely.

IMG_1176

  So very pretty Jennifer!

IMG_1175

To find Jennifer on the web go to her blog!http://craftychickfrommaine.blogspot.com/

Hugs, Suzanne

Friday, April 15, 2011

Yay! It’s PWA Blog Hop Day!

Blog Hop Icon

I love blog hops!  The energy that swirls around this annual event is incredible!  I have to admit that the response really took me by surprise last year – in a huge and wonderful way!

This weekend you’ll have the opportunity to hippety-hop through some amazing creativity.  The artists have all worked hard to bring you their best and some are even awarding it as blog candy.  COOL BEANS!

WIN!

I’ll be cruising through the blogs each day and selecting at least one winner per day from the comments to receive an extra special handmade gift from one of our designers.  If you want to win here’s a tip – leave a comment that is thoughtful and personal in some way.  ;0)

But wait there’s more!

In ADDITION to the prize drawings EVERY SINGLE order placed on the PWA website over the weekend (Saturday and Sunday) will receive a piece of FREE blog candy created by one of our design team members!  WOWEE!!  Just look through our archives to see what you might receive!  Ü

Let’s kick this thing off! 

PWA designer Jean Sunderman brings some western influenced artwork to the party in honor of the Pennywise Arts annual crafting retreat that is taking place the end of this month in Cle Elum, Washington.

Jean’s first card has a handsome fellow on the cover with three silver micro beaded stars for embellishment.  Inside the card says “Save a horse, ride a cowboy” oh my!  ;0)IMG_0988

I love Jean’s atc “I always get my man”.  It’s a sweet little shaker card that used one of the free PWA templates

IMG_0987

  Also from our shaker card files, Jean’s finale is a sassy lassie who’s good with a rope!  IMG_0990 

Thanks for stopping by Pardner!  Now it’s time to mosey on over to my friend Jennifer’s blog.  She’s bursting with creativity and so excited to share with ya’ll!  I heard tell she may be giving away some goodies too!  Ü

Oh, and Yey!  If you’re interested in joining up with a fun group of wild women at the PWA retreat there are still a few spots left and we’d love to have ya!

Thursday, November 25, 2010

Candy Jars A’la Jenn

PWA Designer Jennifer Toussaint’s candy jars are a big hit on the PWA Yahoo Group!  She even had a raffle and made one especially for Julie Imsland, another member of our group.

Julies Jar2 Julies Jar

Wouldn’t this be a great Christmas gift idea for co workers, the mailman, paper boy, etc….  people that you’d like to give a little something to that doesn’t cost a whole lot.  Um, yes!

Here’s a link to the jar that Jenn made for me last summer!

http://pennywisearts.blogspot.com/search?updated-max=2010-07-27T02:55:00-07:00&max-results=7

Tuesday, July 27, 2010

Time Worn

This is a really fun ensemble by Jennifer Toussaint.  For supplies she made a trip to the dollar store.  I love the dollar store!  I’m always finding interesting things to add to my craft stash from there.  Give me ten bucks and an hour or two at Dollar Tree and I’m in heaven!

Time Worn PadJennifer set out to make the note pad and as an afterthought the magnet came to be.  I think they are both fabulous and I especially love the cracked glass look of the magnet!

time worn magnetHere’s how she did them:

The Magnet:

Square rubber stamp of moon and sun by Inkadinkadoo

Vanilla cardstock

Chipboard piece of same size

Ultra Thick Embossing Enamel

Versa Mark Pad

Copper, black and gold micro beads from Pennywise Arts

Watch pieces

Magnet piece

Craft glue

Black pigment ink

Various markers

Directions:

Stamp sun and moon stamp with black ink and let dry on cardstock. Color in with choice of markers and then cut piece out to edge of image. Press into Versa pad and then cover with UTEE and heat to melt with heat gun. Quickly do this 3 times. On the third time sprinkle the piece with micro beads and time pieces. Let dry and then crack the piece by bending. Attach this image to piece of same size chipboard. Using brown marker color edges and back to match the design (or color of your choice). Attach magnet to back with craft glue. Let dry.

The Note pad:

Small notepad from Dollar Tree

Cardstock in vanilla to fit double the size of whatever notepad size you choose (they have several sizes)

Beaded ribbon from Dollar Tree

Same sun/moon stamp

Black pigment ink

UTEE (ultra thick embossing enamel)

Various stickers and word cut out pieces

“In The Sky” rubber stamp set from Stampin’ up

Markers to coordinate your magnet piece colors

Distressing kit from Making Memories

Time worn looking stickers

Directions:

Fold cardstock in half over the pad of paper and trim to fit. Stamp the sun/moon stamp in the middle of the front of the piece of cardstock with black ink and then cover with UTEE and heat gun emboss the image. Color in as desired with markers. Stamp star stamp from the “In The Sky” set around image and on the back. Emboss with UTEE. Distress the front and back by crumpling the piece of paper several times then rub the small green and brown distress inks over the piece thoroughly to make the crinkles stand out as though it were time worn. Adhere the front and back of the piece of cardstock to the notepads front and back with adhesive. Cover the flip side of the beaded ribbon with adhesive and then adhere to the front of the notepad wrapping around to the underside of the front cover. Embellish the front of the notepad cover with stickers of your choice.

What fun things have you made from items purchased at a dollar store?  We’d love for you to share them with us!  Just email me a good quality photo and I’ll post it for you!  suzanne@pennywisearts.com


P.S.

Designer Michele Aiello Zendejas found these cute heart boxes at The Dollar Tree!

http://pennywisearts.blogspot.com/2010/03/beautifully-boxed-and-beaded.html

Tuesday, July 20, 2010

Hey Friend! Candy Jar

You can always tell a true friend by how often they bring/send you chocolate!  And, if said chocolate is your most favorite kind, then you know you are loved!  Ü

Hey Friend

I do love how Jennifer Toussaint’s candy jar decor matches the deep purple of dark chocolate Hershey’s Kisses!  (And did I mention that dark chocolate is my favorite?!!)  Thanks Jenn, I feel loved!!

Does Jennifer’s sweet treat inspire you to do something fun and spontaneously chocolate for a close friend of your own?  Well hurry and gather up the goods!  This won’t take long at all!

Materials:

Clear and purple opaque micro beads from Pennywise Arts

O’So Sticky Tape™ Sheet Pennywise Arts

1/8” O’So Sticky Tape™  Pennywise Arts

Eggplant cardstock (Stampin’ up)

Mouse Stamp - Cute Critters (Stampin’ up)

Me and My Big Ideas scrapbooking paper

Markers from Stampin’ up in Lovely Lilac,  Going Grey, Sage Shadow, Blush Blossom

Round 1-¼ in. circle punch

White cardstock

Flower eyelet

Flower chipboard from Colorbox

White paper flower

Jar from Dollar Tree store

Crinkle scissors

Lavender ribbon

Purple metallic embossing powder

Versa Mark pad

Adhesive tape

Hey Friend stamp or other sentiment stamp of your choice

Directions:

Using Lovely Lilac marker color the “Hey Friend” rubber stamp and stamp two images onto white cardstock. Cut out just around the edges of the sentiment. Use these pieces as templates to cut out pieces of O’So Sticky Tape™ from a sheet. Cut out the O’So Sticky Tape™ and apply over the image. Apply clear micro beads to both sentiments. Use eggplant paper to back each sentiment piece by ½ inch. Use crinkle scissors all around each edge. Use adhesive tape to assemble as shown. The jar I used was square and so I took advantage of the embossed squares on each side and used these squares as templates for my scrapping paper. I applied a piece to each of the four sides. Stamp mouse image on two pieces of white cardstock. Color in using markers or colored pencils. Cut out and border with purple cardstock. Assemble pieces with adhesive. Apply sentiment pieces and mouse pieces on opposite sides of the square jar.

Here’s what the jar looks like from the top:

Hey Friend Jar Lid

Wrap a piece of O’So Sticky Tape™ around the outside edge of the lid and peel back. Apply ribbon firmly to the sticky tape. Then use another piece of sticky tape and wrap around the middle of the ribbon and peel back. Apply purple opaque micro beads to create the beaded line around the lid. Use a Versa Mark pad and place the chipboard flower piece face down in it. Dip in metallic purple embossing powder and emboss. Cool. Use middle circle of flower and cut a circle out of scrapping paper using circle punch. Adhere to circle chipboard piece. Use eyelet tool to add eyelet flower to middle of the circle. Assemble the jar top pieces as shown. Fill jar with your (or your friend’s) favorite candy!

Tuesday, July 13, 2010

Happiness is…

Happiness is Jennifer Toussaint’s pretty picket fence wall hanging!  So bright and cheery, it definitely makes me feel happy when I see it.  Happiness

Jennifer found most of her materials in her craft stash – I bet you probably have most of them already (or something similar)  too!

Materials:

Micro beads from Pennywise Arts in stream, lettuce, gold and iridescent colors.

Wooden picket fence with 2 flowers pre-attached

2 chipboard butterflies

2 large pop dots

12 inches gingham ribbon in blue and white

Happiness or other sentiment stamp

Cardstock scraps in white, pink and green

Opaque glitter

Acrylic paints in lavender, light blue, pink, yellow, white and light green

Crackle effect liquid

2 small gemstones for butterflies and one large gemstone for flower center

Stickles purple glitter glue

Directions:

Paint picket fence with white paint. Let dry and then cover in crackle finish. Paint flowers with pink and blue and then the stems and leaves with green. Cover flowers in coordinating micro beads in stream, lettuce, bubble and gold. Place yellow gem stone in middle of blue flower with crystal effects. Stamp phrase onto white cardstock. Trim around word or phrase. Back this white piece with pink cardstock and then green and white scrapping paper. Adhere to fence with adhesive tape. Cover butterfly chipboard pieces in lavender acrylic paint. Let dry and then cover in opaque glitter. Draw a line with Stickles purple glitter glue down the middle for the body. Then adhere small gemstones for the head of the butterfly. Attach with pop dots. Thread ribbon through holes for hanging.

Tuesday, July 6, 2010

Love Inside

It is such a treat to share amazing artwork with you from our design team each week!  They are an inspirational group of gals that inspire me over and over again.  I always look forward to what surprises will arrive in the mail.  Ü

This decorated tin by Jennifer Toussaint really got me drooling (and I’m sure it has nothing to do with the dark chocolate she sent with it… Naw, nothing.) Box Of Love Clip

In addition to being a very busy wife and mother, Jennifer is a faithful member of our Yahoo Community.  She assists as an administrator, participates in many of our swaps and designs incredible art like this to share!  

The luscious Hershey’s Kisses I mean, luscious alcohol ink colors that Jenn selected for this project really got things off to a great start!

Box of Love

Materials list:

(Recycled) Calypso poinsettia paper flower tin

Adirondack alcohol inks in Citrus and Stream

Cardstock bits from Stampin’ up

Music sheet paper

Assorted crushed bead bits

Watch pieces

Crystal Effects

O’So Sticky Tape from Pennywise Arts

Paper flowers from LTD catalog

Copper charm from Beyond Beautiful

Glue dots

Adhesive

Peeled paint stamp from All night media

Versa Mark ink pad

Micro beads from Pennywise Arts: Copper and Lettuce

General directions:

Using Adirondack felt and stamper to randomly stamp alcohol inks all over metal portion of tin and lid. Dry completely. Wrap a long piece of O'so Sticky Tape all the way around tin and cover with mixture of the copper and lettuce colored beads. Rip up random scraps of cardstock, and stamp a lighter piece of cardstock with peeled paint stamp using Versamark. Dry completely. Rip up pieces of sheet music. Use adhesive to apply the random scraps of paper on the front of the tin. Use adhesive to apply flower pieces randomly. Use glue dots to apply copper charm to the front. Use Crystal Effects to apply crushed bead bits and watch pieces to front.  Here’s a blown up of the close up – Yum-O!

Box Of Love Clip

Next cut a large circle of O’So Sticky Tape to cover the circle of see-through plastic on the lid of the tin. Peel back paper and apply bead mixture to the top of the lid completely.

Box of Love 3

I can’t think of a better way to “go green” than with this lovely green tin and the use of so many recycled materials!  Way to go Jenn!

Box of Love 2

If you like this project you’ll surely want to check back here next week for more!

You can also find Jennifer sharing on her blog too: http://craftychickfrommaine.blogspot.com/

Friday, May 7, 2010

An Exciting New PWA Product!

We are pleased to present the newest member of the Pennywise Arts bead family, Iridescent Bubble Beads!!

bubbly

Our 2mm Bubble Beads are shimmery, gorgeous and HUGE compared to anything else we have in the shop. To get a better idea of the actual size go take out your ruler and look at the side with the centimeters on it (the smallest lined side).  Now look at the smaller lines within the centimeter marks – these beads equal TWO of the millimeter marks – which is why we can’t possibly call them micro beads!  We considered “mondo beads” but bubbles just roll off the tongue and are far more fun to say!  Ü 

Bubble Measure

Though they are not translucent they do pick up some background color which contributes to their unique color quality. The above photo was a product of Photoshop.  In the original Bubble Bead photo the background behind the beads is white so the bubbles are not interacting in any way. 

You’ve all heard of interference embossing powders,.. think of these as “interference” micro beads!  To see examples of how they DO interact keep reading!

Sold in 1 ounce bags for $5.25

Click here to be taken to our website to place an order now!

When we first started PWA seven years ago we only knew what to do with the clear beads.  (I KNOW, how weird is that to imagine!?!)  It took all of the amazing input from our customers to help us catch the vision of what colors could do and our world has been rocked ever since!  We know there are o’so many more creative uses for Bubble Beads and we can’t wait to discover them all and share them with you!  If you have some ideas we hope you will share them with us! 

Our design team is hard at work making some projects to inspire your own creative process and we will be sharing them with you as they arrive in the mail.  Yay to fun mail to look forward to!!  Here are a couple that have already arrived:

The Love Nest By Jennifer Toussaint is such a wonderfully bubbly spring bead idea!  Jenn used Crystal Effects and our Iridescent Bubble Beads to create the roof for her love nest.Love NestFlowers, buttons and of course the darling birdie complement the colors she painted her wooden house.

This keychain by Dee Moran is fit for royalty!  Royal Bubble Bead Keychain
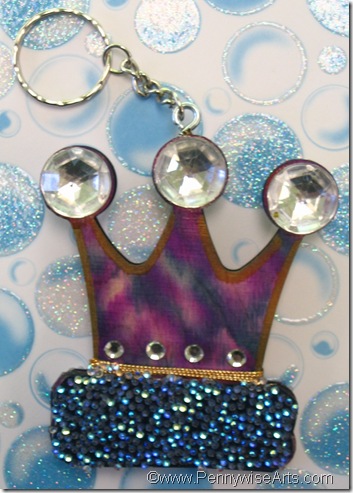
A sturdy wooden crown shape forms the base upon which Dee went wild with ink, gems, trim and our new Iridescent Bubble Beads!

Here’s her simple “how to”:

Step 1.  Take a plain wooden crown shape.  Dee’s came from www.5dollarstudio.etsy.com  (More are expected to be available in the store after May 11, 2010).

Step 2.  Sponge shape with alcohol inks on both sides.

Step 3.  Edge both sides of the crown with gold Krylon pen

Step 4.  Trace the shape of the base of the crown onto navy colored card stock, then apply O'so Sticky tape to the card stock.  Use O’So Sticky Tape to adhere cardstock to the wood crown.  Remove red liner from the tape and apply bubble beads.  (Remember to do both sides of the crown this way – being a key chain it’s two sided.)

Step 5.  Wrap gold cording around the top of the Bubble beaded piece.  (Front and back).

Step 6.  Glue large gems to the points of the crown.

Step 7.  Screw in a small eyehook to the top of the wooden piece and attach key chain piece.

Click here to be taken to our website to place an order now!

Background paper credit:  To show off our new Iridescent Bubble Beads we used background paper by Best Creation #GP307.  It’s an embossed, glittery two sided cardstock that will definitely be turning up in some future art – once it’s done being a photo box background!

Monday, March 15, 2010

Birds Of A Feather Flock 1

We’ve been busy, busy on the Pennywise Arts Yahoo group!  With several swaps in play all at once I’ve found myself moving with fervor to meet all the deadlines.  Swapping this week are our beautiful birds……..

Kathi

Bird Above By Kathi Hall

EuniceEunice2 Bird Above By Eunice Creswell

 Jenn

Bird Above By Jennifer Toussaint Julie

Bird Above By Julie Imsland

Karen2 Karen

Bird Above By Karen Slusher


Be sure to check back!  Another flock of birds will be posted tomorrow!