Showing posts with label tutorial. Show all posts

Monday, July 23, 2012

French Fleur

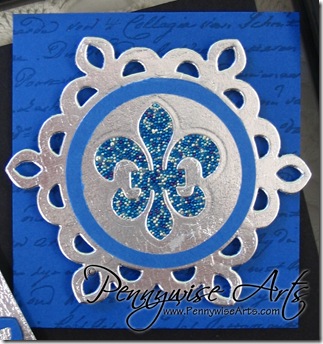
I had such a fun day at Art ‘n Soul in Olympia, Washington yesterday!  Meeting so many “beadie buddies” and hearing your feedback about the blog and class lineup really made my day!  The Pennywise make ‘n take was this pretty French fleur die cut artist trading card.French Fleur Demo I prepared for 50 makers and came home with 8 extra makings, that’s sure a lot of fun folks in one small place at the same time! 

I scheduled 4 classes there for September!  Hooray!  The dates to save are September 9th and 23rd! More details coming soon! 

Here’s how we did the above atc:

The short explanation:

Silver base, dark blue layer stamped with Versamark and French script from Stamper’s Anonymous, silver fleur frame and a medallion made with a blue cardstock circle covered in O’So with the silver fleur on top and the micro bead mixture filling in around it.

The longer more detailed and visually pleasing explanation:

The silver cardboard foil is recycled material - would you believe a lid from a takeout container?!  I cut it using the Spellbinders Fleur de lis accents die set (S5-042)fleurdieset and my Vagabond electric die cutter. 

pwavagabond One interesting tidbit I learned when die cutting the detailed frame was shimming it with a piece of bubble wrap behind the paper (not behind the cutting plate).  It gives it a little more koosh I guess and helps the die get all the way through the thicker metallic material. The first time through some of the bubbles will pop which is a fun added bonus!

To conserve the pretty silver paper I put the fleur die in the middle of the frame and cut it at the same time.  Since this gets covered up by the medallion it didn’t matter if it was centered or straight.

frame

The circles were all cut with my Cricut - including the O'So Sticky Tape circles!  I love letting my machines do all the fussy stuff!  The Cricut will cut clean through paperbacked sticky tape.  I set the blade on depth 6 with high pressure.  Your machine may vary.Circut circles

Note: Any red liner tape sheets can be converted to paper by saving the white liner from a used sheet and trading it out for the red.

medallion

To make the medallions I put a 1.5” circle of  O’So Sticky Tape over a 1.5” blue cardstock circle.  I removed the top liner from the tape and placed the silver fleur die cut in the middle. 

Then the medallion was pressed into a mixture of colored opaque micro beads. (Royal blue, silver, teal and purple).

The pictures are dark. I was too lazy to put my shoes on and go outside like I usually do for the best lighting.

Here is another one of my other experiments using all of the same materials:
Fleur2

For the above medallion I cut the fleur first.  Then I used a circle punch to cut it from the sheet.  A circle of O’So Sticky was placed behind the cutout and the micro beads fill it in.  If you work with Spellbinders at all you know that layers, layers, layers make the design.  Foam tape lifts the frame piece off of the background for more dimension.

If you’ve read this far you are a true blue Pennywise fan and to reward your loyalty I will send the above atc to the first 8 people to leave a comment on the blog!   Leave a sweet note in the comments section and then click the “contact me” button at the top of the blog page and email your mailing address to me PRIVATELY!  You’ll know if you are in the first 8 just by counting the comments.

Hugs, Suzanne

Friday, February 3, 2012

Valentine Gift Bag

On one of our play days together my friend Julie Imsland was inspired by a gift bag sample she saw on the web.  Right before my eyes in a very, very short amount of time Julie transformed a white paper sack into this darling Valentine gift/treat bag! 

Julies Gift Bag Front

Below  are her directions.  Note, the tab of the package opens at the back.

Supplies:

Small lunch sack with base of approx. 3” x 5”, I used a recycled white sack

Solid cardstock to match focal image

Focal image by SwingShift Designs: Valentine Hearts 3

Patterned Papers, two to match focal image

¼” O’so Sticky Tape

Gold Opaque Micro beads

Paper adhesive of choice (I used ATG tape)

Foam tape

Self adhesive Velcro circles

Directions:

  1. Open sack completely, and then fold flat, creasing the base in the middle so the front and back of the sack base meet. See photo. (Instead of folding the sack base to one side as usual.)  
  2. Julies Gift Bag Side

  3. Measure the width of the sack front (mine was about 5 ⅛”) and cut 2 pieces of solid cardstock that width x 3 ½”. Adhere these pieces to the front and back of the sack, aligning with the bottom edge.
  4. Cut down the top of the paper sack with decorative scissors next to the edge of the cardstock.
  5. Cut patterned paper for the top portion of the front, ¼” smaller than the width of the solid piece x 2 ¼” high. Cut second patterned paper for the bottom portion the same width as the top x 1” high. Adhere these two papers to the solid cardstock.
  6. Place a piece of ¼” O’so sticky tape along the edge where the patterned papers meet. Peel off the red liner & press tape into a dish of gold micro beads. Press beads down firmly with fingers.
  7. Cut one piece of patterned paper ¼” smaller than the back cardstock. Center and adhere to cardstock.
  8. Tab is a 3” x 1” strip of solid cardstock with a piece of patterned paper ¼” smaller centered and adhered. Fold tab in half and adhere one half of tab at top of the package front.
  9. Cut out focal image and adhere to package front tab with foam tape.
  10. Apply an adhesive Velcro dot to the other end of tab to close package at the back.

Julies Gift Bag Front

Wouldn’t these make fun party favors?

Hugs, Suzanne

Tuesday, November 15, 2011

Glass Blocks Revisited

Another show stopper has been the holiday glass block tutorial.  I shortcut and use gorgeous holiday napkins to hurry mine along.  I do love instant gratification!

I’ve also seen the blocks sold in craft stores with the holes already drilled in them – even better!  Things have come a long way baby!

Hugs, Suzanne


This week we are spotlighting projects from the Pennywise Arts website that would make great Christmas gifts.  We have a plethora of artwork in our gallery and gobs of tutorials in our past online classes section.

Saturday, April 2, 2011

Chocolate Sings

Our Cuttlebug Queen is at it again!  PWA designer Julie Imsland uses her Cuttlebug more than anyone I know and it’s often for some big beadie ideas!  This time she has taken the “Beaded Cuttlebug”  Embossing Technique to new sighs.

Money Talks

Here are the basic supplies that Julie used this time:

Money Talks Group(Not shown:  O’So Sticky Powder)

To create your own singing chocolate ATC just tear a piece of background paper vertically to cover half of the ATC.  Follow the directions on the PWA website for doing the Beaded Cuttlebug Embossing Technique using Encore Ultimate Metallic Gold Ink by Tsukineko, Allegro Cuttlebug Embossing Folder by Provo Craft and  Pennywise Arts Clear Ultra Fine Micro Beads.

Stamp Credits:

Candy/Cupcake Stamp by Hero Arts

Caption Stamp by Hampton Art Stamps

Thursday, February 24, 2011

Never Too Late For Love

Michelle's Heart ATC

Valentine’s Day may have come and gone but it’s never too late to show some love to a friend.  PWA Designer Michelle McCarthy created an atc with so much detail and interest I had to ask her to share the “how to” and she quickly fired back an entire tutorial with pictures and everything!  Woweee!  Be sure to read all the way to the end because Michelle shows how to create that cool background!

Supplies:

CS for top
CS for background
Any punch
Any colored Micro beads
O'so Sticky Tape or sheet
scissors

DSCF4373

Directions:


1.  Using any punch of choice, punch out from your chosen top CS.  Make sure you leave space around edges to trim later.
DSCF4375

2.  Turning punch negative upside down, cover opening with piece of O'so tape, leaving front side with exposed tape.

DSCF4376
3.  Now dip and cover in chosen micro beads

DSCF4377

DSCF4378
4.  from back, unpeel O’so tape and attach second or background piece (For instance, I wanted the heart to be solid red, so I added the red CS to "fill in" anything the micro beads may have missed.)
  DSCF4379

DSCF4380

5.  Now using your scissors, trim away around your punch, thus creating a frame around your micro beads shape.  And there you go, O'So simple!

DSCF4382


DSCF4384


Bonus!  Technique for background of ATC:
 

1.  It really has to be seen in person for you to totally get the effect.  All you do is add any shape or piece (I used the punch out from the heart I used to create the upper technique).

2.  Apply to a background piece with a little glue to keep it down.
DSCF4385

DSCF4386

3.  Run the whole piece through the die cutter with a chosen Embossing Folder.  Now sit back and admire the technique!  It's embedded into the larger piece of CS and is very cool!

DSCF4387

DSCF4388

      DSCF4389       

Thanks so much Michelle!  I LOVE this card!!

Michelle's Heart ATC

Friday, February 18, 2011

Patriotic Tag Trio

If you’re feeling patriotic for President’s Day then Michele Aiello-Zendejas has just the inspiration for some beautiful all American art.  Perhaps you’ll want to make your own tag trio which features a free collage sheet sampler from Pennywise Arts and Swing Shift Designs!

1PatrioticTagTrioFinalLarge

Supplies:

•Free Swing Shift Designs Patriotic Collage Sheet

•Pennywise Arts Ultra Fine Micro Beads

•Pennywise Arts O’So Sticky Tape

•Double Sided Foam tape

•3 Manila Tags in graduated sizes (or cut them down yourself)

•Brown Ink Pad

•Assorted Coordinating Ribbons & Lace

•Assorted Buttons

•Assorted star stickers

•Assorted flowers

•Leaf Die Cuts or pre-made leaves

•”Decorative Container Filler” from Dollar Tree or Small Foam Balls or large no hole beads

•Lace Stamp Set (Anna Griffin)

•Assorted Patriotic Stamps

•One ¾” Loose Binder Ring

•Adhesive (I used a Glue Gun & Glue Sticks)

•Scroll Die Cut

•Diamond Glaze or Glossy Accents

•Red & Blue Marker (optional)

Directions:

Cut the tags into graduated sizes if necessary. Stamp the tags with “Lace” stamps on the front and back. Distress the edges of the tags with brown ink.

clip_image002

Adhere free Patriotic Collage sheets to the tags with double-sided foam tape.

clip_image002[4]

Optional: Distress the edges of the images with brown ink and color in a small focal point of the image with blue and/or red ink pens.

clip_image002[6]

Stamp the tags randomly with patriotic images.

Adhere decorative die cuts and lace to the tags.

clip_image002[8]

I purchased the Decorative Container Filler at the Dollar Tree.

clip_image002[10]

Wrap Some flowers around some decorative Container Filler balls to add interest.

clip_image002[12]

Add more flowers, more “decorative filler”, leaves, buttons, and star stickers as desired.

clip_image002[14]

Run a line of Diamond Glaze or Glossy Accents around the edge of each tag and then dip tags into ultra fine Micro Beads. Set aside to dry.

Attach coordinating ribbon through the tops of the tags. Stack the tags with the largest on the bottom and the smallest on the top. Use a loose binder ring to attach them all together.

2PatrioticTagTrioFinalLarge

Monday, February 7, 2011

Valentine Sign Give Away

Just in time for Valentine’s Michele Aiello Zendejas created a beautiful sign collaged in handmade roses (from punches!) and micro beaded collage sheet images.  Her layering and design skills always amaze.  Her eye for details and unique embellishments take her designs over the top.  (Keep reading to learn Michele’s secret to making those gorgeous punched roses!)

ValentineSignFinalLarge

And we’re GIVING it away!!  

Would you like to have this beauty hanging on your door in time for Valentine’s Day??  It could happen!!   All orders over $25 that are placed on our website now through Wednesday at noon will have a chance!   AND if you order collage sheets you will get an EXTRA chance for each sheet ordered – digital OR printed!

All orders/entries will be entered into our little “Hat” random winner picker program at 12:01 pm on Wednesday.   From there I will go directly to the post office with all of the orders.

If you are the winner, you will find this goodie enclosed in your package.  Best of all, the US Post Office should have it to you by Saturday!  Of course, the winner will be announced on our blog and will hopefully leave us a comment when it is received!

To make your own Valentine sign, Michele has supplied step by step instructions:

Supplies:

Swing Shift Designs Collage Sheets: Valentine Hearts 2 and Valentines Hearts 3

•Pennywise Arts Ultra Fine Micro Beads

•Pennywise Arts O’So Sticky Tape

•Double Sided Foam tape

•Red, Pink, and Black Cardstock

•Red Ink Pad

•White Lace

•Bird Die Cut

•Branch Die Cut

•Tag Die Cuts (two sizes to layer)

•Flourish Die Cuts

•Graduated sizes of 6-Petal Flower Die Cuts

•Leaf Die Cuts or pre-made leaves

•Wired pearls

•Flourish Stamp

•“Love” Stamp

•Black Craft Wire

•Mandrel or dowel to coil wire.

•Adhesive (I used a Glue Gun & Glue Sticks)

•3 Eyelets

•Hole Punch

•Eyelet Setter

•Brayer

Directions:

Choose 4 images from the Valentine Hearts Collage Sheets 2 and 3. Cut them out close to the edge of the design. Cover with O’So Sticky Tape and ultra fine micro beads. Set aside. clip_image002

Punch three 6-petal flowers for each rose that you are making.

clip_image002[4]

  1. Make a slit between two petals of one of the flowers.
  2. Cut out one petal off one of the flowers
  3. Cut out two petals from one of the flowers.

Adhere the petals on either side of the cuts on top of each other. Just add glue to the top area of the petal, not at the base. Your 3 three six-petal flowers will now be 1 five-petal, 1 four-petal, and 1 three petal. Use one of the petals that you cut off for the rose center. Roll it up loosely.

clip_image002[6]

Trim the bottoms off of the four-petal flower, the three-petal flower, and the rolled up center petal. Stack and glue them from large to small until you’ve made a rose.

Different size punches or die cuts will create different sized flowers.

clip_image002[8]

I use a jump ring mandrel to curl the edges of the roses for a more realistic look. I’ve also used a round toothpick, the handle part of a cotton swab, different sized round dowels, and skewers to shape petals, depending on their size.

Layer flourish die cuts onto the heart and then add the cut out hearts one by one. Adhere the first heart on the top left with one layer of double-sided foam tape. Use two layers of foam tape for the middle heart and three layers for the bottom heart.

Add roses and leaves to the heart as desired.

clip_image002[1]

Attach the last heart to a coordinating layered tag. Add sentiment and embellishments to the tag. Add a coordinating bird and branch die cut to the large heart and then add wired pearls as desired.

Punch holes and set eyelets at the top of the tag and the heart. Coil wire (I used a large jump ring mandrel) and attach the tag to the wire, then attach the wire to the completed heart.

clip_image002[3]

Wednesday, February 2, 2011

Asian Shadowbox

February is a month of fun holidays!  This week we have groundhog day (Wednesday), Chinese New Year (Thursday), Valentine’s Day (14th) and President’s Day (21st).

Our featured designer for February is Michele Aiello-Zendejas.  Michele was able to work three of those holidays into her elegantly created designs for the month. (Sorry no groundhog!)

Her first project is an “Asian Inspired Assemblage Shadow Box”.  Michele uses lots of great embellishments in her designs and will often create her own embellishments like some of the flowers and the fans shown.

AsianShadowBoxFinalLargePic

After you get inspired here, be sure to collect your FREE Asian Female Image Download from our website.  This image is courtesy of Michele and her company, Swing Shift Designs.

Asian Inspired Assemblage Shadow Box

By Michele Aiello-Zendejas

Supplies:

•1 Shadow Box

Clear Ultra Fine Micro Beads (Pennywise Arts)

O’So Sticky Tape (Pennywise Arts)

Free Asian Female Image Courtesy of Swing Shift Designs for Pennywise Arts

•Chinese newspaper or Chinese text

•2 Chinese Money Envelopes

•Coordinating solid color paper

•4 Corner Stickers

•4 Photo Corners

•Gold Cording

•6 Decorative Beads

•Flower Paper Punches and/or ready-made flowers

•Embroidery Floss and Seed Beads for flower stamens

•Leaf punch or ready-made leaves

•Thin wire

•3 Asian Coins

•Small foam balls (vase filler or beanbag/doll filler)

•Black or Brown Ink

•Adhesive (I used a glue gun & glue sticks)

•Double Sided Foam Tape

•Brayer

Directions:

Take apart the shadow box and begin covering the back with sheets of Chinese text and trim to fit.

clip_image002[4]

After the back is completely covered with paper, distress the edges with an ink pad.

Layer and adhere the images with double-sided foam tape for dimension.

Use O’So Sticky Tape to attach a layer of Micro Beads to the focal image. Use a brayer to make sure that the micro beads are imbedded in the tape. Brayering the beads into the tape also give you a more defined image.

clip_image002[6]

Next punch out several flowers.

clip_image002[8]

Stack 5 of the flowers and set aside.  Loop about six strands of embroidery floss around your finger or the body of a large marking pen.   Tie off the bottom loops with thin wire, then twist the wire into a stem.  Cut the top thread loops and fluff (to make the yellow centers shown below).  Punch a small hole with a needle tool into each of the five flowers.  Then insert the stem through the stack of flowers.   For smaller flowers,  just thread a seed bead onto a wire, twist to secure the bead and then twist the  wire into a stem.  Punch a small hole in the center of each flower with a needle tool, then thread the wire through the flower.

clip_image002[10]


clip_image002[12]


clip_image002[14]

Use glue to secure the flower to the stem or just roll the stem to secure.

Put the shadow box together and secure with glue. Begin layering your embellishments to your liking.

clip_image002[16]

Here is a list of embellishments that I used:

•Accordion fold strips of gold paper to create fans.

•String six beads onto some cording and knot at the top.

•Small foam balls (Vase filler or doll/bean bag filling) colored with pink ink and a gold paint pen.

•Three plastic game pieces colored with a gold paint pen.

•4 gold photo corners adorn the focal image.

•4 gold decorative corner stickers adorn the corners of the shadow box.

•I used purchased small party favor type flowers as accents.