Showing posts with label altered. Show all posts

Sunday, September 30, 2012

Altered Cigar Mail Box Kit

Creative Classes In Paper   Presented by Suzanne Glazier of Pennywise Arts

clip_image002

When this altered cigar box arrived in my mail it took my breath away!  PWA designer, Dee Moran’s attention to the details made me want to keep looking and looking to make sure I didn’t miss a thing!  My next instinct was to make one!  mail box top

And since I think you’ll want to make one too, Dee has given me permission to offer this in a workshop with the possibility of also offering  kits by mail.  Please let me know if this interests you!

I’ve been able to track down almost all of the components that Dee used with some substitutions that work just as well as the original.  Graphic 45 has discontinued the papers that Dee used so the boxes we make in class will be slightly different than the example but not enough to change the overall look and feel of the box.

This is some of the substitute paper we will be using in class:

peninhand “Pen In Hand” (shown above) was also discontinued but I was able to get my hands on enough sheets for 20 students.  The variety of vintage  ink bottles and pen nibs keep with the “mail” theme very nicely, don’t you think?

Here is one side view of Dee’s Box:

mail box side

Inside the lid Dee put corkboard and decorated push pins (not shown).  The box has separate sections for hand stamped note paper, a matching pen, a Post It note pad with an elegant coordinating cover, a pocket for postage stamps, another pocket for labels and some very fun clips! mail box inside

mailbox clips The average paper crafter will have no problem putting this project together in a day.  Workshop would probably run about six hours with a BYOB (bring your own bag) lunch break.

This time of year I look at everything with the eye of “does this project have gift potential?” An altered cigar box made into a sweet box for mail supplies is a resounding, “YES”!

Hugs, Suzanne

Friday, February 3, 2012

Valentine Gift Bag

On one of our play days together my friend Julie Imsland was inspired by a gift bag sample she saw on the web.  Right before my eyes in a very, very short amount of time Julie transformed a white paper sack into this darling Valentine gift/treat bag! 

Julies Gift Bag Front

Below  are her directions.  Note, the tab of the package opens at the back.

Supplies:

Small lunch sack with base of approx. 3” x 5”, I used a recycled white sack

Solid cardstock to match focal image

Focal image by SwingShift Designs: Valentine Hearts 3

Patterned Papers, two to match focal image

¼” O’so Sticky Tape

Gold Opaque Micro beads

Paper adhesive of choice (I used ATG tape)

Foam tape

Self adhesive Velcro circles

Directions:

  1. Open sack completely, and then fold flat, creasing the base in the middle so the front and back of the sack base meet. See photo. (Instead of folding the sack base to one side as usual.)  
  2. Julies Gift Bag Side

  3. Measure the width of the sack front (mine was about 5 ⅛”) and cut 2 pieces of solid cardstock that width x 3 ½”. Adhere these pieces to the front and back of the sack, aligning with the bottom edge.
  4. Cut down the top of the paper sack with decorative scissors next to the edge of the cardstock.
  5. Cut patterned paper for the top portion of the front, ¼” smaller than the width of the solid piece x 2 ¼” high. Cut second patterned paper for the bottom portion the same width as the top x 1” high. Adhere these two papers to the solid cardstock.
  6. Place a piece of ¼” O’so sticky tape along the edge where the patterned papers meet. Peel off the red liner & press tape into a dish of gold micro beads. Press beads down firmly with fingers.
  7. Cut one piece of patterned paper ¼” smaller than the back cardstock. Center and adhere to cardstock.
  8. Tab is a 3” x 1” strip of solid cardstock with a piece of patterned paper ¼” smaller centered and adhered. Fold tab in half and adhere one half of tab at top of the package front.
  9. Cut out focal image and adhere to package front tab with foam tape.
  10. Apply an adhesive Velcro dot to the other end of tab to close package at the back.

Julies Gift Bag Front

Wouldn’t these make fun party favors?

Hugs, Suzanne

Tuesday, December 20, 2011

Snowman Party Favor

I’m hurrying to squeeze in all of the fun things I’ve been working on for Christmas, in case you need easy last minute ideas!

Look at this adorable snowman candy bar dressed up in a sheet of white printer paper and embellished with things you probably already have on hand:  gems, paper, paint, felt.  Do one in just 10 minutes or so or set up a production line and make 10 in under and hour.Snowmanfavor He looks very similar to Laura Davis’s domino ornament!  I think my snowman needs a bank of micro beads snow along the bottom too!

Laurasdom

Hugs and Happy Holidays, Suzanne

Tuesday, November 29, 2011

Silver and Gold Ornament

Silver and Gold Ornament

I would consider this silver and gold ornament to be "altered".  The frame came in a boxed set with the red ribbon already attached.  The image of the couple admiring their holiday lights is from our Swingshift Designs Christmas 9 collage sheet.

I filled in the swirly parts of the frame with Sure Tac glue from Pennywise Arts and sprinkled gold beads on top.  (Any clear drying glue will work).  I gently tapped off the loose beads and let it dry thoroughly.  Pressing the beads into the glue would cause them to loose some of the sheen, so I resisted the urge to do that.  Ü

What a quick keepsake!

Time to put image in frame:  1 minute

Time to add the beads:  2 minutes

Drying time doesn't count because I was sleeping.

Hugs!
Suzanne


Pennywise Arts, where your favorite color can be clear! www.PennywiseArts.Com

Tuesday, March 22, 2011

Tick Tock Fun Clock

PWA Designer Michelle McCarthy has so many creative ideas pouring out of her head! 

Look how she transformed a simple clock kit into a masterpiece of art for a friend:

DSCF4407

I could definitely get used to seeing time in this whole new way!

Michelle is so good at just jumping right in and creating things that she can visualize in her head beforehand.  And then there are people like me who want to know the “hows”…..

This is what Michelle started with:DSCF4396

The clock kit came from Paper Zone in two pieces, one solid piece (back) and one front piece with the precut squares and rectangles.

Supplies:

Designer papers

Micro beads:  Stream, Brown and Clear.

O’So Sticky Tape

Stamps:  Friendship Recipe Stampendous
Stamp by Inkadinkadoo (no name)

Various rhinestones, flowers, Buttons, Tags, misc.

Michelle said that the hardest part was to fit the top paper.  To do it she turned over the top (front) wood piece and laid it on the back side of the card stock to trace the cut outs which were then trimmed with an Exacto knife.

The paper was then applied to the wood with thinned out glue and the bling and embellishments followed.

The edges were lined with a micro bead mix of Stream and Brown and some of the cut aways were filled in with clear beads.

This angle shows the micro beads off the best:

DSCF4401

And a couple of slightly different views:

 DSCF4399 DSCF4400

Such a neat project Michelle!!

Friday, March 18, 2011

Three Entries

Remember Julie’s “Love Grows” beaded frame from a few weeks ago? 

http://pennywisearts.blogspot.com/2011/02/love-grows.html

I now have three entries to share from the two brave gals who were willing to show what they have made using PWA products!

Genene Butler took a plain acrylic frame and added beads to jazz it up. Genene said that she wanted to practice applying the beads in layers and different layouts.  This was her first attempt:

IMG_3596 The second project Genene shared is her testing a theory on mixing beads and glitter to create unique globes:

IMG_3599

Here’s an up close peek:

IMG_3598

Theresa  Dalzell-Wells sent in a photo of a wooden box she decorated using stamped images and PWA micro beads:

Theresa 2

Thanks for taking the time to enter our fun little contest you two!  Hopefully your bravery will inspire others to see just how easy it can be to enter and win with PWA!

And now to enter each of these talented ladies into “The Hat” program to select the recipient of Julie’s “lovely” frame….

And the winner is………….

Theresa!!!

And as an additional little surprise, Julie has taken the frame home with her to do an additional “little something” to it, lucky you Theresa!

And THANK you both for playing along with us!!

Hugs, Suzanne


Saturday, February 26, 2011

Beaded Love Shadow Box

  Once in awhile I host little “Migraine Parties” at my home.  They were dubbed that about 7 years ago, and the name just stuck.  All it means is that yoBeady LOVEu call in sick to work (possibly with a migraine) and then come over and play for the day.  I love having friends over to craft with me because their energy fills my craft room and the laughter and creativity lingers in the space for days after they’ve gone home.  It’s fabulous!
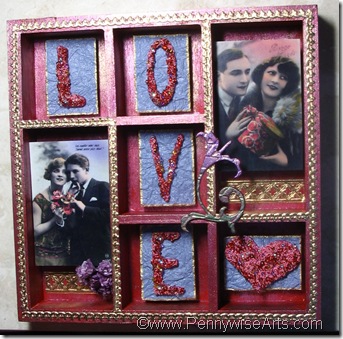
 

Last time I had one of these parties, Julie Imsland was over working on her shadowbox – the one that NO ONE wants to win, even though they don’t have to DO anything other than take a picture and send an email …….for shame…but I digress….. 

So, another PWA designer happened to be there that day, I call her Miss Yvonne, but her real name is Yvonne Grimes.  Miss Yvonne was so inspired by Julie’s box that she actually drove HOME to look in her own craft stash and then came back with a box to work on!

Here’s what Miss Yvonne had to say:

“I was inspired by Michele A-Z’s shadowbox and Julie’s $1 spot find to look through my $1 store frame stash and came up with this shadowbox that was perfect for collage images.”

plain box

Beaded Love Shadow Box   By Yvonne Grimes

Materials:

Wood shadowbox frame

Acrylic paint in desired color

Lumiere paint in desired colors

Tim Holtz Grungeboard letters, heart, and flower

PWA Opaque Micro beads in desired colors (I used red and pink from my stash)

PWA Bubble Beads

Assorted seed beads in desired colors

PWA Collage Sheet “Be Mine”

Cardstock (to back collage image)

Handmade or textured paper, contrasting color to paint & beads

Thick foam tape or dots (or layer thin foam tape to desired thickness)

Gold ‘german scrap’ borders

Small dried or other flowers

SureTac Glue

Krylon gold pen


How To:

Paint the entire frame with a base color in acrylic paint. After it dries apply one or two colors of Lumiere paints over the base coat. Apply with an almost dry brush so that you don’t entirely cover the base color. Set aside to dry.

Paint the grungeboard letters, heart, and flower with the same colors.

Apply “bead soup” (Suzanne’s word for it!) to the grungeboard letters and heart after the paint is dry. Apply a thick layer of SureTac glue to each piece of grungeboard. Then drop seed beads, bubble beads, and lastly micro beads onto the glue to entirely cover each piece and then set them aside to dry. (I put mine on a non-stick craft sheet or piece of foil so I can pick the whole thing up and move it.) Once the glue is dry, gently tap off the unstuck beads.

Beaded heart closeup

Use your finger or a dauber to apply a very thin layer of Lumiere paint directly to the grungeboard flower. I used contrasting colors so it would stand out against the frame.

Attach german scrap borders using SureTac glue around the outside of the frame and around the two sections where the collage images will be mounted.

Attach small piece of german scrap border using SureTac glue to bottom of each section where the collage images will be mounted.

Choose your collage images and trim to fit in the desired section of your frame. Mount each collage image onto a piece of cardstock cut slightly smaller than the image to add stability, and use foam tape or dots to mount each collage image into its niche.

Cut pieces of homemade or textured paper to go behind each grungeboard letter and the heart. Outline with gold Krylon pen if desired.

Mount the beaded grungeboard onto the background paper, and use foam tape or dots to mount each letter and the heart into its niche.

Use SureTac glue to attach the grungeboard flower and other flower embellishment onto the frame where desired.

Attach ribbon to the frame hangars.

Beady LOVE

I love to watch how we all inspire one another!  I think I’ll be saving this one to award as blog candy for the blog hop that is coming soon! 

Sunday, February 13, 2011

Love Grows

It’s true that love does grow with patience, time and care.  This sweet Valentine collage frame by PWA Designer Julie is a tender visual of what it might actually look like if you planted heart seeds and nurtured them to harvest…

Love Grows By Julie I It was difficult to photo this sparkly treasure so I wanted to tell you that the photos and letters are popped up with mounting foam to give the collage depth.  It definitely makes a difference!

Would you like a chance to own this one of a kind creation?

All you need to do is email a good quality photo of something you’ve altered with any PWA products.  Please include your first and last name and a short description of your item and what products you used along with the photo.   All entries will be shared with our blog audience.  One winner will be selected at random by our “hat” to receive the love of this creation.  To protect my email account from spy bots, please click on the “Contact Me” button near the top right of this blog page.

Here’s how Julie did it:

Supplies:

Frame with 2.5" x 3.5" openings (I got this plastic one for $1 at Target)

O'So Sticky Tape, 3/8"

Mini Translucent Micro Beads, Stream

Alphabet stamps

Blue dye ink, to match collage images 

PWA Collage Sheet, To My Valentine1

Glossy Accents

Black, white & red cardstock

Circular punches, two sizes

Foam Tape, Dimensional Glue Dots, scrap of corrugated cardboard (optional)

Flat paint brush


Directions:

  1. Remove the glass & backing from frame.  The glass will not be used for this project.
  2. Place a strip of O'So Sticky tape around the sides of each rectangle opening.
  3. Set the frame in a shallow pan or tray, remove the pink liner and cover the exposed tape with Mini Micro Beads.  Press beads into adhesive.
  4. Squeeze Glossy Accents (adhesive) over the beaded rectangle openings.  Spread adhesive over the beaded strips with a flat paint brush.  With the frame still in a shallow pan or tray, generously pour or spoon more of the Micro Beads over the beaded strips.  Set aside to dry.
  5. Once dry, gently brush off loose beads and return them to bag/jar.
  6. Cut a piece of black cardstock to the same size as frame backing and clip these into the frame.
  7. Trim desired collage images.  To pop the images away from the backing for a shadow box effect, mount the images onto the black cardstock with foam tape.  As an alternative to foam tape, I found it easy to adhere a scrap of corrugated cardboard to the back of each image and then adhere the cardboard scrap to the black cardstock.
  8. Stamp letters with blue ink onto white cardstock.  Use circular punch to punch out each letter.  Punch out a larger circle of red cardstock, and mount each small letter circle onto these.
  9. Use dimensional glue dots to mount letters onto black cardstock in remaining frame openings.
  10. If desired, punch or cut a small red heart for center of frame and adhere with a glue dot. 

Note... Adding extra beads over the first layer gives more dimension to the frame and also intensifies the color of the beaded surfaces.

Love Grows Frame

Before Julie’s muse got a hold of the frame
Love Grows By Julie IAfter Julie’s muse got finished playing!


Wednesday, December 22, 2010

Gift Card Holders

If you follow the Pennywise blog regularly you might recall these AOL cd boxes that were in desperate need of alteration:

aol boxes I’d collected a substantial amount of them years ago when they could be found on the counter at the post office free for the taking (and taking, and taking).  Even just two at a time, they added up quickly when you consider that back then I went to the post office five days a week.  Best of all, these very unique boxes are made of WOOD!

On the first weekend of December, I sat down with four Stampin’ Up paper packs, Sure Tac Glue and 28 AOL boxes.  I was determined to have my project as close to completed as possible before the weekend slipped by.

gift card boxes I’m proud to say that I attained my goal and even got a head start on the handmade poinsettia flowers to embellish each one.  (Jolee’s eat your heart out!) 

Poinsettas With a little help from my friend Chriss Grabb, the flowers were finished during several episodes of “White Collar”. Ü

The boxes are even finished on the inside!  (Spellbinders dies made them look so professional!)

Inside Gift Card Boxes

All I had left to do was make the  tags and add the gift cards!  I chose Restaurant.com cards to show my appreciation to the Pennywise Arts Design Team.  I got a great discount on them and I think it’s fun to go hunting for deals at restaurants we haven’t tried yet!  Design Team members, be sure to read the instructions on the back of the card!

Thanks everyone for your input, ideas and feedback.  I look forward to a prosperous 2011 and hope you’ll be right there with me!

Hugs,  Suzanne

Friday, December 3, 2010

Cards In A Tin

Great tin containers can be found most anywhere and with a little imagination, they can take on a look completely different than when you saw them first.

Michelle McCarthy altered this tin with alcohol inks, rubber stamped images, micro beads and beaded trim. 

IMG_0577IMG_0581  

Inside she can store cards to send, or the whole combination can be given away as a gift.

IMG_0579

I know more than a few people who would love to get a tin of handmade cards as a gift!

Hugs, Suzanne

Sunday, August 1, 2010

More Dollar Store Art

The gals in our Yahoo community are really taking up the challenge and creating great art from things that cost only one dollar!  You go girls!  I love all of the ideas and inspirations!

Laura Davis was first to share and her altered dollar store book is gorgeous!

Laura'sVictorianSpread

Michele Aiello Zendejas needed a thank you gift so she created these stunning notepads! 

Be sure to visit Michele’s blog to see lots more of her artwork!
http://www.atozdesigns.com/maz/

Evelyn Spikes made a special trip to the dollar store in search of things to play in our challenge and here is what she found:

Dollar Tree Finds

I was most intrigued by the candle holder in the back and I love what Evelyn did with it!


tealight evelyn 1000x740 

Look close up!  The bubble beads really add a layer of dimension!  And I imagine when the candle is lit that there could be some fun light play on them as well.

evelyncloseupcrop

The little white pails have been transformed! Dollar Tree mini pails crop

A close up view shows how Evelyn added the bubble beads to this project too:

mini pails closeup crop

Evelyn has a very active blog with lots of her other art postings!  http://www.beyondjustblackandwhite.blogspot.com

I dug up several things that were done in the past to share as well.


Annette Lanker got me totally addicted to these fun frames from the dollar store!Dollar Store Frame

Annette filled in the circles with a clear drying glue and added different colored (opaque) micro beads to each section.  Inside she put a sheet of O’So Sticky Tape and added a neat mosaic element to the tape before applying more coordinating micro beads:

Annette Lanker

Once upon a time a group of beadie buds took a day trip to Alaska for a shoebox party and oh what fun we had!  I wanted a special frame to commemorate that trip of a lifetime so I used Annette’s technique:

Suzanne Glazier

And here is another frame that I embellished for a swap I participated in:

 3 Frame   My 3 Frame

All three frames were painted over with white acrylic paint that was then colored with alcohol inks.

I love to show close up pictures so you can really see the detail better.  The suns were made using alcohol ink on flat glass pebbles glued to wire that had been curled.  There is a layer of clear embossed sun stamping on the frame that is really only visible in the upper left corner of this photo:

Sun

The surf frame was embossed with O’so Sticky Powder, micro beads and fru fru flakes.  It’s my favorite of the three!

Surf

The big embossed seashells don’t show well in this photo of the sand frame but there are there.  Over that I made a thick squiggle of Sure Tac Glue (it dries clear and I love it!)  I place the shells where I wanted them and then grouted the rest of the exposed glue with micro beads.  When it was dry I went over it with a bottle of alcohol ink, squeezing the color right from the bottle over the shells and beads.  I love how many of the shells natural colors and textures still showed so well after inking them brown!

Sand   

If you’re read this far you must be a dollar store addict and art junkie too!  Send me photos of your creations and I’ll share them here!   Email: suzanne@pennywisearts.com