Thursday, August 19, 2010

Something Fishy Here

Funny thing about this post is that it’s not formatting like it normally does….. something is definitely fishy and it’s not just this spotlight card from Yvonne Grimes! IMG_0251


Here’s how she did it:

Alcohol Inked Spotlight Card By Yvonne Grimes

(stamp by Peddler’s Pack)

1. Use Stazon Jet Black ink to stamp your image once on clear acetate, and once on white cardstock.

2. Use alcohol inks to color the back side of the stamped acetate. (Alcohol ink will lift the Stazon ink right off the acetate if you apply over the inked side)

a. Attach a felt pad to the wood handle and apply 5-6 drops of each color next to each other in the center of the felt pad.

b. Use handle to repeatedly “pounce” the alcohol ink onto the acetate. Turn and overlap while pouncing until the entire piece is covered as desired.

c. Apply 1-2 drops of blending solution onto same felt pad and “pounce” all over to lighten color and add spots.

d. Set aside to dry for couple minutes.

3. Cut a piece of O’So Sticky tape sheet to the size of the white cardstock and apply tape to white cardstock over the stamped image. Use the “tape trick” to line up tape before sticking it down.

a. “Tape Trick” – peel and fold back just one corner of the paper backing from the tape. Lay entire piece of tape down letting the turned back corner keep exposed tape off the surface. Get your edges all lined up and then stick down the exposed corner.

b. Remove rest of the paper backing and use your fingers to burnish the tape down good over the entire surface so there are no air bubbles.

4. Take your colored piece of acetate and trim to edge of image. Then cut several sections of whatever size and shape you desire from the colored piece.

5. Use the “tape trick” again to place your acetate over the matching areas on the cardstock.

a. Lift just a corner of the red liner and fold back to make a flap. Lay the acetate over the matching area with the flap holding it off of the exposed tape. Get it lined up and then stick down onto the exposed tape. Pull the red liner off far enough to stick the rest of the acetate piece down.

b. Repeat as desired for each acetate section.

c. Use the red liner to burnish the acetate sections onto the tape.

6. When done applying acetate pieces, remove red liner, dunk entire piece into the Mini Micro Beads to cover the exposed tape, and burnish with the brayer.

7. Use double-stick tape to apply image to mat, and mat to card.

Embellish card as desired and you’re done!


At Pennywise Arts we’ve become world famous for our shoebox parties!  Last month we had a mini shoebox party in North Bend and Yvonne shared this fishy project there.  Artist Vicki Chow put her own spin on the technique by cutting out the fish!  Pretty cool!

IMG_0253

Here is the same technique used on another card by Yvonne:

IMG_0252

Tuesday, August 17, 2010

Bubbly

PWA designer Becky Ward has added a lot of great texture to this “bubbly” card!

IMG_0260

Three layers of cardstock, a Cuttlebugged background, three dimensional popped up flower, ribbon and Pennywise Bubble Beads all come together to create an astonishing card that has to be fondled to be fully appreciated!  Ü

Hello Bubble Beads!

We are pleased to show off this bright and beautiful card by Marianne Colschen!  The pink, yellow and orange colors of this creation are hot, hot, hot!

IMG_0142 

Marianne used our new Iridescent Bubble Beads to accent the centers of her flowers and they add so much texture and shine!  Do you love it as much as I do?? 

Saturday, August 14, 2010

Birds Beads and Butterflies

A couple of weeks ago I had the opportunity to take a class from my dear friend and PWA designer (formerly our office manager), Yvonne Grimes and oh what a wonderful class it was!  Yvonne went wild with Memory Box papers and Outlines rubber stamps to create this gorgeous mirror (from Ikea):

Yvonnes Mirror 2Each package of 6” by 6” Memory Box paper came with 30 sheets of paper in ten different coordinating patterns.   Yvonne embossed NINE different sheets of paper for every student so that all we had to do was cut and color.  Sweet!  Layers and layers and more layers are her secret to creating these fun mosaic blocks.  Here is my bee:

bee

Can you see the micro bead layer?  It’s the outermost square in white and blue.  I love how just putting the clear beads over the paper distorts the image and reflects the colors from underneath!

I’ve always teased Yvonne for being a “fussy cutter” because she’ll cut out the tiniest details for her artwork.  (And she teases me for liking to color things so it’s all fair!)   In class it was neat to experience her world of  “fussy cutting”!  With these amazing results, it really made me reconsider my previous aversion to it!

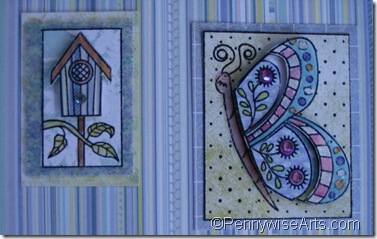
Here is my birdhouse and butterfly together:

butterflyIt’s hard to see the dimension in the photos but several pieces are layered up one, two or even three thicknesses of foam tape.  Our 1/8” foam tape strips really came in handy here!  All of the blocks are colored with shimmery watercolor paints (any brand will do!) and finished off with lots of gems and jewels.

Yvonne even sent every student home with all the extra papers from the kits and we got to keep all of our leftover embossed pieces!

IMG_0279Using her technique and my leftover pieces I was able to make 20 ATCs and still have enough papers to keep on going!  WOW!!!

IMG_0280 If you’re on the PWA ATC 1-4-1 swap list, you’ll be seeing one of these ATCs  in your mailbox before the end of the month!  Ü

yvonnesm

Yvonne is currently employed at Friends and Company in Issaquah, WA.  Be sure to look for her on the class schedule!  Yvonne is an awesome teacher and I have no doubt that you’ll have an excellent experience!

P.S.  I’ve seen what she’s been working on for this fall and it’s gonna be FUN!!

Thursday, August 12, 2010

Beautiful Girl

Marianne Colschen is a very busy beader!  I have a whole box of fun stuff from her to share with you this month!  Marianne created this layout of her gorgeous granddaughter to show how she uses our micro beads to add texture to her elements and make them sparkle too!

Die cut and micro beaded flowers along with a dragonfly are the perfect accent for a girly design!

Scrapbook or Frame

Here is a close up of the dragonfly.  The body has been lifted up with pop dots.  I just love the “bling” of the gems!

Scrapbook or Frame up close 

Our O’So Sticky Paperback Tape works great with punches and die cutters.  Sizzix, Cuttlebugs, Cricuts and more – get them out and make something beadiful today!


Note:  Please take special care when using O’So Sticky Tape in your hand held punches to insure that your punch is clean before and after use with O’So Sticky.  Some sticky residue can build up and it’s important that you clean it off to keep your punch working smoothly.  Always use O’So Sticky Paperback in hand held punches, NEVER use the regular (red liner) tape.  The red is actually made of rubber and could damage your punch.

Tuesday, August 3, 2010

Bubble Beaded!

Marianne Notebook

Marianne Colschen has been a busy, busy beader finding all kinds of fun and unique ways to incorporate our newest Iridescent Bubble Beads into her art! 

This darling notebook is small enough to tuck into a purse and stylish enough to make you want to actually write important things down in it!  Ü

BONUS!  This week one lucky customer will find this bead-i-ful beauty tucked into their order envelope!  All orders placed between Tuesday August 3rd and Saturday August 7th will be assigned a number in numerical order of receipt.  A predetermined “secret number” has already been assigned as the winner and if you happen to be “that” order number then you win!  We hope the winner will post a comment back to this page too – cause it’s always fun to hear from excited customers!

We look forward to sharing more of Marianne’s art with you all month long so keep coming back!

Hugs,

Suzanne

Oh –and go place your orders!  www.PennywiseArts.com !!

Monday, August 2, 2010

Art Is A Process

The Pennywise Yahoo community has a lot of really great swaps throughout the year.  The fat book page swaps are one of my favorite.  The current fat book theme is “See The World” using a luggage tag template that was provided.

Alert!  If you are in this swap and want to be surprised you should stop reading now.  This blog post could be interpreted as a swap spoiler and I wouldn’t want to influence you in any way.

It was easy to decide that I wanted to do something with the ocean because of all the stuff I have that I could use (and use up!) in doing it.  Plus, I just love the ocean!

As I was working on my tags I became very aware of my own personal art process:

1. I am a social artist.  I gain enthusiasm and inspiration when sharing a play day with other artists.  The afterglow of spending time with friends making art lasts for days and I love this intensely creative time.

2.  I don’t usually have a plan for how the end will look, I just ride the wave of “now” and see where it takes me. 

3. I make a big mess when doing art!

For the first part of my tag process I covered chipboard with paper from Design Originals.  Then I clear embossed part of the image with a shell stamp to give the illusion of water.  Stamp credit: Stampington and Company

My Process Emboss Friends can be the best resource of all for ideas and inspiration.  My friend Julie came to play and shared some recycled heavy acetate with a wave shape cut from one side.  The wheels started turning and I knew I wanted to incorporate that wave into my design.

I thought about the wave on the sand square of my dollar store art (see previous post) and decided to use that technique on my tags.  I cut the acetate to match the length of the tags and then squeezed out a line of Sure Tac Glue.  I then placed shells along that line and added clear micro beads for grout on the spaces in between.  The glue will dry clear.

My Process GlueAnd that is as far as I have gotten so far.  I think I’ll continue to share my process as I experience it with these tags.  One thing is for sure, I definitely have a messy process!  Here is a picture of my table:

My Process Mess

Hugs, Suzanne

P.S.  If you are interested in joining the 10 for 10 luggage tag swap and receiving one of my tags in trade, please contact me!  The due date is August 31st – still a whole month away!