Showing posts with label paper craft. Show all posts

Monday, November 5, 2012

Come Make Art With Me!

Creative Classes In Paper   Presented by Suzanne Glazier of Pennywise Arts

clip_image002


There is still time to join me at Art 'n Soul in Olympia this Sunday for TWO fun classes!

butterfly 

Bottle Cap Pendants $25  (12:00 noon)

Using supplies from Pennywise Arts and Bottlecap, Inc. we will complete 5 pendants of different design in about 90 minutes.

Class kit includes ball chain and beautiful clear lid gift boxes for all 5 pendants.  So easy and so beautiful!  Check five friends off your Christmas gift list lickety split!


Handmade Paper Stars!  $283Dstar  (2:30 pm)

These incredible three dimensional stars are over 13” across and are made completely of paper! Learn how easy it is to create one of your very own with templates from Pennywise Arts! Students will be given additional templates to take home, including bonus pages with a variety of star sizes.

Students may wish to bring their own basic supply kit with scissors, cutting mat and craft knife to reduce any waiting time for shared materials.

Call Art ‘N Soul to get registered! 360.357.6820

Art ‘N Soul is located at 909 Sleater Kinney Rd SE Ste 12, in Lacey, WA.

Hope to see you there!  Hugs, Suzanne

Other class offerings can be found on our website:  http://www.pennywisearts.com/classes.php 

Private art parties are available at my place or yours!

Friday, September 7, 2012

Paper Roses Galore!

Presented by Suzanne Glazier of Pennywise Arts

clip_image002

I hope you’re not tired of seeing my paper roses yet!  I don’t think it’s possible to ever tire of making them!  Yesterdays photo didn’t show the individual packages very well, so I retook the pictures.  :)

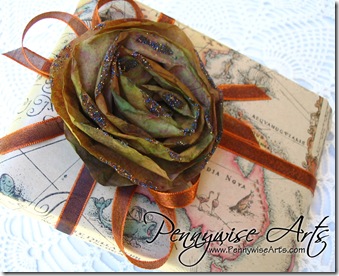
This rose/bow is huge!  It’s about 10” across.

IMG_2130

It’s super easy to add any blend of micro beads to the edges for more interest and texture (if that’s even possible!)

IMG_2118

I had so much fun matching my roses up with hand made papers from my stash and coordinating it all together with my favorite ribbons from May Arts.

IMG_2120  IMG_2133 This is my favorite one so far:

IMG_2114  Now to get busy on my shaker card samples for classes on the 23rd!  (There will be kits for sale online too, in case you live too far away to come shake it up with us). Ü

Hugs, Suzanne

Friday, April 15, 2011

Yay! It’s PWA Blog Hop Day!

Blog Hop Icon

I love blog hops!  The energy that swirls around this annual event is incredible!  I have to admit that the response really took me by surprise last year – in a huge and wonderful way!

This weekend you’ll have the opportunity to hippety-hop through some amazing creativity.  The artists have all worked hard to bring you their best and some are even awarding it as blog candy.  COOL BEANS!

WIN!

I’ll be cruising through the blogs each day and selecting at least one winner per day from the comments to receive an extra special handmade gift from one of our designers.  If you want to win here’s a tip – leave a comment that is thoughtful and personal in some way.  ;0)

But wait there’s more!

In ADDITION to the prize drawings EVERY SINGLE order placed on the PWA website over the weekend (Saturday and Sunday) will receive a piece of FREE blog candy created by one of our design team members!  WOWEE!!  Just look through our archives to see what you might receive!  Ü

Let’s kick this thing off! 

PWA designer Jean Sunderman brings some western influenced artwork to the party in honor of the Pennywise Arts annual crafting retreat that is taking place the end of this month in Cle Elum, Washington.

Jean’s first card has a handsome fellow on the cover with three silver micro beaded stars for embellishment.  Inside the card says “Save a horse, ride a cowboy” oh my!  ;0)IMG_0988

I love Jean’s atc “I always get my man”.  It’s a sweet little shaker card that used one of the free PWA templates

IMG_0987

  Also from our shaker card files, Jean’s finale is a sassy lassie who’s good with a rope!  IMG_0990 

Thanks for stopping by Pardner!  Now it’s time to mosey on over to my friend Jennifer’s blog.  She’s bursting with creativity and so excited to share with ya’ll!  I heard tell she may be giving away some goodies too!  Ü

Oh, and Yey!  If you’re interested in joining up with a fun group of wild women at the PWA retreat there are still a few spots left and we’d love to have ya!

Tuesday, March 22, 2011

Tick Tock Fun Clock

PWA Designer Michelle McCarthy has so many creative ideas pouring out of her head! 

Look how she transformed a simple clock kit into a masterpiece of art for a friend:

DSCF4407

I could definitely get used to seeing time in this whole new way!

Michelle is so good at just jumping right in and creating things that she can visualize in her head beforehand.  And then there are people like me who want to know the “hows”…..

This is what Michelle started with:DSCF4396

The clock kit came from Paper Zone in two pieces, one solid piece (back) and one front piece with the precut squares and rectangles.

Supplies:

Designer papers

Micro beads:  Stream, Brown and Clear.

O’So Sticky Tape

Stamps:  Friendship Recipe Stampendous
Stamp by Inkadinkadoo (no name)

Various rhinestones, flowers, Buttons, Tags, misc.

Michelle said that the hardest part was to fit the top paper.  To do it she turned over the top (front) wood piece and laid it on the back side of the card stock to trace the cut outs which were then trimmed with an Exacto knife.

The paper was then applied to the wood with thinned out glue and the bling and embellishments followed.

The edges were lined with a micro bead mix of Stream and Brown and some of the cut aways were filled in with clear beads.

This angle shows the micro beads off the best:

DSCF4401

And a couple of slightly different views:

 DSCF4399 DSCF4400

Such a neat project Michelle!!

Saturday, February 26, 2011

Beaded Love Shadow Box

  Once in awhile I host little “Migraine Parties” at my home.  They were dubbed that about 7 years ago, and the name just stuck.  All it means is that yoBeady LOVEu call in sick to work (possibly with a migraine) and then come over and play for the day.  I love having friends over to craft with me because their energy fills my craft room and the laughter and creativity lingers in the space for days after they’ve gone home.  It’s fabulous!
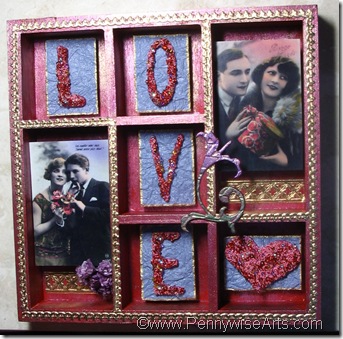
 

Last time I had one of these parties, Julie Imsland was over working on her shadowbox – the one that NO ONE wants to win, even though they don’t have to DO anything other than take a picture and send an email …….for shame…but I digress….. 

So, another PWA designer happened to be there that day, I call her Miss Yvonne, but her real name is Yvonne Grimes.  Miss Yvonne was so inspired by Julie’s box that she actually drove HOME to look in her own craft stash and then came back with a box to work on!

Here’s what Miss Yvonne had to say:

“I was inspired by Michele A-Z’s shadowbox and Julie’s $1 spot find to look through my $1 store frame stash and came up with this shadowbox that was perfect for collage images.”

plain box

Beaded Love Shadow Box   By Yvonne Grimes

Materials:

Wood shadowbox frame

Acrylic paint in desired color

Lumiere paint in desired colors

Tim Holtz Grungeboard letters, heart, and flower

PWA Opaque Micro beads in desired colors (I used red and pink from my stash)

PWA Bubble Beads

Assorted seed beads in desired colors

PWA Collage Sheet “Be Mine”

Cardstock (to back collage image)

Handmade or textured paper, contrasting color to paint & beads

Thick foam tape or dots (or layer thin foam tape to desired thickness)

Gold ‘german scrap’ borders

Small dried or other flowers

SureTac Glue

Krylon gold pen


How To:

Paint the entire frame with a base color in acrylic paint. After it dries apply one or two colors of Lumiere paints over the base coat. Apply with an almost dry brush so that you don’t entirely cover the base color. Set aside to dry.

Paint the grungeboard letters, heart, and flower with the same colors.

Apply “bead soup” (Suzanne’s word for it!) to the grungeboard letters and heart after the paint is dry. Apply a thick layer of SureTac glue to each piece of grungeboard. Then drop seed beads, bubble beads, and lastly micro beads onto the glue to entirely cover each piece and then set them aside to dry. (I put mine on a non-stick craft sheet or piece of foil so I can pick the whole thing up and move it.) Once the glue is dry, gently tap off the unstuck beads.

Beaded heart closeup

Use your finger or a dauber to apply a very thin layer of Lumiere paint directly to the grungeboard flower. I used contrasting colors so it would stand out against the frame.

Attach german scrap borders using SureTac glue around the outside of the frame and around the two sections where the collage images will be mounted.

Attach small piece of german scrap border using SureTac glue to bottom of each section where the collage images will be mounted.

Choose your collage images and trim to fit in the desired section of your frame. Mount each collage image onto a piece of cardstock cut slightly smaller than the image to add stability, and use foam tape or dots to mount each collage image into its niche.

Cut pieces of homemade or textured paper to go behind each grungeboard letter and the heart. Outline with gold Krylon pen if desired.

Mount the beaded grungeboard onto the background paper, and use foam tape or dots to mount each letter and the heart into its niche.

Use SureTac glue to attach the grungeboard flower and other flower embellishment onto the frame where desired.

Attach ribbon to the frame hangars.

Beady LOVE

I love to watch how we all inspire one another!  I think I’ll be saving this one to award as blog candy for the blog hop that is coming soon! 

Wednesday, December 22, 2010

Gift Card Holders

If you follow the Pennywise blog regularly you might recall these AOL cd boxes that were in desperate need of alteration:

aol boxes I’d collected a substantial amount of them years ago when they could be found on the counter at the post office free for the taking (and taking, and taking).  Even just two at a time, they added up quickly when you consider that back then I went to the post office five days a week.  Best of all, these very unique boxes are made of WOOD!

On the first weekend of December, I sat down with four Stampin’ Up paper packs, Sure Tac Glue and 28 AOL boxes.  I was determined to have my project as close to completed as possible before the weekend slipped by.

gift card boxes I’m proud to say that I attained my goal and even got a head start on the handmade poinsettia flowers to embellish each one.  (Jolee’s eat your heart out!) 

Poinsettas With a little help from my friend Chriss Grabb, the flowers were finished during several episodes of “White Collar”. Ü

The boxes are even finished on the inside!  (Spellbinders dies made them look so professional!)

Inside Gift Card Boxes

All I had left to do was make the  tags and add the gift cards!  I chose Restaurant.com cards to show my appreciation to the Pennywise Arts Design Team.  I got a great discount on them and I think it’s fun to go hunting for deals at restaurants we haven’t tried yet!  Design Team members, be sure to read the instructions on the back of the card!

Thanks everyone for your input, ideas and feedback.  I look forward to a prosperous 2011 and hope you’ll be right there with me!

Hugs,  Suzanne

Saturday, August 28, 2010

A Little Hello

Sometimes an understatement makes a big statement, like with this simple little card designed by Beki Ward.

IMG_0262

Beki layered a couple of pretty papers, stamped her sentiment, punched the edge of the card cover and added a sweet little micro beaded flower pot.  I love it!

Monday, August 2, 2010

Art Is A Process

The Pennywise Yahoo community has a lot of really great swaps throughout the year.  The fat book page swaps are one of my favorite.  The current fat book theme is “See The World” using a luggage tag template that was provided.

Alert!  If you are in this swap and want to be surprised you should stop reading now.  This blog post could be interpreted as a swap spoiler and I wouldn’t want to influence you in any way.

It was easy to decide that I wanted to do something with the ocean because of all the stuff I have that I could use (and use up!) in doing it.  Plus, I just love the ocean!

As I was working on my tags I became very aware of my own personal art process:

1. I am a social artist.  I gain enthusiasm and inspiration when sharing a play day with other artists.  The afterglow of spending time with friends making art lasts for days and I love this intensely creative time.

2.  I don’t usually have a plan for how the end will look, I just ride the wave of “now” and see where it takes me. 

3. I make a big mess when doing art!

For the first part of my tag process I covered chipboard with paper from Design Originals.  Then I clear embossed part of the image with a shell stamp to give the illusion of water.  Stamp credit: Stampington and Company

My Process Emboss Friends can be the best resource of all for ideas and inspiration.  My friend Julie came to play and shared some recycled heavy acetate with a wave shape cut from one side.  The wheels started turning and I knew I wanted to incorporate that wave into my design.

I thought about the wave on the sand square of my dollar store art (see previous post) and decided to use that technique on my tags.  I cut the acetate to match the length of the tags and then squeezed out a line of Sure Tac Glue.  I then placed shells along that line and added clear micro beads for grout on the spaces in between.  The glue will dry clear.

My Process GlueAnd that is as far as I have gotten so far.  I think I’ll continue to share my process as I experience it with these tags.  One thing is for sure, I definitely have a messy process!  Here is a picture of my table:

My Process Mess

Hugs, Suzanne

P.S.  If you are interested in joining the 10 for 10 luggage tag swap and receiving one of my tags in trade, please contact me!  The due date is August 31st – still a whole month away!

Tuesday, July 27, 2010

Time Worn

This is a really fun ensemble by Jennifer Toussaint.  For supplies she made a trip to the dollar store.  I love the dollar store!  I’m always finding interesting things to add to my craft stash from there.  Give me ten bucks and an hour or two at Dollar Tree and I’m in heaven!

Time Worn PadJennifer set out to make the note pad and as an afterthought the magnet came to be.  I think they are both fabulous and I especially love the cracked glass look of the magnet!

time worn magnetHere’s how she did them:

The Magnet:

Square rubber stamp of moon and sun by Inkadinkadoo

Vanilla cardstock

Chipboard piece of same size

Ultra Thick Embossing Enamel

Versa Mark Pad

Copper, black and gold micro beads from Pennywise Arts

Watch pieces

Magnet piece

Craft glue

Black pigment ink

Various markers

Directions:

Stamp sun and moon stamp with black ink and let dry on cardstock. Color in with choice of markers and then cut piece out to edge of image. Press into Versa pad and then cover with UTEE and heat to melt with heat gun. Quickly do this 3 times. On the third time sprinkle the piece with micro beads and time pieces. Let dry and then crack the piece by bending. Attach this image to piece of same size chipboard. Using brown marker color edges and back to match the design (or color of your choice). Attach magnet to back with craft glue. Let dry.

The Note pad:

Small notepad from Dollar Tree

Cardstock in vanilla to fit double the size of whatever notepad size you choose (they have several sizes)

Beaded ribbon from Dollar Tree

Same sun/moon stamp

Black pigment ink

UTEE (ultra thick embossing enamel)

Various stickers and word cut out pieces

“In The Sky” rubber stamp set from Stampin’ up

Markers to coordinate your magnet piece colors

Distressing kit from Making Memories

Time worn looking stickers

Directions:

Fold cardstock in half over the pad of paper and trim to fit. Stamp the sun/moon stamp in the middle of the front of the piece of cardstock with black ink and then cover with UTEE and heat gun emboss the image. Color in as desired with markers. Stamp star stamp from the “In The Sky” set around image and on the back. Emboss with UTEE. Distress the front and back by crumpling the piece of paper several times then rub the small green and brown distress inks over the piece thoroughly to make the crinkles stand out as though it were time worn. Adhere the front and back of the piece of cardstock to the notepads front and back with adhesive. Cover the flip side of the beaded ribbon with adhesive and then adhere to the front of the notepad wrapping around to the underside of the front cover. Embellish the front of the notepad cover with stickers of your choice.

What fun things have you made from items purchased at a dollar store?  We’d love for you to share them with us!  Just email me a good quality photo and I’ll post it for you!  suzanne@pennywisearts.com


P.S.

Designer Michele Aiello Zendejas found these cute heart boxes at The Dollar Tree!

http://pennywisearts.blogspot.com/2010/03/beautifully-boxed-and-beaded.html

Tuesday, July 20, 2010

Hey Friend! Candy Jar

You can always tell a true friend by how often they bring/send you chocolate!  And, if said chocolate is your most favorite kind, then you know you are loved!  Ü

Hey Friend

I do love how Jennifer Toussaint’s candy jar decor matches the deep purple of dark chocolate Hershey’s Kisses!  (And did I mention that dark chocolate is my favorite?!!)  Thanks Jenn, I feel loved!!

Does Jennifer’s sweet treat inspire you to do something fun and spontaneously chocolate for a close friend of your own?  Well hurry and gather up the goods!  This won’t take long at all!

Materials:

Clear and purple opaque micro beads from Pennywise Arts

O’So Sticky Tape™ Sheet Pennywise Arts

1/8” O’So Sticky Tape™  Pennywise Arts

Eggplant cardstock (Stampin’ up)

Mouse Stamp - Cute Critters (Stampin’ up)

Me and My Big Ideas scrapbooking paper

Markers from Stampin’ up in Lovely Lilac,  Going Grey, Sage Shadow, Blush Blossom

Round 1-¼ in. circle punch

White cardstock

Flower eyelet

Flower chipboard from Colorbox

White paper flower

Jar from Dollar Tree store

Crinkle scissors

Lavender ribbon

Purple metallic embossing powder

Versa Mark pad

Adhesive tape

Hey Friend stamp or other sentiment stamp of your choice

Directions:

Using Lovely Lilac marker color the “Hey Friend” rubber stamp and stamp two images onto white cardstock. Cut out just around the edges of the sentiment. Use these pieces as templates to cut out pieces of O’So Sticky Tape™ from a sheet. Cut out the O’So Sticky Tape™ and apply over the image. Apply clear micro beads to both sentiments. Use eggplant paper to back each sentiment piece by ½ inch. Use crinkle scissors all around each edge. Use adhesive tape to assemble as shown. The jar I used was square and so I took advantage of the embossed squares on each side and used these squares as templates for my scrapping paper. I applied a piece to each of the four sides. Stamp mouse image on two pieces of white cardstock. Color in using markers or colored pencils. Cut out and border with purple cardstock. Assemble pieces with adhesive. Apply sentiment pieces and mouse pieces on opposite sides of the square jar.

Here’s what the jar looks like from the top:

Hey Friend Jar Lid

Wrap a piece of O’So Sticky Tape™ around the outside edge of the lid and peel back. Apply ribbon firmly to the sticky tape. Then use another piece of sticky tape and wrap around the middle of the ribbon and peel back. Apply purple opaque micro beads to create the beaded line around the lid. Use a Versa Mark pad and place the chipboard flower piece face down in it. Dip in metallic purple embossing powder and emboss. Cool. Use middle circle of flower and cut a circle out of scrapping paper using circle punch. Adhere to circle chipboard piece. Use eyelet tool to add eyelet flower to middle of the circle. Assemble the jar top pieces as shown. Fill jar with your (or your friend’s) favorite candy!

Tuesday, April 27, 2010

Buttons and Beads

Today we have another great project tutorial from designer Evelyn Spikes.  I love how quick and easy this card is to make and the results are colorfully fun!9. Adhere stamped sentiment to front

Supplies Needed:

Patterned cardstock with circles or cardstock stamped with circles in pattern

Coordinating colors of cardstock for mat and A2 card

Coordinating colors of buttons

O’So Sticky Tape sheet from Pennywise Arts

Clear ultrafine micro beads from Pennywise Arts

Adhesive of choice

 How To Do This Technique

Step 1  Select coordinating cardstock.  Cut and fold card base.

3. Select coordinating cardstock

Step 2  Cut patterned paper; cut piece of O’So the same size

Step 3  Apply O’So to patterned paper.

5. Cut O'So to fit patterned cardstock 

Step 4  Remove O’So Sticky Tape liner and adhere buttons where desired on patterned paper.

6. Peel liner and apply buttons in circles

Step 5  Pour ultrafine beads over exposed O’So.

7. Pour on ultrafine beads

Step 6  Layer beaded piece over mat piece.

 8. Adhere beaded piece to card

Step 7  Cut and apply thin piece of mat color to front of card; adhere beaded piece.

Step 8  Stamp and adhere sentiment to front of card.

        9. Adhere stamped sentiment to front

Stamp Credit: Rubber Stampede

Thursday, April 1, 2010

More Than A Tag


 Evelyn for blog

Our featured
designer for April
is Evelyn Spikes

Evelyn is “a happily retired high school English teacher in NE Oregon.”  She says, “I am fortunate to be able to spend as much time as I want crafting with paper and taking photographs. Married for more than 30 years, my husband and I have two grown sons....one in western Oregon and one in New York.”

We are excited to share some of the art that Evelyn has created in her spare time for the Pennywise Arts Design Team!  This is her first project, “More Than a Tag”. 10. Complete tag In this post Evelyn shows and tells us how she made this unique tag design, if you want to follow along just gather up these supplies:

*  Medium-sized tag (2 5/8 x 5 ¼”) and  an additional tag for cutting (manila file folder or cardstock can be used)

*  Collage stamp with distinct geometric images

*  Dye ink color of choice

Paperback O’So Sticky

*  Foam squares

*  Clear ultrafine micro beads

*  Choice of coordinating embellishments, including ribbon

How To Do This Technique

Step 1. Use dye ink to stamp tag with collage stamp.

1. Ink collage stamp

Step 2. Stamp a second time on extra tag.

2. Stamp tag

Step 3. Cut out desired geometric images in collage.

3. Stamp second tag; cut out images

Step 4. Using cut-out images, trace shapes on paperback O’So, cut out and apply to images.

4. Trace around image on paperback O'So

Step 5. Bead images with clear beads. Set aside.

5. Cover all cut-outs with O'So

Step 6. Apply ink to edges of stamped tag.

6. Apply ink to edges of tag

Step 7. Using foam squares, apply beaded collage shapes to matching locations on tag.

8. Beaded pop-ups7. Bead all cut-out shapes; apply to base with foam squares

8. Apply embellishments and coordinating ribbon.

9. Select embellishments and apply 

Stamp Credit: Inkadinkado

Evelyn has her own art blog where she shares her creations.  It’s updated regularly and is a great source of inspiration.   Be sure to check it out!