Showing posts with label embellishments. Show all posts

Thursday, March 3, 2011

Beadalicious Grungeboard Embellishments

I was just messing around one day……

IMG_0918

and decided to paint a piece of Grungeboard with blue Lumier paint.  When it was dry I covered it with Diamond Glaze.  Then I sprinkled it with my sea inspired bead soup.  (A mixture of seed beads, bugle beads and micro beads mostly in blue and purple hues with a splash of green and gold.  I was so pleased with myself that I went on to do the ENTIRE package of Grungeboard in this manner!  So if you see these elements on everything I do for awhile, that’s why!  Ü

Here is a neat accordion book that Miss Yvonne taught me how to make using 6” square canvases as the covers. 

IMG_0911e

I think my beadalicious Grungeboard was the perfect cover accent, don’t you?

I haven’t finished the inside yet but have big plans for the fun niches hidden inside! 

IMG_0924 

I definitely need to bead more Grungeboard!  Hmmmm,… what color combo to do next?  Why don’t you try it and share yours with me!?

Hugs, Suzanne

Thursday, August 12, 2010

Beautiful Girl

Marianne Colschen is a very busy beader!  I have a whole box of fun stuff from her to share with you this month!  Marianne created this layout of her gorgeous granddaughter to show how she uses our micro beads to add texture to her elements and make them sparkle too!

Die cut and micro beaded flowers along with a dragonfly are the perfect accent for a girly design!

Scrapbook or Frame

Here is a close up of the dragonfly.  The body has been lifted up with pop dots.  I just love the “bling” of the gems!

Scrapbook or Frame up close 

Our O’So Sticky Paperback Tape works great with punches and die cutters.  Sizzix, Cuttlebugs, Cricuts and more – get them out and make something beadiful today!


Note:  Please take special care when using O’So Sticky Tape in your hand held punches to insure that your punch is clean before and after use with O’So Sticky.  Some sticky residue can build up and it’s important that you clean it off to keep your punch working smoothly.  Always use O’So Sticky Paperback in hand held punches, NEVER use the regular (red liner) tape.  The red is actually made of rubber and could damage your punch.

Tuesday, July 6, 2010

Love Inside

It is such a treat to share amazing artwork with you from our design team each week!  They are an inspirational group of gals that inspire me over and over again.  I always look forward to what surprises will arrive in the mail.  Ü

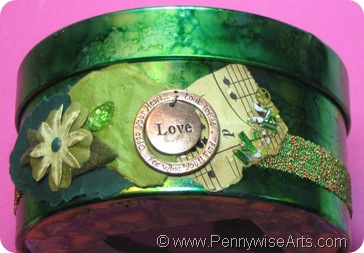
This decorated tin by Jennifer Toussaint really got me drooling (and I’m sure it has nothing to do with the dark chocolate she sent with it… Naw, nothing.) Box Of Love Clip

In addition to being a very busy wife and mother, Jennifer is a faithful member of our Yahoo Community.  She assists as an administrator, participates in many of our swaps and designs incredible art like this to share!  

The luscious Hershey’s Kisses I mean, luscious alcohol ink colors that Jenn selected for this project really got things off to a great start!

Box of Love

Materials list:

(Recycled) Calypso poinsettia paper flower tin

Adirondack alcohol inks in Citrus and Stream

Cardstock bits from Stampin’ up

Music sheet paper

Assorted crushed bead bits

Watch pieces

Crystal Effects

O’So Sticky Tape from Pennywise Arts

Paper flowers from LTD catalog

Copper charm from Beyond Beautiful

Glue dots

Adhesive

Peeled paint stamp from All night media

Versa Mark ink pad

Micro beads from Pennywise Arts: Copper and Lettuce

General directions:

Using Adirondack felt and stamper to randomly stamp alcohol inks all over metal portion of tin and lid. Dry completely. Wrap a long piece of O'so Sticky Tape all the way around tin and cover with mixture of the copper and lettuce colored beads. Rip up random scraps of cardstock, and stamp a lighter piece of cardstock with peeled paint stamp using Versamark. Dry completely. Rip up pieces of sheet music. Use adhesive to apply the random scraps of paper on the front of the tin. Use adhesive to apply flower pieces randomly. Use glue dots to apply copper charm to the front. Use Crystal Effects to apply crushed bead bits and watch pieces to front.  Here’s a blown up of the close up – Yum-O!

Box Of Love Clip

Next cut a large circle of O’So Sticky Tape to cover the circle of see-through plastic on the lid of the tin. Peel back paper and apply bead mixture to the top of the lid completely.

Box of Love 3

I can’t think of a better way to “go green” than with this lovely green tin and the use of so many recycled materials!  Way to go Jenn!
Box of Love 2

If you like this project you’ll surely want to check back here next week for more!

You can also find Jennifer sharing on her blog too: http://craftychickfrommaine.blogspot.com/

Tuesday, June 29, 2010

Butterfly Art Book

Art Butterfly Book Cover

Perfect for a day when you just want to sit and make something, this butterfly book by Jean Sunderman is full of easy samples of collage art.  The finished book is an inspiration to collagists everywhere!

Materials Jean Used:

Gold Opaque, Orange Translucent, Green Opaque and Clear Micro beads from Pennywise Arts

Winged Things I and II Collage Sheets from Pennywise Arts

O’ So Sticky Tape and Sheets from Pennywise Arts

Butterfly Chipboard Book: Michaels  (For the SVG file of this butterfly just email me suzanne@pennywisearts.com !)

Paper: DCWV Once Upon A Time

Embellishments: Flowers, Scrabble Letters, Crowns, Pearls and Faux String of Pearls, Brads

Gold Leaf Paint Pen

Vintage Photo Distress Ink

Embossing powder


Once you’ve assembled your supplies, put on some good music and get going!  You’ll be surprised how quickly you can complete something if you have everything you need at your fingertips!

Here’s the rest of Jean’s book…

 Page 2

 Page 3

Here’s a great close up of one of Jean’s angels with beaded wings:

Page 3 Close

Jean Butterfly 4 cutPage 5 

If you need more direction, here you go:

Cover front and back of each butterfly with patterned papers. Be sure and punch whole after each side for metal ring.

Edge all pieces with gold paint pen.

Cut out various Winged Things and edge with Distress Inks. Add O’So Sticky Tape to various wings and areas on each collage piece.

Dip brads in embossing powder while still warm, stick in beads to create centers for flowers. Add Scrabble letters to cover and decorate each page as desired.

On last page decorate with letters to spell “art” and add collage sheet quote.


Thanks so much Jean!

Tuesday, March 23, 2010

I Love A Party!

Everyone that knows me, knows how much I love a party.  It doesn’t even have to be a really big whoopdy-doopty shindig.  Just a friend or two, some good conversation, some good eats,…. that’s all it takes for me to be completely and utterly “party-fied”! 

DT - Bday - Michele AZ

Michele Aiello Zendejas designed this fun party hat card that has been embellished to the hilt (in Michele style) with brads, charms, paper clip, clear micro beads and embossed stamped tiles.  The purple and lime green colors make me wanna plan a party!  Oh, ya,… I almost forgot that I am!  I’m in the thick of planning the PWA party of the year, our annual shoebox retreat!  Now that’s a party to look forward to!  Wish you could all be there!  Ü

Hugs, Suzanne