Friday, April 8, 2011

Did Someone Say Chocolate Bunnies?

Julie Imsland is so good about revisiting the Pennywise Arts website and looking for forgotten or undiscovered gems to pull out and now she’s done it again! 
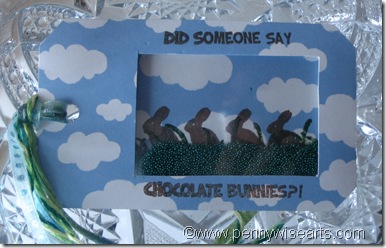
chocolate bunnies

Julie found our free to download shaker tag template to create this really fun bunny tag.  Note to self:  there are lots of free downloadable fun things to discover on the PWA website!

Supplies:

Pennywise Arts Shaker Tag Template

1/8" O'So Sticky Tape

1/8" Foam Tape Strips

Acetate

Cloud Pattern Paper

Bunnies and Caption Stamp by Studio G

Brown and Green Pigment Ink

Grass Stamp

Clear Embossing Powder

Green Embossing Powder

Green Opaque Micro Beads

 chocolate bunnies group

Instructions:

Print out the tag template onto back of patterned paper (or print out template and trace shape onto back of patterned paper).

Cut out tag along solid lines and punch holes as marked on template.

Cut a scrap of patterned paper 2.5" x 2" for the scene.  Stamp bunnies in brown pigment ink & heat emboss with clear embossing powder.  Sponge green pigment ink below stamped bunnies, and stamp grass with same ink along bunny feet.  Heat emboss with green embossing powder.

Ink first line of saying with brown pigment ink, stamp on tag front above opening & heat emboss with clear embossing powder.  Ink second line of saying and continue in same manner below the tag front opening.

Assemble the shaker following the instructions for Super Simple Shaker Cards.  (Using the 1/8" foam tape & green opaque micro beads.)

Saturday, April 2, 2011

Chocolate Sings

Our Cuttlebug Queen is at it again!  PWA designer Julie Imsland uses her Cuttlebug more than anyone I know and it’s often for some big beadie ideas!  This time she has taken the “Beaded Cuttlebug”  Embossing Technique to new sighs.

Money Talks

Here are the basic supplies that Julie used this time:

Money Talks Group(Not shown:  O’So Sticky Powder)

To create your own singing chocolate ATC just tear a piece of background paper vertically to cover half of the ATC.  Follow the directions on the PWA website for doing the Beaded Cuttlebug Embossing Technique using Encore Ultimate Metallic Gold Ink by Tsukineko, Allegro Cuttlebug Embossing Folder by Provo Craft and  Pennywise Arts Clear Ultra Fine Micro Beads.

Stamp Credits:

Candy/Cupcake Stamp by Hero Arts

Caption Stamp by Hampton Art Stamps

Wednesday, March 30, 2011

One More Belgium ATC

I have to apologize to Cathy Hutchins of South Australia for missing her ATC card in my photo shoot!  Ooopsies!

IMG_0971 IMG_0970

Thanks to Ann Lawton of Australia, this truly was an international ATC swap!

Hopefully soon I will have pics of the cards from the Belgium ladies!

Hugs,  Suzanne

A Second Look

Here’s another beautiful beaded window card that Michelle McCarthy created:

DSCF4402  DSCF4405

Love the icy look and the adorable penguin!

Monday, March 28, 2011

Belgium ATC Swap

A small group of Pennywise artists had the opportunity to swap ATCs  with a group of ladies from Belgium.  These are the ATCs that were sent from the US:

Theresa DalzelWells 3 Theresa DalzelWells 4

Theresa Dalzel-Wells

Yvonne Grimes Ann Lawton

Yvonne Grimes                           Ann Lawton

Diane Quinlan Julie Imsland

Diane Quinlan                          Julie Imsland

Kelly Green Laura Davis 

Kelli Green                         Laura Davis

Linda DesGroseilliers 1 Linda DesGroseilliers 2

Linda DesGroseilliers

 Linda DesGroseilliers 3 Linda DesGroseilliers 4

Linda DesGroseilliers

Michelle McCarthy Suzanne Glazier

Michelle McCarthy                        Suzanne Glazier

Theresa DalzelWells 1 Theresa DalzelWells 2

Theresa Dalzel-Wells


Can you guess what our theme was by looking at the ATCs?  No cheating if you knew previously!  Post your answer here!

Saturday, March 26, 2011

Beaded Windows A New View

PWA designer Michelle McCarthy told me that she was using the Beaded Window Technique in a little different way and I love what she has done!

DSCF4404

Here’s the basic idea:

A card is created with a window in the front that shows through to the inside.  That window is given a “frosty” look by beading one side of the acetate film with O’So Sticky Tape and clear micro beads.

DSCF4406

We have a tutorial with step by step pictures on our website!  If you want to give this technique a try click here.

Hugs,  Suzanne

Tuesday, March 22, 2011

Tick Tock Fun Clock

PWA Designer Michelle McCarthy has so many creative ideas pouring out of her head! 

Look how she transformed a simple clock kit into a masterpiece of art for a friend:

DSCF4407

I could definitely get used to seeing time in this whole new way!

Michelle is so good at just jumping right in and creating things that she can visualize in her head beforehand.  And then there are people like me who want to know the “hows”…..

This is what Michelle started with:DSCF4396

The clock kit came from Paper Zone in two pieces, one solid piece (back) and one front piece with the precut squares and rectangles.

Supplies:

Designer papers

Micro beads:  Stream, Brown and Clear.

O’So Sticky Tape

Stamps:  Friendship Recipe Stampendous
Stamp by Inkadinkadoo (no name)

Various rhinestones, flowers, Buttons, Tags, misc.

Michelle said that the hardest part was to fit the top paper.  To do it she turned over the top (front) wood piece and laid it on the back side of the card stock to trace the cut outs which were then trimmed with an Exacto knife.

The paper was then applied to the wood with thinned out glue and the bling and embellishments followed.

The edges were lined with a micro bead mix of Stream and Brown and some of the cut aways were filled in with clear beads.

This angle shows the micro beads off the best:

DSCF4401

And a couple of slightly different views:

 DSCF4399 DSCF4400

Such a neat project Michelle!!