Once in awhile I host little “Migraine Parties” at my home. They were dubbed that about 7 years ago, and the name just stuck. All it means is that yo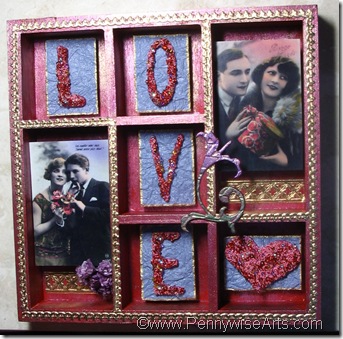 u call in sick to work (possibly with a migraine) and then come over and play for the day. I love having friends over to craft with me because their energy fills my craft room and the laughter and creativity lingers in the space for days after they’ve gone home. It’s fabulous!
Last time I had one of these parties, Julie Imsland was over working on her shadowbox – the one that NO ONE wants to win, even though they don’t have to DO anything other than take a picture and send an email …….for shame…but I digress…..
So, another PWA designer happened to be there that day, I call her Miss Yvonne, but her real name is Yvonne Grimes. Miss Yvonne was so inspired by Julie’s box that she actually drove HOME to look in her own craft stash and then came back with a box to work on!
Here’s what Miss Yvonne had to say:
“I was inspired by Michele A-Z’s shadowbox and Julie’s $1 spot find to look through my $1 store frame stash and came up with this shadowbox that was perfect for collage images.”

Beaded Love Shadow Box By Yvonne Grimes
Materials:
Wood shadowbox frame
Acrylic paint in desired color
Lumiere paint in desired colors
Tim Holtz Grungeboard letters, heart, and flower
PWA Opaque Micro beads in desired colors (I used red and pink from my stash)
PWA Bubble Beads
Assorted seed beads in desired colors
PWA Collage Sheet “Be Mine”
Cardstock (to back collage image)
Handmade or textured paper, contrasting color to paint & beads
Thick foam tape or dots (or layer thin foam tape to desired thickness)
Gold ‘german scrap’ borders
Small dried or other flowers
SureTac Glue
Krylon gold pen
How To:
Paint the entire frame with a base color in acrylic paint. After it dries apply one or two colors of Lumiere paints over the base coat. Apply with an almost dry brush so that you don’t entirely cover the base color. Set aside to dry.
Paint the grungeboard letters, heart, and flower with the same colors.
Apply “bead soup” (Suzanne’s word for it!) to the grungeboard letters and heart after the paint is dry. Apply a thick layer of SureTac glue to each piece of grungeboard. Then drop seed beads, bubble beads, and lastly micro beads onto the glue to entirely cover each piece and then set them aside to dry. (I put mine on a non-stick craft sheet or piece of foil so I can pick the whole thing up and move it.) Once the glue is dry, gently tap off the unstuck beads.

Use your finger or a dauber to apply a very thin layer of Lumiere paint directly to the grungeboard flower. I used contrasting colors so it would stand out against the frame.
Attach german scrap borders using SureTac glue around the outside of the frame and around the two sections where the collage images will be mounted.
Attach small piece of german scrap border using SureTac glue to bottom of each section where the collage images will be mounted.
Choose your collage images and trim to fit in the desired section of your frame. Mount each collage image onto a piece of cardstock cut slightly smaller than the image to add stability, and use foam tape or dots to mount each collage image into its niche.
Cut pieces of homemade or textured paper to go behind each grungeboard letter and the heart. Outline with gold Krylon pen if desired.
Mount the beaded grungeboard onto the background paper, and use foam tape or dots to mount each letter and the heart into its niche.
Use SureTac glue to attach the grungeboard flower and other flower embellishment onto the frame where desired.
Attach ribbon to the frame hangars.

I love to watch how we all inspire one another! I think I’ll be saving this one to award as blog candy for the blog hop that is coming soon!


![clip_image002[4]](https://blogger.googleusercontent.com/img/b/R29vZ2xl/AVvXsEj5hzliSJgmAZwNVufnVtZqkwqGtUesFtwoc7HwKDns3kEOf8BYfPWu3PjZjApx-ko7H8jvYRQGqlfGE-NIwKSMOzVAmuCze0l0irTO_A5MrRI5da9cjUAl7HXNF1nt63z1K3_PQpaqNbU/s1600-h/clip_image002%5B4%5D%5B4%5D.jpg "clip_image002[4]")
![clip_image002[6]](https://blogger.googleusercontent.com/img/b/R29vZ2xl/AVvXsEh0g46p6LRmqUulcm-A37bEtmVQkRayR6-pKQo2k6HgihkFJVYUuVAlMGKaCj77yoffaDcbbtmcQ-qdNcjhgknOshzyR7l0zprKIfAMMIraBXhua7vj_uTtHbj4Tdrg6q88nJKs9V-nmHc/s1600-h/clip_image002%5B6%5D%5B4%5D.jpg "clip_image002[6]")
![clip_image002[8]](https://blogger.googleusercontent.com/img/b/R29vZ2xl/AVvXsEiIaf2q-p4iaUkTJVmBNdjToIJ-_x6qRtHanoIOn1_euqee6MmN2YwW-lv9wiKiwEuDMJE3TZ51meg4g137iiPwZfHkj3DadGZOdgKOjetz_O1vnnvh1bGubOxWLGGoWwO0QiF_jlRmT2M/s1600-h/clip_image002%5B8%5D%5B4%5D.jpg "clip_image002[8]")
![clip_image002[10]](https://blogger.googleusercontent.com/img/b/R29vZ2xl/AVvXsEhsNHbmb01MIPiS0lH9l3gxRG8SXfXcaN7owf0SCBjPxUkcbpND1T2mew3rAqzg6sgtW4ouzMqwC0Shh7jYk_EVolf6642bfR5PHqBjluq4zlZu77aOuvq4G-FBnNj7JU8Bb_LT9QoawE8/s1600-h/clip_image002%5B10%5D%5B4%5D.jpg "clip_image002[10]")
![clip_image002[12]](https://blogger.googleusercontent.com/img/b/R29vZ2xl/AVvXsEhIFBZ-feA8_NXBnmohM-kzQhh5pqCY9jzgxMxTUQb65-IBS7HD_s7PlHQzlVQpvL3itIl8t4XEB6GPGEqYEtM8-9_ORCEo-ZUiUkIQCNdQRFmcKz-oI7DB4A7egIeMB9oLR620A3PZ-sA/s1600-h/clip_image002%5B12%5D%5B4%5D.jpg "clip_image002[12]")
![clip_image002[14]](https://blogger.googleusercontent.com/img/b/R29vZ2xl/AVvXsEgONsKKsEgI01FANL9ZGnQgl6R9hrQ-y0ZxOQvwpFol5oHahNZQLZ5fFUe_c45FrGl-GNdugpRShBcOv4nJpMcFz6wdY16AqxQTH0Ho7tihaGPFJrxLUmbfCWzCkpWVTcsmMHIbZpalkrY/s1600-h/clip_image002%5B14%5D%5B6%5D.jpg "clip_image002[14]")
