Showing posts with label ornament. Show all posts

Friday, December 23, 2011

Canning Lids In Disguise

canninglidtag My friend Kathi Hall showed me that neat ornaments and gift tags can be created using canning lids as a base.  I really like the weight it adds, it sure makes it hang nice.  I can’t show you the ornament that Kathy did at a shoebox party because I’ve already gifted it but here is my latest:

An image from one of our Christmas collage sheets by Michele Aiello Zendejas of Swing Shift Designs is cut out and the white edges inked with Galaxy Gold Brilliance to tone it down.

Canning Lid Ornament

A fancy gold embossed napkin was Modge Podged onto a canning lid and trimmed  to fit.  A mixture of bronze, gold and butterscotch micro beads were glued around the inside edge of the lid with a few ivory seed beads sprinkled for good measure.  The image was added with foam pop dots and PWA Bubble beads were glued to the berries on the stocking. This was layered onto cranberry red cardstock.

I found an old plastic doily in my stash o’stuff, and distressed the edges with tan Staz On ink.  I really like the texture and “frill” it contributes.  I glued ribbon behind it for a hanger and added a piece of coordinating cardstock on the back with “To” and “From” stamped on it.  (Not shown)

canninglidtag

Kathy found darling red gingham lids at Walmart.  They must be really popular this time of year because I couldn’t find them anywhere.

If you need a quick handmade tag our downloadable collage sheets can be sent to your inbox!  If you are in a hurry be sure to shoot me a quick email after you place your online order so I don’t miss it!  Suzanne@PennywiseArts.com I will be checking for digital orders regularly until the afternoon of Christmas Eve.  Orders placed after 3:00 pm Pacific Time on Saturday won’t be sent until Monday.

We have a lot of really fantastic images to choose from and not just for Christmas!  New Years is just around the corner with Valentines not too far behind.  ;0)

I’m wishing you and yours a very Merry Christmas!  

Hugs, Suzanne

New Glass Slide Ornaments

Playing around in my craft room this week I created some new glass slide ornaments from our Christmas collage sheets.  I played with different hangers based on ideas from the domino swap as well as the wire wrapping I did on the “Over the river” atc posted on Tuesday of this week.

Glass Slides

Left: I cut the ornament hangers into two pieces and wedged the ends between the images that are sandwhiched between the slides.  Plastic slides worked best for putting lumping things inside because they will bend just a little.

Center:  The hanger is created from a piece of 1/4” O’So wrapped over the top from front to back.  Each end touches the glass for a stronger bond.  Bead the inside of the loop before removing the liner to bead the outside.

Right:  Still not a perfected technique but I do like the wire wrapping with the beads that move back and forth.  Getting the loop to land in the middle at the top was harder than I thought it would be, but I don’t have a lot of wire work under my belt yet.

It’s definitely not to late to whip up a few of these yourself!  They take only minutes to do.  Purchase digital collage sheets from our website, print and cut out.  Place between two slides (glass or plastic) then wrap with 1/4” O’So around the edges and fold the excess tape to the front and back to make a frame.  Press into micro beads and you’re done.

Hugs and Happy Beading!   Suzanne

Thursday, December 22, 2011

Creative Ways To Hang A Domino

It’s always fun to see the ideas that others come up with for hanging dominos.  Here are some from the PWA domino swap (and a couple creative ones from past years).

A fancy bead glued to the top.bead

A bead made from rolling clay and poking a straw through it to create the hole.

Clay Bead

Pre drilled dominoes from Pennywise Arts.

drilled

An ornament hook glued to the back.

 karenshook

An eye hook screwed into the top.

Kathisdom

Ribbon wrapped tightly around the edges and then cinched up through the center of a flat bead.  The ribbon is then knotted to hold fast.

 Kathysdom Kathysdom2

A bead glued to the top.

Kellisdom

Several pony beads glued to the top (side) edge.

Lorisdom

Ribbon wrapped and tied tightly at the top with a knot.

ribbon

A band of beaded O’So Sticky on the sides (glue was added so the cord wouldn’t slip out.)

Sandysdom

A heart shaped clip bent so the bottom sticks up for a hook to attach to.

Wire Clipiolas

Wire poked through the holes and twisted back on itself.

wire

When adding things to the top to use for hangers, be sure to use a super strong glue like epoxy, E6000 or Jewel Tac.  It needs to be able to hold the heavy weight of a domino and not all glues are strong enough.

Hugs!  Suzanne

Wednesday, December 21, 2011

Pennywise Annual Domino Ornament Swap!

clapping Here’s a big round of applause to everyone who participated in our annual holiday domino ornament swap!  And extra hugs and kisses to our hostess with the mostest, Pam Campbell! 

And without further adieu, the lovely “Winter” themed dominoes of 2011!

Suzanne Glazier Because I didn’t want to cut the arms off of my gingerbread man  I stamped him onto tissue paper and colored it with colored pencils.  Holly and berries were also stamped and colored to fill in white spaces.   Suzannesdom

Suzannesdomside

I used Diamond Glaze to attach the tissue to the drilled domino and give it a glossy finish.  Sure Tac glue was used as “frosting” for the waves and ultra fine white opaque micro beads were sprinkled on.Red Stickles (glitter glue) added sparkle to his cheeks and I dipped the bottom edge into a snow medium that was the consistency of marshmallow cream.  (Fun! Ü)

Copper wire was poked through the tissue and into the pre dilled holes of the domino.  The ends were wrapped several times and the middle was twirled around a pencil to make it curly.

Annette Lanker chose images from our collage sheets.  She beaded the top with clear ultra fine micro beads and the sides with a mixture of red, green and gold opaque micro beads.

AnnettesdomAnnettesdomside

Debbie Shults sends “Cool Winter Wishes” from Barbie!  Her dom is covered with clear micro beads and the sides have white opaque micro beads and glitter added over 1/4” O’So Sticky Tape.

Debbiesdom

Julie Imsland colored her little elfish fellow with Copic markers.  The shovel was “fussy cut” to fit into his hand.  This cute little guy is “clear”ing micro bead snow from his sidewalk.Juliesdom

Karen Slusher used sparkly stickers and Diamond Glaze on her doms.  The sides were edged with 1/4” O’So Sticky Tape and silver opaque micro beads. Karensdom

I can’t tell for sure if Kathi Hall’s domino is embossed or if it might be a napkin applied with Modge Podge.  Either way the effect is pretty and bright!  Kathi edged her design with 1/4” O’So Sticky Tape and masked off a strip in the middle with a rickrack pattern in red and white opaque micro beads.

 KathisdomKathisdomside

Kathy Bledsoe’s little skater is all bundled up complete with a red micro bead stripe on her sweater.  Kathy’s unique hanging attachment gives the illusion that her domino is drilled through from top to bottom, but it’s not!  So clever!  I will show how each dom is hung in my next post, there are so many good ideas! Kathysdom

Kelli Green uses a holiday collage image coated with a thick clear glaze finish.  The edges are bordered with a mixture of coordinating micro beads to create a frame around the top and sides.Kellisdom
Laura Davis’s adorable snowman is a domino all dressed up for winter.  His hat is made of felt, face is made from tiny seed beads and his scarf is a piece of gingham ribbon wrapped around his neck and secured to the front with glue.  He’s hanging out in a micro bead snow bank edged with glitter glue.

Laurasdom

Lori Botkin’s domino has so many creative embellishments!  It jingles from the little bells along the bottom and the miniature Christmas lights are so adorable! Lorisdom 

Melissa Ragsdill’s  little angel is made from two dominoes, one standard and one mini layered on white flower petals.  The head is a painted wooden button and the wings are tipped with SureTac glue and mini micro beads.

Melissasdom

Michelle McCarthy’s design sports a cool  penguin.  The face of the domino is colored with markers then embellished with puffy snow and glittery accents.  For the sides, Michelle wrapped the edges with O’So Sticky Tape then tied silver ribbon around it.  The rest of the exposed O’So was dipped into silver and blue opaque micro beads.

Michellesdom Michellesdom2 

Pam Campbell made two different designs for her doms.  This snowman is sitting in a sparkly bank of micro beads catching snowflakes.  Clear seed beads and a snowflake charm complete the dangles on the bottom.

Pamsdom2

 Pamsdom Pamsdomside

Sandy Belair’s ornaments have many layers that create a fully textured and dimensional effect.  The doms were inked in a lettuce green color then covered with O’So Sticky Tape.  Red crocheted ribbon was laid onto the O’So and clear micro beads filled in around it. Gems, cording, red opaque micro beads and puffy stickers complete the festive design.

Sandysdom

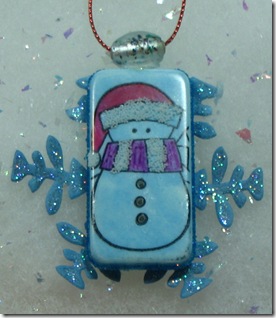
Sherry Schauble created a snowman complete with his own die cut and glittered snowflake.  His Santa hat and scarf are lined with white opaque micro beads and the sides are finished with 1/8” O’So Sticky Tape and blue translucent micro beads. Sherrysdom
Thanks to all of you, for making our last swap of the year an excellent one!

Hugs, Suzanne

Monday, December 19, 2011

Snowy Scene Shaker Ornament

PWA designer Julie Imsland created a totally new and unique idea using two shaker card pouches!

Juliespouchscene Julie shares her “how to”:

Supplies:

2 – Impression Obsession Oval “Shake It” Shaker Card Pouches from Pennywise Arts

Core’dinations Whitewash Collection Cardstock, Butterchurn

Pennywise Arts- White Opaque Micro Beads, 1/8” O’So Sticky Tape

SureTac Glue

White chipboard scraps

Narrow White Cording

White RickRack Trim

Ek Success™ Alpine Trail Edge Punch

Martha Stewart Crafts™ Frosty Village Edge Punch

Directions:

Make a template for the inside of the shaker by laying an oval shaker pouch face down on a chipboard scrap. With a pencil trace around the small oval face and cut this pattern out inside the pencil line. Check to make sure this template will fit the inside edge of the shaker. Trim as needed.

Cut 1 ½”, 2 ¼”, 2 ¾” strips of the Butterchurn paper in 4” lengths. (Note one side of the paper is pale yellow and the other is white.)

For the snowy scene: Punch 2 narrow and 3 wide strips with the Alpine Trail edge punch. Punch 2 medium strips with the Frosty Village edge punch.

Cut 4 spacers from chipboard scraps. These will be trimmed to be hidden between some of the scene strips to create dimension.

Create layered shaker scene using the oval template as a pattern to mark and trim the sides of each strip, and gradually reduce the height of each layer. Note one side of the paper is pale yellow and the other is white; refer to the list below to know which color should be facing outward.

Layer strips as follows using a tape runner or glue stick to attach the layers:

1. Narrow white trees

2. Chipboard spacer

3. Medium white village

4. Wide yellow trees

5. Chipboard spacer

6. Wide white trees—this is the tallest strip, turn it over and these will be yellow trees

7. Chipboard spacer

8. Wide white trees

9. Medium yellow village

10. Chipboard spacer

11. Narrow white trees

Peel the cover from the adhesive around the outside edge of one of the shaker pouches. Dot the bottom edge of the layered stack with SureTac glue to adhere the stacked snowy scene inside the shaker. Spoon about a teaspoon of white micro beads into the shaker.

Peel the cover from the adhesive of the remaining shaker pouch add a bead of SureTac glue all the way around and carefully stick the two adhesive edges together. Pinch them tightly all around the outside edge to insure not beads will “escape”.

Dot a bit of SureTac glue at the two side and along the bottom of the shaker to secure a narrow cord for hanging the ornament.

Use 1/8” O’So Sticky tape to adhere rick rack around the outside edge of each side of the shaker.

Juliespouchscene

So stunning Julie!   Thanks for sharing!

Hugs, Suzanne

Friday, December 9, 2011

Sparkly Lighted Ornaments

Pennywise Arts is sponsoring the month of December on Gingersnap Creations and many PWA artists will be featured there.  Yesterday  on Gingersnap Creations our very own Michele Aiello-Zendejas shared some stunning beaded ornaments with an easy step by step tutorial so you can make them too!

PWAStarryNightTrio1
Supplies:

Instructions for the 3-Sided (Triangle) Ornament:

PWAStarryNightTrio3Slide
1. Cut out the three images that you want to use from the Swing Shift Designs Christmas Slide Soup Collage Sheet, Designed by Michele Aiello-Zendejas exclusively for Pennywise Arts. I used the two of the Three Kings slides and the Star of Bethlehem for this ornament.
2. Adhere the slides to the back of the images. Note: You won't see the slides, they are used for support only. You could use chipboard or very heavy cardstock instead of slides for the 3-sided slide ornament, but not for the 4- or 5-sided slide ornament. The 4- and 5-slide ornaments are lighted, so the support has to be transparent.
3. Peel one side of the backing off of a sheet/piece of O'So Sticky Tape. Lay the three slides face down onto the exposed adhesive. Leave a very small space, 2mm or the thickness of your slides, between the slides so you can fold the sheet with the microscope slides stuck to it into a triangle shape later.
4. The three slides are now held together by the O'So Sticky tape that you added in step 3. Trim the excess tape off around the outer slides. DO NOT cut between the three slides or separate them.
5. Peel off the rest of the backing, then dip the front side of the attached slides into a 50/50 mixture of Pennywise Arts Ultra Fine Micro Beads and Pennywise Arts Mini Micro Beads.
6. Place a piece of single side heavy duty tape on the back along one side of the attached slides and then carefully fold the three slides into a triangle shape. Use a chopstick to reach inside of the triangle and press the tape onto the back of the slides to secure them.
7. Run a piece 1/4” width piece of O'So Sticky Tape around the top and bottom of the ornament. Remove the protective liner and then dip it into the PWA bubble beads and then into a 50/50 mixture of PWA's Ultra Fine Micro Beads and PWA's Mini Micro Beads.
8. Attach 1 piece of 3” long wire to the inside (approximated ¼ to 1/2” in) at the top and bottom of each slide with hot glue.
9. Gather the three wires on the bottom and slide the beads on from large to small. Then bend the excess wire into a curl or scroll. Gather the three wires at the top and slide the beads on from large to small. Twist the wires together and bend into a loop. Add a hook and hang it on your tree!

Instructions for the 4-Sided (Quadrilateral/Square) Lighted Ornament:
PWAStarryNightTrio4Slide

1. Cut out the four images that you want to use from the Swing Shift Designs Christmas Slide Soup Collage Sheet, Designed by Michele Aiello-Zendejas exclusively for Pennywise Arts. I used all three of the Three Kings slide images and the Star of Bethlehem slide image for this ornament.
2. Adhere the microscope slides to the back of the images with O'So Sticky Tape.
3. Adhere O'So Sticky Tape to the front of each image. Remove the protective liner and then dip it into a 50/50 mixture of PWA's Ultra Fine Micro Beads and PWA's Mini Micro Beads.
4. Cut a hole out of the center of a small square Shake It Shaker Card Window large enough for the Battery Operated Tea Light Candle to fit through. This will be the base.
5. Measure around the Battery Operated Tea Light Candle, then add ¼ to 1/2” for overlap. Cut a piece of Transparent Film to the length you just measured by 3” tall. Roll it into a tube and secure with clear tape. It should fit easily around the Battery Operated Tea Light Candle. Attach the clear tube to the bottom Shake It square with clear tape. Insert the Battery Operated Tea Light Candle from the hole in the bottom and secure it with clear removable tape. Do not glue it in. You want to be able to remove it so you can change it out when the battery goes dead.
6. Apply O'So Sticky Tape to the top part of the base piece. Remove the liner. Place a 1/4” strip of O'So Sticky Tape down the center of each slide. Remove the protective liner from the tape and attach the four image slides evenly spaced around the clear tube. The slides should now be connected to the tube and to the base, one on each side of the base.
7. Use another small square Shake It Shaker Card Window for the top of this project. Secure it to the top of the four image slides with thin strips of O'So Sticky Tape.
8. Cover the top Shake It Shaker Card Window with O'So Sticky Tape. Remove the liner to expose the tape.
9. Add some beads, small to large, onto a head pin. Bend and trim the excess wire from the head pin and then attach it to the top of the project. It should be centered on top of the Shake It Shaker Card Window.
10. Attach four acrylic flowers to the base, and four flowers around the beaded head pin on the top of the project.
11. Dip the exposed tape on the top and base into the PWA bubble beads and then into a 50/50 mixture of PWA's Ultra Fine Micro Beads and PWA's Mini Micro Beads.

Instructions for the 5-Sided (Pentagon) Lighted Ornament:

PWAStarryNightTrio5Slide 

1. Cut out the five images that you want to use from the Swing Shift Designs Christmas Slide Soup Collage Sheet, Designed by Michele Aiello-Zendejas exclusively for Pennywise Arts. I used all three of the Three Kings slide images and two of the Star of Bethlehem slide images for this ornament. Set one Star of Bethlehem slide images aside. Punch a few tiny stars out of each of The Kings slides and one of the Star of Bethlehem Slides, then punch out a few 1/16” circles in all five slides. Now punch a small star out of the center of of the Star of Bethlehem slide image that you set aside. Punch out a few 1/16” circles from this slide as well.
2. Adhere the microscope slides to the back of the images using O'So Sticky Tape. Note: The microscope slides are used for support. The 5 sided slide ornament is lighted, so the support has to be transparent.
3. Peel one side of the backing off of a sheet/piece of O'So Sticky Tape. Lay the five microscope slides face down onto the exposed adhesive. Leave a very small space, 2mm or the thickness of your microscope slides, between the microscope slides so you can fold the sheet with the microscope slides stuck to it into a pentagon shape later.
4. The five microscope slides are now held together by the O'So Sticky tape that you added in step 3. Trim the excess tape off around the outer microscope slides. DO NOT cut between the five microscope slides or separate them.
5. Peel off the rest of the backing, then dip the front side of the attached microscope slides into a 50/50 mixture of Pennywise Arts Ultra Fine Micro Beads and Pennywise Arts Mini Micro Beads.
6. Place a piece of single side heavy duty tape on the back along one side of the attached microscope slides and then carefully fold the five microscope slides into a pentagon shape. Use a chopstick to reach inside of the pentagon and press the tape onto the back of the adjoining microscope slide to secure it.
7. Punch or cut a 2” circle (or larger, depending on the thickness of your microscope slides) from the Clear Transparent Film. Use the 5 sided ornament as a template and place a dot where the 5 corners meet, all the way around the circle.
8. Cover both sides of the 2” circle with O'So Sticky Tape. Punch a 1/16” inch hole into the center of the circle. Thread a head pin through the hole you just punched. Place a small piece of tape on the head of the head pin to secure it to the circle. Remove the bottom layer of protective backing from the tape and adhere the circle to the top of the 5 sided ornament, fold the tape down onto the sides of the ornament.
9. Remove the protective liner from the tape. Thread the faceted beads, from large to small, onto the head pin. Bend the head pin into a hook shape. Place 5 acrylic flowers around the newly beaded head pin. Then dip it into the PWA bubble beads and then into a 50/50 mixture of PWA's Ultra Fine Micro Beads and PWA's Mini Micro Beads.
10. Run a piece 1/4” width piece of O'So Sticky Tape around the top and bottom of the ornament. Remove the protective liner and then dip it into the PWA bubble beads and then into a 50/50 mixture of PWA's Ultra Fine Micro Beads and PWA's Mini Micro Beads.
11. Place a Battery-Operated Tea Light Candle inside the bottom of the ornament. The battery should fit snugly. If your battery operated candle falls out, use a few small pieces of clear transparent film as a shim to keep it inside the ornament. Do not glue it in. You want to be able to remove it so you can change it out when the battery goes dead.

PWAStarryNightTrio5SlideLightsOn
Reminder: never leave anything producing heat unattended.
Thanks Michele for sharing your amazing talent and inspiring us with your creative ideas!

Hugs, Suzanne

Wednesday, November 16, 2011

Ornaments From Glass Slides

These glass slide ornaments are a huge hit every year – I know because we sell gobs of the collage sheets for it every holiday season!  Michele Aiello-Zendejas of Swingshift Designs created several of the sheets to be perfectly sized for glass slides and inchies.

These two were made by PWA Designer Yvonne Grimes.

Collage images were placed between two glass microscope slides and 1/4” O’So Sticky Tape was run around the edges to create the frame and hold the micro beads.  Even her hanger was made from O’So and beads!  You can see more variations on our website tutorial page.

We have a really nice selection of Christmas collage sheets on our website that can be purchased in print or digital form.  Any of them could be trimmed to fit a slide to make these ornaments!

Hugs, Suzanne


This week we are spotlighting projects from the Pennywise Arts website that would make great Christmas gifts.  We have a plethora of artwork in our gallery and gobs of tutorials in our past online classes section.

Monday, November 14, 2011

3-D Stars

If you need ideas for Christmas gifts this year, don’t forget that we have a huge collection of artwork in our gallery and gobs of tutorials in our past online classes section.

This week I’ll be highlighting a few of my favorites:

This 3-D star is really fun to make!  The templates and instructions are just a click away!   Included in the complete photo tutorial are three different sized printable star patterns to choose from courtesy of Mr. Brian my template making man.  Ü

Hugs, Suzanne

Thursday, November 10, 2011

Another Installment of Domino Ornaments

Lisa Blakeney
Kathi Hall’s “Peace on Earth” ornament has a really thick and  glossy finish on the top, I love how it looks and feels!

Michele Aiello Zendejas
Snow Davison made this Santa domino for me many years ago.  In fact it was the first domino ornament I had ever seen and I was in love! 

TheresaDalzell-WellsDomino
And last but not least is one made by Terry Townsend.  I think she decoupaged a fancy napkin onto the domino.  Then she covered it with clear micro beads.  Sometimes it’s really hard to get a good picture when clear beads are involved, they just want to shine and reflect.  It’s their nature and they can’t help it.  Ü  I’m sorry I couldn’t get a better photo for you of Terry’s ornament.  You just have to come over and see it in person.
Here are some more of the lovely dominos in my collection!

Lisa Blakeney made the snowflake at left.  Clear micro beads garnish the sides for an icy wintery look.

Kathi Hall
Michele Aiello-Zendejas decked her poinsettias out with gold micro beads and a fun tassel.

Snow Davidson
Our Beadie Buddy Theresa Dalzell-Wells used one of the Swing Shift Designs collage sheets from the Pennywise site on her domino at left.   Clear Ultra Fine micro beads cover the top and a mixture of blue and silver adorns the sides.

Terry Townsend


I get so caught up in sharing and giving that I didn’t seem to save any of the ones that I made!   If you have one and come across it when you unpack your decorations this year, won’t you please send me a picture?  I’d really appreciate it!

Hugs, Suzanne

P.S.  Don’t forget that Pennywise has pre-drilled dominoes on the “beadables” page of our website to make it quicker and easier than ever to whip up some ornaments of your own!