Showing posts with label rubber stamping. Show all posts

Tuesday, July 27, 2010

Time Worn

This is a really fun ensemble by Jennifer Toussaint.  For supplies she made a trip to the dollar store.  I love the dollar store!  I’m always finding interesting things to add to my craft stash from there.  Give me ten bucks and an hour or two at Dollar Tree and I’m in heaven!

Time Worn PadJennifer set out to make the note pad and as an afterthought the magnet came to be.  I think they are both fabulous and I especially love the cracked glass look of the magnet!

time worn magnetHere’s how she did them:

The Magnet:

Square rubber stamp of moon and sun by Inkadinkadoo

Vanilla cardstock

Chipboard piece of same size

Ultra Thick Embossing Enamel

Versa Mark Pad

Copper, black and gold micro beads from Pennywise Arts

Watch pieces

Magnet piece

Craft glue

Black pigment ink

Various markers

Directions:

Stamp sun and moon stamp with black ink and let dry on cardstock. Color in with choice of markers and then cut piece out to edge of image. Press into Versa pad and then cover with UTEE and heat to melt with heat gun. Quickly do this 3 times. On the third time sprinkle the piece with micro beads and time pieces. Let dry and then crack the piece by bending. Attach this image to piece of same size chipboard. Using brown marker color edges and back to match the design (or color of your choice). Attach magnet to back with craft glue. Let dry.

The Note pad:

Small notepad from Dollar Tree

Cardstock in vanilla to fit double the size of whatever notepad size you choose (they have several sizes)

Beaded ribbon from Dollar Tree

Same sun/moon stamp

Black pigment ink

UTEE (ultra thick embossing enamel)

Various stickers and word cut out pieces

“In The Sky” rubber stamp set from Stampin’ up

Markers to coordinate your magnet piece colors

Distressing kit from Making Memories

Time worn looking stickers

Directions:

Fold cardstock in half over the pad of paper and trim to fit. Stamp the sun/moon stamp in the middle of the front of the piece of cardstock with black ink and then cover with UTEE and heat gun emboss the image. Color in as desired with markers. Stamp star stamp from the “In The Sky” set around image and on the back. Emboss with UTEE. Distress the front and back by crumpling the piece of paper several times then rub the small green and brown distress inks over the piece thoroughly to make the crinkles stand out as though it were time worn. Adhere the front and back of the piece of cardstock to the notepads front and back with adhesive. Cover the flip side of the beaded ribbon with adhesive and then adhere to the front of the notepad wrapping around to the underside of the front cover. Embellish the front of the notepad cover with stickers of your choice.

What fun things have you made from items purchased at a dollar store?  We’d love for you to share them with us!  Just email me a good quality photo and I’ll post it for you!  suzanne@pennywisearts.com


P.S.

Designer Michele Aiello Zendejas found these cute heart boxes at The Dollar Tree!

http://pennywisearts.blogspot.com/2010/03/beautifully-boxed-and-beaded.html

Tuesday, July 20, 2010

Hey Friend! Candy Jar

You can always tell a true friend by how often they bring/send you chocolate!  And, if said chocolate is your most favorite kind, then you know you are loved!  Ü

Hey Friend

I do love how Jennifer Toussaint’s candy jar decor matches the deep purple of dark chocolate Hershey’s Kisses!  (And did I mention that dark chocolate is my favorite?!!)  Thanks Jenn, I feel loved!!

Does Jennifer’s sweet treat inspire you to do something fun and spontaneously chocolate for a close friend of your own?  Well hurry and gather up the goods!  This won’t take long at all!

Materials:

Clear and purple opaque micro beads from Pennywise Arts

O’So Sticky Tape™ Sheet Pennywise Arts

1/8” O’So Sticky Tape™  Pennywise Arts

Eggplant cardstock (Stampin’ up)

Mouse Stamp - Cute Critters (Stampin’ up)

Me and My Big Ideas scrapbooking paper

Markers from Stampin’ up in Lovely Lilac,  Going Grey, Sage Shadow, Blush Blossom

Round 1-¼ in. circle punch

White cardstock

Flower eyelet

Flower chipboard from Colorbox

White paper flower

Jar from Dollar Tree store

Crinkle scissors

Lavender ribbon

Purple metallic embossing powder

Versa Mark pad

Adhesive tape

Hey Friend stamp or other sentiment stamp of your choice

Directions:

Using Lovely Lilac marker color the “Hey Friend” rubber stamp and stamp two images onto white cardstock. Cut out just around the edges of the sentiment. Use these pieces as templates to cut out pieces of O’So Sticky Tape™ from a sheet. Cut out the O’So Sticky Tape™ and apply over the image. Apply clear micro beads to both sentiments. Use eggplant paper to back each sentiment piece by ½ inch. Use crinkle scissors all around each edge. Use adhesive tape to assemble as shown. The jar I used was square and so I took advantage of the embossed squares on each side and used these squares as templates for my scrapping paper. I applied a piece to each of the four sides. Stamp mouse image on two pieces of white cardstock. Color in using markers or colored pencils. Cut out and border with purple cardstock. Assemble pieces with adhesive. Apply sentiment pieces and mouse pieces on opposite sides of the square jar.

Here’s what the jar looks like from the top:

Hey Friend Jar Lid

Wrap a piece of O’So Sticky Tape™ around the outside edge of the lid and peel back. Apply ribbon firmly to the sticky tape. Then use another piece of sticky tape and wrap around the middle of the ribbon and peel back. Apply purple opaque micro beads to create the beaded line around the lid. Use a Versa Mark pad and place the chipboard flower piece face down in it. Dip in metallic purple embossing powder and emboss. Cool. Use middle circle of flower and cut a circle out of scrapping paper using circle punch. Adhere to circle chipboard piece. Use eyelet tool to add eyelet flower to middle of the circle. Assemble the jar top pieces as shown. Fill jar with your (or your friend’s) favorite candy!

Tuesday, July 6, 2010

Love Inside

It is such a treat to share amazing artwork with you from our design team each week!  They are an inspirational group of gals that inspire me over and over again.  I always look forward to what surprises will arrive in the mail.  Ü

This decorated tin by Jennifer Toussaint really got me drooling (and I’m sure it has nothing to do with the dark chocolate she sent with it… Naw, nothing.) Box Of Love Clip

In addition to being a very busy wife and mother, Jennifer is a faithful member of our Yahoo Community.  She assists as an administrator, participates in many of our swaps and designs incredible art like this to share!  

The luscious Hershey’s Kisses I mean, luscious alcohol ink colors that Jenn selected for this project really got things off to a great start!

Box of Love

Materials list:

(Recycled) Calypso poinsettia paper flower tin

Adirondack alcohol inks in Citrus and Stream

Cardstock bits from Stampin’ up

Music sheet paper

Assorted crushed bead bits

Watch pieces

Crystal Effects

O’So Sticky Tape from Pennywise Arts

Paper flowers from LTD catalog

Copper charm from Beyond Beautiful

Glue dots

Adhesive

Peeled paint stamp from All night media

Versa Mark ink pad

Micro beads from Pennywise Arts: Copper and Lettuce

General directions:

Using Adirondack felt and stamper to randomly stamp alcohol inks all over metal portion of tin and lid. Dry completely. Wrap a long piece of O'so Sticky Tape all the way around tin and cover with mixture of the copper and lettuce colored beads. Rip up random scraps of cardstock, and stamp a lighter piece of cardstock with peeled paint stamp using Versamark. Dry completely. Rip up pieces of sheet music. Use adhesive to apply the random scraps of paper on the front of the tin. Use adhesive to apply flower pieces randomly. Use glue dots to apply copper charm to the front. Use Crystal Effects to apply crushed bead bits and watch pieces to front.  Here’s a blown up of the close up – Yum-O!

Box Of Love Clip

Next cut a large circle of O’So Sticky Tape to cover the circle of see-through plastic on the lid of the tin. Peel back paper and apply bead mixture to the top of the lid completely.

Box of Love 3

I can’t think of a better way to “go green” than with this lovely green tin and the use of so many recycled materials!  Way to go Jenn!

Box of Love 2

If you like this project you’ll surely want to check back here next week for more!

You can also find Jennifer sharing on her blog too: http://craftychickfrommaine.blogspot.com/

Tuesday, June 22, 2010

“Just A Note” From Jean

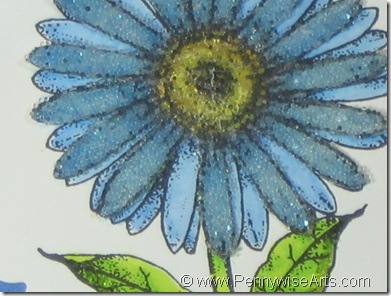
Jean Just Flower Closeup bLet Jean inspire you with another one of her fresh and fun floral designs!

In this tutorial Jean beads just some of the flower petals to create the multi dimensional Gerbera Daisy shown above.  Below are her easy to follow step by step instructions.

  Jean Just A Note

Materials:

Clear and Lettuce Green micro beads

O’So Sticky Tape Sheet

Stamps: Li’l Davis Designs, The Angel Company

Scallop Circle Nestabilities

Tuxedo Black Ink

Cardstock: Stampin’ Up!

Patterned Papers: K & Company

Pink Sheer Ribbon

Metal Tag

Glue Pen

Copic Markers: B21 Baby Blue, B24 Sky, YG23 New Leaf, YG25 Celadon Green

Directions:

Finished Card size is 5 ½ x 5 ½. Cut patterned paper slightly smaller. Attach to card front.

Cut a scallop circle in white and a size bigger in blue. Stamp the white piece with a Gerbera Daisy. Color with Copics. Stamp the daisy again on a white scrap piece. Color only the flower and cover with O’So Sticky Tape sheet. Cut out flower from sticky sheet removing some of the petals. (This allows the other flower to show through)

Cover Completely with clear beads. Bend petals slightly and attach over full daisy.

Use a glue pen on bottom part of leaves and cover with lettuce colored beads. Let dry. Attach flower circle to blue circle and to front of card.

Add a pink ribbon and stamped metal tag.

Love Jean’s style?  Follow her on Blogspot!
www.artsyj.blogspot.com

Thursday, June 17, 2010

Silent Beauty

It still feels like “April Showers” here in the Snoqualmie Valley and that means I am still waiting for my potted flowers to really make their magic.  Thankfully I had this card from PWA designer Jean Sunderman to brighten a rainy day!

Jean’s creative floral centers made from mico beads and masks really make magic happen on this card:

Jean Silent Beauty

Silent Beauty by Jean Sunderman

Materials:

Micro beads: Copper Opaque, Silver, Dark Rose Opaque, Light Green Opaque, Gold

Cardstock: Orange, Green and White- Stampin’ Up!

Stamp: Li’l Davis Designs

Brilliance Inks: Lime and Yellow

Colorbox Chalk Ink: Pansy, Green and Tangerine

Bottle Caps

O’So Sticky Tape Sheets

1” Circle Punch

Plastic stencil of flower


Once you have it all together, here’s the how to:

Directions:

Create a card to fit a regular business size envelope. Card should measure 9 x 4 or so.

Cut patterned paper ¼ inch smaller. Mount to green cardstock and trim. Attach to front of card.

Jean has a clever way to create a perfect shadow image from just one unmounted stamp!  Here’s what she does: 

Attach the clear stamp to block the stamp face down on the block (flipped over from “normal”.   Now use the back of the stamp to create a “shadow” on white cardstock. Clean off and attach stamp the correct way with the stamp face up. Stamp in a darker or coordinating color to create the outlines of the design.

Stamp three flowers and cut out as shown.

Flatten 3 bottle caps. Remove any rubber on the inside. Punch out three 1 inch circles of the O’So Sticky Tape Sheet. Stick to the inside of each bottle cap. Peel off backing and lay flower stencil on the sticky sheet. Cover with beads. Remove stencil and cover the rest with another color.

Attach all bottle caps to flower centers. Add flowers to front of card with one flower raised with 3D foam tape. 

Here’s a close up of one flower that shows the neat contrast inside the bottle cap:

Jean Bottlecap Flower Close Up 

To finish the card stamp a quote on white cardstock. Mount to orange cardstock and trim. Add to card front. Stamp a small flower, add beads to center and attach with 3D foam tape.

Be sure to visit Jean’s blog where you can see even more of her artwork:  www.artsyj.blogspot.com

Tuesday, June 8, 2010

Where Flowers Bloom

Pennywise Arts is so blessed to have many very talented designers creating just to inspire you!  This month we’ll be featuring the artwork of Yvonne Grimes and Jean Sunderman. 

 Yvonne head shot2

Yvonne

jean sunderman

Jean


Yvonne will start us off with a fun technique she calls “Beaded Paper Lace”.  She wrote excellent instructions to go along – so grab your supplies and give it a try!

IMG_0001

Beaded “Paper Lace” Card By Yvonne Grimes

Supplies:

· “Paper Lace” - Scrapbook paper that has a die-cut design with open spaces

· Contrasting paper for background

· Coordinating papers for stamped sentiment, matting, and A2 card blank

· Rubber Stamp with quote, sentiment, or other focal point

· O’So Sticky Tape Sheets

· Clear Mini Micro Beads

· Foam tape or squares

· Embellishments such as rhinestones, pearls, paper flowers, etc…

1. Cut the background piece of paper to 3-3/4”x5”. For best results choose a paper that contrasts with your “lace” paper as it will be covered with beads.

2. Cut a piece of O’So Sticky tape to 3-3/4”x5” and cover the background paper with it, but leave the red liner on for now.

3. Cut a piece of lace paper so it is just a little smaller than the background, and figure out your placement before removing the red liner and attaching the lace paper to the background. Use the red liner over the whole piece to press the lace paper down well.

4. Remove red liner and dip the whole piece in clear Mini Micro Beads. Press the beads in well with either a brayer or your fingers.

5. Attach the beaded piece to a coordinating paper layer cut to 4”x5-1/4”, and then attach to the cardstock blank.

6. Create the stamped image, layer with coordinating papers and attach to the beaded background with foam tape.

7. Embellish as desired.


Here’s another variation Yvonne did using the same technique:

beaded paper lace card 2


Won’t you share YOUR Beaded Paper Lace creation with us???

Friday, May 21, 2010

Bed Of Beads Stamping

by Michele Aiello-Zendejas

Please note:  These instructions are copyrighted.  Feel free to share this link with your friends and stamp groups.  If you choose to reproduce "Bed of Beads Stamping", please credit Michele Aiello-Zendejas of Pennywise Arts for creating the technique.  Thank you! :-)

Supply List:
Cardstock (colors of your choice)
Bold Rubber stamp, without a lot of detail
StazOn Ink (color of your choice, dark shades work best)
Coordinating color permanent marker
Pennywise Arts Micro Beads (solid color of your choice, opaque or translucent, light colors work best)
Pennywise Arts O'So Sticky Tape Sheets
Flat back gems and/or other embellishments such as punched shapes, buttons, etc.
Tidy Tray or something to catch the micro beads when you pour them onto the O'So Sticky Tape
Brayer
Paper Trimmer

Directions:


Step 1:

Gather your supplies.  Choose the rubber stamp you want to use and cut a piece of O'So Sticky Tape to size. Choose coordinating cardstock and cut to the size you need to layer and decorate a card.


Step 2:

Peel off one side of the tape and adhere it to a piece of cardstock cut to the same size.  Pull off the liner and cover it with micro beads.  Brayer the beads in so they are embedded into the tape.


Step 3:

Stamp directly on top of the bed of micro beads with StazOn ink. 


Step 4:

Use a permanent marker to color the edges of the "Bed of Beads".  You can also run the edges against your ink pad.  Use the marker to fill in any areas of the stamped image that did not print well.  Use a pouncing motion when you apply color.  If you try to color the micro beads like you are coloring paper, you will end up accidentally removing some of the micro beads.


Step 5:

Apply flat back gems and/or any embellishment you would like.

Your completed images will look similar to these:

1.  White cardstock, light green opaque PWA micro beads, and black StazOn. 
2.  White cardstock, white opaque micro beads, and black StazOn.
3.  White cardstock, light lavender translucent micro beads, and black StazOn.
2.  White cardstock, white opaque micro beads, and red StazOn.


Step 6:

Cut a piece of cardstock about 1/4" larger than your bed of beads.  Edge with a permanent marker or ink pad.  Layer as desired.


Step 7:

Layer image as desired to create a card.


Michele Aiello-Zendejas


Michele Aiello-Zendejas


Michele Aiello-Zendejas


Michele Aiello-Zendejas


Diane Young


Beth Ullman


Jennifer Toussaint


Jennifer Toussaint


April Day


Jami Zdankus


Evelyn Spikes


Dot Alcorn


Georgia Wood


Theresa Dalzell-Wells


Theresa Dalzell-Wells


Diane Young


Evelyn Spikes


Diane Young


Theresa Dalzell-Wells


Suzanne Glazier


Yvonne Grimes