Tuesday, August 3, 2010

Bubble Beaded!

Marianne Notebook

Marianne Colschen has been a busy, busy beader finding all kinds of fun and unique ways to incorporate our newest Iridescent Bubble Beads into her art! 

This darling notebook is small enough to tuck into a purse and stylish enough to make you want to actually write important things down in it!  Ü

BONUS!  This week one lucky customer will find this bead-i-ful beauty tucked into their order envelope!  All orders placed between Tuesday August 3rd and Saturday August 7th will be assigned a number in numerical order of receipt.  A predetermined “secret number” has already been assigned as the winner and if you happen to be “that” order number then you win!  We hope the winner will post a comment back to this page too – cause it’s always fun to hear from excited customers!

We look forward to sharing more of Marianne’s art with you all month long so keep coming back!

Hugs,

Suzanne

Oh –and go place your orders!  www.PennywiseArts.com !!

Monday, August 2, 2010

Art Is A Process

The Pennywise Yahoo community has a lot of really great swaps throughout the year.  The fat book page swaps are one of my favorite.  The current fat book theme is “See The World” using a luggage tag template that was provided.

Alert!  If you are in this swap and want to be surprised you should stop reading now.  This blog post could be interpreted as a swap spoiler and I wouldn’t want to influence you in any way.

It was easy to decide that I wanted to do something with the ocean because of all the stuff I have that I could use (and use up!) in doing it.  Plus, I just love the ocean!

As I was working on my tags I became very aware of my own personal art process:

1. I am a social artist.  I gain enthusiasm and inspiration when sharing a play day with other artists.  The afterglow of spending time with friends making art lasts for days and I love this intensely creative time.

2.  I don’t usually have a plan for how the end will look, I just ride the wave of “now” and see where it takes me. 

3. I make a big mess when doing art!

For the first part of my tag process I covered chipboard with paper from Design Originals.  Then I clear embossed part of the image with a shell stamp to give the illusion of water.  Stamp credit: Stampington and Company

My Process Emboss Friends can be the best resource of all for ideas and inspiration.  My friend Julie came to play and shared some recycled heavy acetate with a wave shape cut from one side.  The wheels started turning and I knew I wanted to incorporate that wave into my design.

I thought about the wave on the sand square of my dollar store art (see previous post) and decided to use that technique on my tags.  I cut the acetate to match the length of the tags and then squeezed out a line of Sure Tac Glue.  I then placed shells along that line and added clear micro beads for grout on the spaces in between.  The glue will dry clear.

My Process GlueAnd that is as far as I have gotten so far.  I think I’ll continue to share my process as I experience it with these tags.  One thing is for sure, I definitely have a messy process!  Here is a picture of my table:

My Process Mess

Hugs, Suzanne

P.S.  If you are interested in joining the 10 for 10 luggage tag swap and receiving one of my tags in trade, please contact me!  The due date is August 31st – still a whole month away!

Sunday, August 1, 2010

More Dollar Store Art

The gals in our Yahoo community are really taking up the challenge and creating great art from things that cost only one dollar!  You go girls!  I love all of the ideas and inspirations!

Laura Davis was first to share and her altered dollar store book is gorgeous!

Laura'sVictorianSpread

Michele Aiello Zendejas needed a thank you gift so she created these stunning notepads! 

Be sure to visit Michele’s blog to see lots more of her artwork!
http://www.atozdesigns.com/maz/

Evelyn Spikes made a special trip to the dollar store in search of things to play in our challenge and here is what she found:

Dollar Tree Finds

I was most intrigued by the candle holder in the back and I love what Evelyn did with it!


tealight evelyn 1000x740 

Look close up!  The bubble beads really add a layer of dimension!  And I imagine when the candle is lit that there could be some fun light play on them as well.

evelyncloseupcrop

The little white pails have been transformed! Dollar Tree mini pails crop
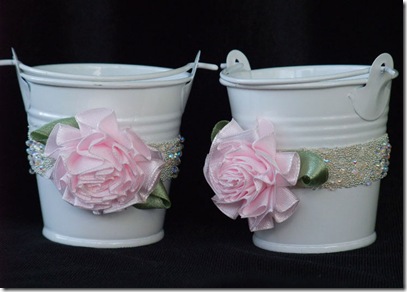
A close up view shows how Evelyn added the bubble beads to this project too:

mini pails closeup crop

Evelyn has a very active blog with lots of her other art postings!  http://www.beyondjustblackandwhite.blogspot.com

I dug up several things that were done in the past to share as well.


Annette Lanker got me totally addicted to these fun frames from the dollar store!Dollar Store Frame

Annette filled in the circles with a clear drying glue and added different colored (opaque) micro beads to each section.  Inside she put a sheet of O’So Sticky Tape and added a neat mosaic element to the tape before applying more coordinating micro beads:

Annette Lanker

Once upon a time a group of beadie buds took a day trip to Alaska for a shoebox party and oh what fun we had!  I wanted a special frame to commemorate that trip of a lifetime so I used Annette’s technique:
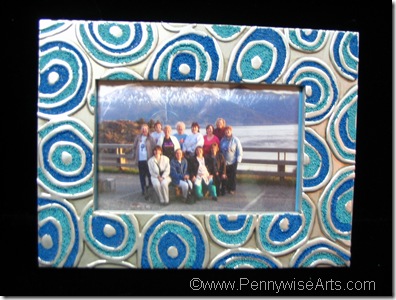
Suzanne Glazier

And here is another frame that I embellished for a swap I participated in:

 3 Frame   My 3 Frame

All three frames were painted over with white acrylic paint that was then colored with alcohol inks.

I love to show close up pictures so you can really see the detail better.  The suns were made using alcohol ink on flat glass pebbles glued to wire that had been curled.  There is a layer of clear embossed sun stamping on the frame that is really only visible in the upper left corner of this photo:
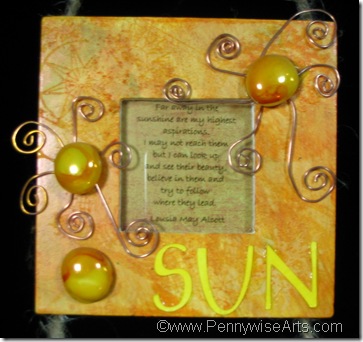
Sun

The surf frame was embossed with O’so Sticky Powder, micro beads and fru fru flakes.  It’s my favorite of the three!

Surf

The big embossed seashells don’t show well in this photo of the sand frame but there are there.  Over that I made a thick squiggle of Sure Tac Glue (it dries clear and I love it!)  I place the shells where I wanted them and then grouted the rest of the exposed glue with micro beads.  When it was dry I went over it with a bottle of alcohol ink, squeezing the color right from the bottle over the shells and beads.  I love how many of the shells natural colors and textures still showed so well after inking them brown!

Sand   

If you’re read this far you must be a dollar store addict and art junkie too!  Send me photos of your creations and I’ll share them here!   Email: suzanne@pennywisearts.com

Tuesday, July 27, 2010

Time Worn

This is a really fun ensemble by Jennifer Toussaint.  For supplies she made a trip to the dollar store.  I love the dollar store!  I’m always finding interesting things to add to my craft stash from there.  Give me ten bucks and an hour or two at Dollar Tree and I’m in heaven!

Time Worn PadJennifer set out to make the note pad and as an afterthought the magnet came to be.  I think they are both fabulous and I especially love the cracked glass look of the magnet!

time worn magnetHere’s how she did them:

The Magnet:

Square rubber stamp of moon and sun by Inkadinkadoo

Vanilla cardstock

Chipboard piece of same size

Ultra Thick Embossing Enamel

Versa Mark Pad

Copper, black and gold micro beads from Pennywise Arts

Watch pieces

Magnet piece

Craft glue

Black pigment ink

Various markers

Directions:

Stamp sun and moon stamp with black ink and let dry on cardstock. Color in with choice of markers and then cut piece out to edge of image. Press into Versa pad and then cover with UTEE and heat to melt with heat gun. Quickly do this 3 times. On the third time sprinkle the piece with micro beads and time pieces. Let dry and then crack the piece by bending. Attach this image to piece of same size chipboard. Using brown marker color edges and back to match the design (or color of your choice). Attach magnet to back with craft glue. Let dry.

The Note pad:

Small notepad from Dollar Tree

Cardstock in vanilla to fit double the size of whatever notepad size you choose (they have several sizes)

Beaded ribbon from Dollar Tree

Same sun/moon stamp

Black pigment ink

UTEE (ultra thick embossing enamel)

Various stickers and word cut out pieces

“In The Sky” rubber stamp set from Stampin’ up

Markers to coordinate your magnet piece colors

Distressing kit from Making Memories

Time worn looking stickers

Directions:

Fold cardstock in half over the pad of paper and trim to fit. Stamp the sun/moon stamp in the middle of the front of the piece of cardstock with black ink and then cover with UTEE and heat gun emboss the image. Color in as desired with markers. Stamp star stamp from the “In The Sky” set around image and on the back. Emboss with UTEE. Distress the front and back by crumpling the piece of paper several times then rub the small green and brown distress inks over the piece thoroughly to make the crinkles stand out as though it were time worn. Adhere the front and back of the piece of cardstock to the notepads front and back with adhesive. Cover the flip side of the beaded ribbon with adhesive and then adhere to the front of the notepad wrapping around to the underside of the front cover. Embellish the front of the notepad cover with stickers of your choice.

What fun things have you made from items purchased at a dollar store?  We’d love for you to share them with us!  Just email me a good quality photo and I’ll post it for you!  suzanne@pennywisearts.com


P.S.

Designer Michele Aiello Zendejas found these cute heart boxes at The Dollar Tree!

http://pennywisearts.blogspot.com/2010/03/beautifully-boxed-and-beaded.html

Tuesday, July 20, 2010

Hey Friend! Candy Jar

You can always tell a true friend by how often they bring/send you chocolate!  And, if said chocolate is your most favorite kind, then you know you are loved!  Ü

Hey Friend

I do love how Jennifer Toussaint’s candy jar decor matches the deep purple of dark chocolate Hershey’s Kisses!  (And did I mention that dark chocolate is my favorite?!!)  Thanks Jenn, I feel loved!!

Does Jennifer’s sweet treat inspire you to do something fun and spontaneously chocolate for a close friend of your own?  Well hurry and gather up the goods!  This won’t take long at all!

Materials:

Clear and purple opaque micro beads from Pennywise Arts

O’So Sticky Tape™ Sheet Pennywise Arts

1/8” O’So Sticky Tape™  Pennywise Arts

Eggplant cardstock (Stampin’ up)

Mouse Stamp - Cute Critters (Stampin’ up)

Me and My Big Ideas scrapbooking paper

Markers from Stampin’ up in Lovely Lilac,  Going Grey, Sage Shadow, Blush Blossom

Round 1-¼ in. circle punch

White cardstock

Flower eyelet

Flower chipboard from Colorbox

White paper flower

Jar from Dollar Tree store

Crinkle scissors

Lavender ribbon

Purple metallic embossing powder

Versa Mark pad

Adhesive tape

Hey Friend stamp or other sentiment stamp of your choice

Directions:

Using Lovely Lilac marker color the “Hey Friend” rubber stamp and stamp two images onto white cardstock. Cut out just around the edges of the sentiment. Use these pieces as templates to cut out pieces of O’So Sticky Tape™ from a sheet. Cut out the O’So Sticky Tape™ and apply over the image. Apply clear micro beads to both sentiments. Use eggplant paper to back each sentiment piece by ½ inch. Use crinkle scissors all around each edge. Use adhesive tape to assemble as shown. The jar I used was square and so I took advantage of the embossed squares on each side and used these squares as templates for my scrapping paper. I applied a piece to each of the four sides. Stamp mouse image on two pieces of white cardstock. Color in using markers or colored pencils. Cut out and border with purple cardstock. Assemble pieces with adhesive. Apply sentiment pieces and mouse pieces on opposite sides of the square jar.

Here’s what the jar looks like from the top:

Hey Friend Jar Lid

Wrap a piece of O’So Sticky Tape™ around the outside edge of the lid and peel back. Apply ribbon firmly to the sticky tape. Then use another piece of sticky tape and wrap around the middle of the ribbon and peel back. Apply purple opaque micro beads to create the beaded line around the lid. Use a Versa Mark pad and place the chipboard flower piece face down in it. Dip in metallic purple embossing powder and emboss. Cool. Use middle circle of flower and cut a circle out of scrapping paper using circle punch. Adhere to circle chipboard piece. Use eyelet tool to add eyelet flower to middle of the circle. Assemble the jar top pieces as shown. Fill jar with your (or your friend’s) favorite candy!

Tuesday, July 13, 2010

Happiness is…

Happiness is Jennifer Toussaint’s pretty picket fence wall hanging!  So bright and cheery, it definitely makes me feel happy when I see it.  Happiness

Jennifer found most of her materials in her craft stash – I bet you probably have most of them already (or something similar)  too!

Materials:

Micro beads from Pennywise Arts in stream, lettuce, gold and iridescent colors.

Wooden picket fence with 2 flowers pre-attached

2 chipboard butterflies

2 large pop dots

12 inches gingham ribbon in blue and white

Happiness or other sentiment stamp

Cardstock scraps in white, pink and green

Opaque glitter

Acrylic paints in lavender, light blue, pink, yellow, white and light green

Crackle effect liquid

2 small gemstones for butterflies and one large gemstone for flower center

Stickles purple glitter glue

Directions:

Paint picket fence with white paint. Let dry and then cover in crackle finish. Paint flowers with pink and blue and then the stems and leaves with green. Cover flowers in coordinating micro beads in stream, lettuce, bubble and gold. Place yellow gem stone in middle of blue flower with crystal effects. Stamp phrase onto white cardstock. Trim around word or phrase. Back this white piece with pink cardstock and then green and white scrapping paper. Adhere to fence with adhesive tape. Cover butterfly chipboard pieces in lavender acrylic paint. Let dry and then cover in opaque glitter. Draw a line with Stickles purple glitter glue down the middle for the body. Then adhere small gemstones for the head of the butterfly. Attach with pop dots. Thread ribbon through holes for hanging.

Friday, July 9, 2010

Relaxing Bubbles

When was the last time you took a bubble bath?  Gosh, it’s only a faded memory for me!  Stephanie Loomis’s bubble bath card is overflowing with our Iridescent Bubble Beads and isn’t it just the cutest??

Stephanie Relax

In our fast paced lives, I think it’s as important as ever for us to remember to relax and pamper ourselves.  I wonder how many bubble baths Steph will inspire this week??


Stamp Credit: The Angel Company